This technical guide explains how to set up single sign-on (SSO) and directory integrations between your organisation’s directory and Matrix Booking.
Contents
Set up our SSO integration
The steps below are to set up our SSO integration for your organisation if you’re live with Matrix Booking. In Microsoft Azure, your IT team need to:
Choose the right SAML NameID
Matrix Booking makes sure that a user’s account and their booking history is maintained. For example, if a user’s email address has been changed, our system uses the SAML NameID to identify the user’s account.
However, this only works if the SAML NameID remains the same. If you’re using Microsoft AD FS or Entra ID, we recommend that the SAML NameID contains either:
-
user principal name (UPN) (default)
-
object ID
Matrix Booking uses POST SAML bindings. The assertions contained in the SAML response must be signed and include:
-
NameID – a unique identifier for the user and one that ideally won’t change.
-
email
-
firstName
-
lastName
Notes:
-
If your organisation changes usernames when they have had a change of name, it’s recommended that you use the object ID. This is because if you change the name in Microsoft Azure, Matrix Booking will assign the same person a new user account because our system won’t recognise the name change.
If you use the object ID, it remains the same regardless of a name change. Therefore, Matrix Booking can maintain the user’s account and their booking history. -
We expect the object ID to be passed as a base-64 encoded value.
Set up the integration in Microsoft Azure
To set up your SSO integration:
-
Log in to Microsoft's Azure Portal as an Administrator.
-
If it appears in the Azure services section of the Home screen, select Enterprise applications and skip to step 6.
-
If Enterprise applications doesn’t appear on the Home screen, select All services in the side menu.
-
In the Filter search search bar, enter “Enterprise”.
-
Select Enterprise applications. The Enterprise applications | All applications screen will appear.
-
Select + New application. The Browse Microsoft Entra Gallery screen will appear.
-
Select Create your own application. The Create your own application dialog will appear.
-
In the Input name text box under the What's the name of your app? section, enter “Matrix Booking”.
-
Select Integrate any other application you don't find in the gallery (Non-gallery).
-
Select Create. Your application will be created.
-
Select Assign users and groups under the Getting started section. The Users and groups screen will appear.
-
Select + user/group. The Add Assignment screen will appear.
-
Select None Selected under the Users and groups section.
-
Select the tick boxes next to the users and groups that you want to use SSO to log in to Matrix Booking.
-
Select Select.
-
Select Assign.
-
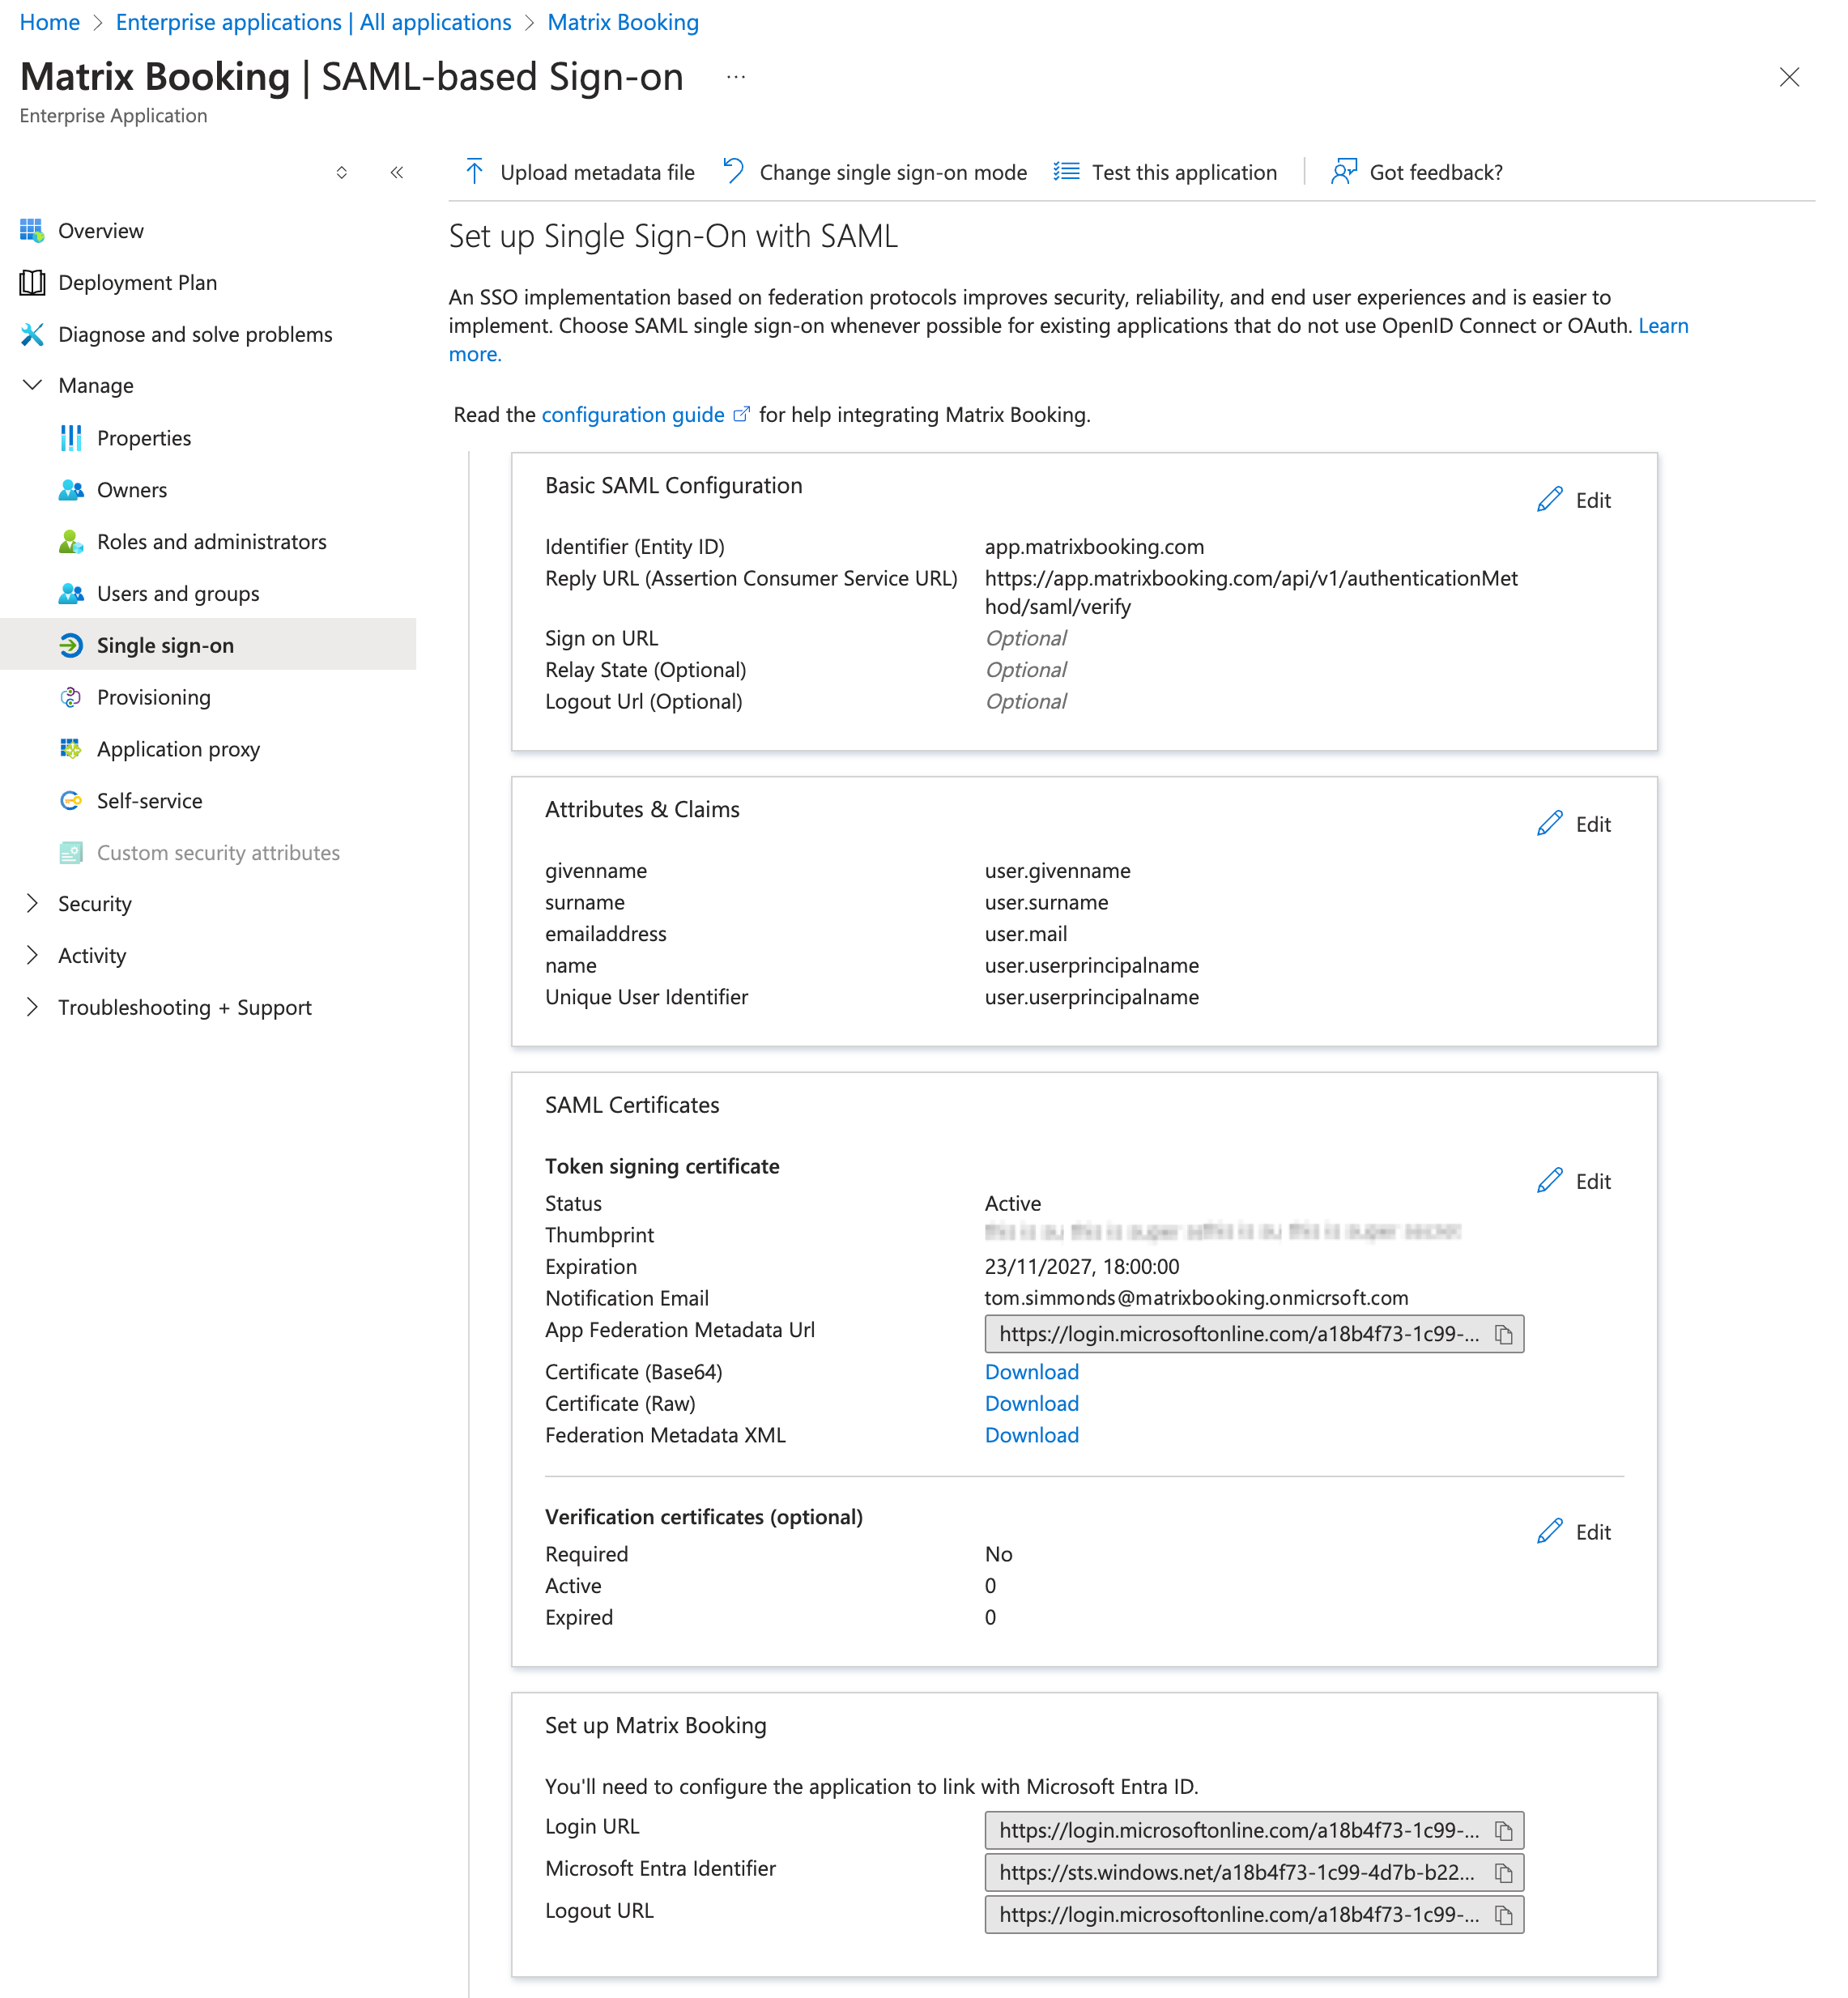
Select Single sign-on under the Manage dropdown from side menu of the Matrix Booking Overview screen. The Single sign-on screen will appear.
-
Select SAML. The SAML-based Sign-on screen will appear.
-
Select Edit under the Basic SAML Configuration section. The Basic SAML Configuration dialog will appear.
-
Select Add identifier under the Identifier (Entity ID) section. A table will appear underneath.
-
In the Enter an identifier text box, enter “app.matrixbooking.com”. If you have multiple Matrix Booking organisations from a single IdP, you may need to change the “app” to a unique Entity ID.
-
Select Add Reply URL under the Reply URL (Assertion Consumer Service URL). A table will appear underneath.
-
In the Add reply URL text box, enter “https://app.matrixbooking.com/api/v1/authenticationMethod/saml/verify”.
-
Select Save.
-
Select X (or Close) to close the dialog. The Test single sign-on with Matrix Booking dialog will appear.
-
Select No, I’ll test later.
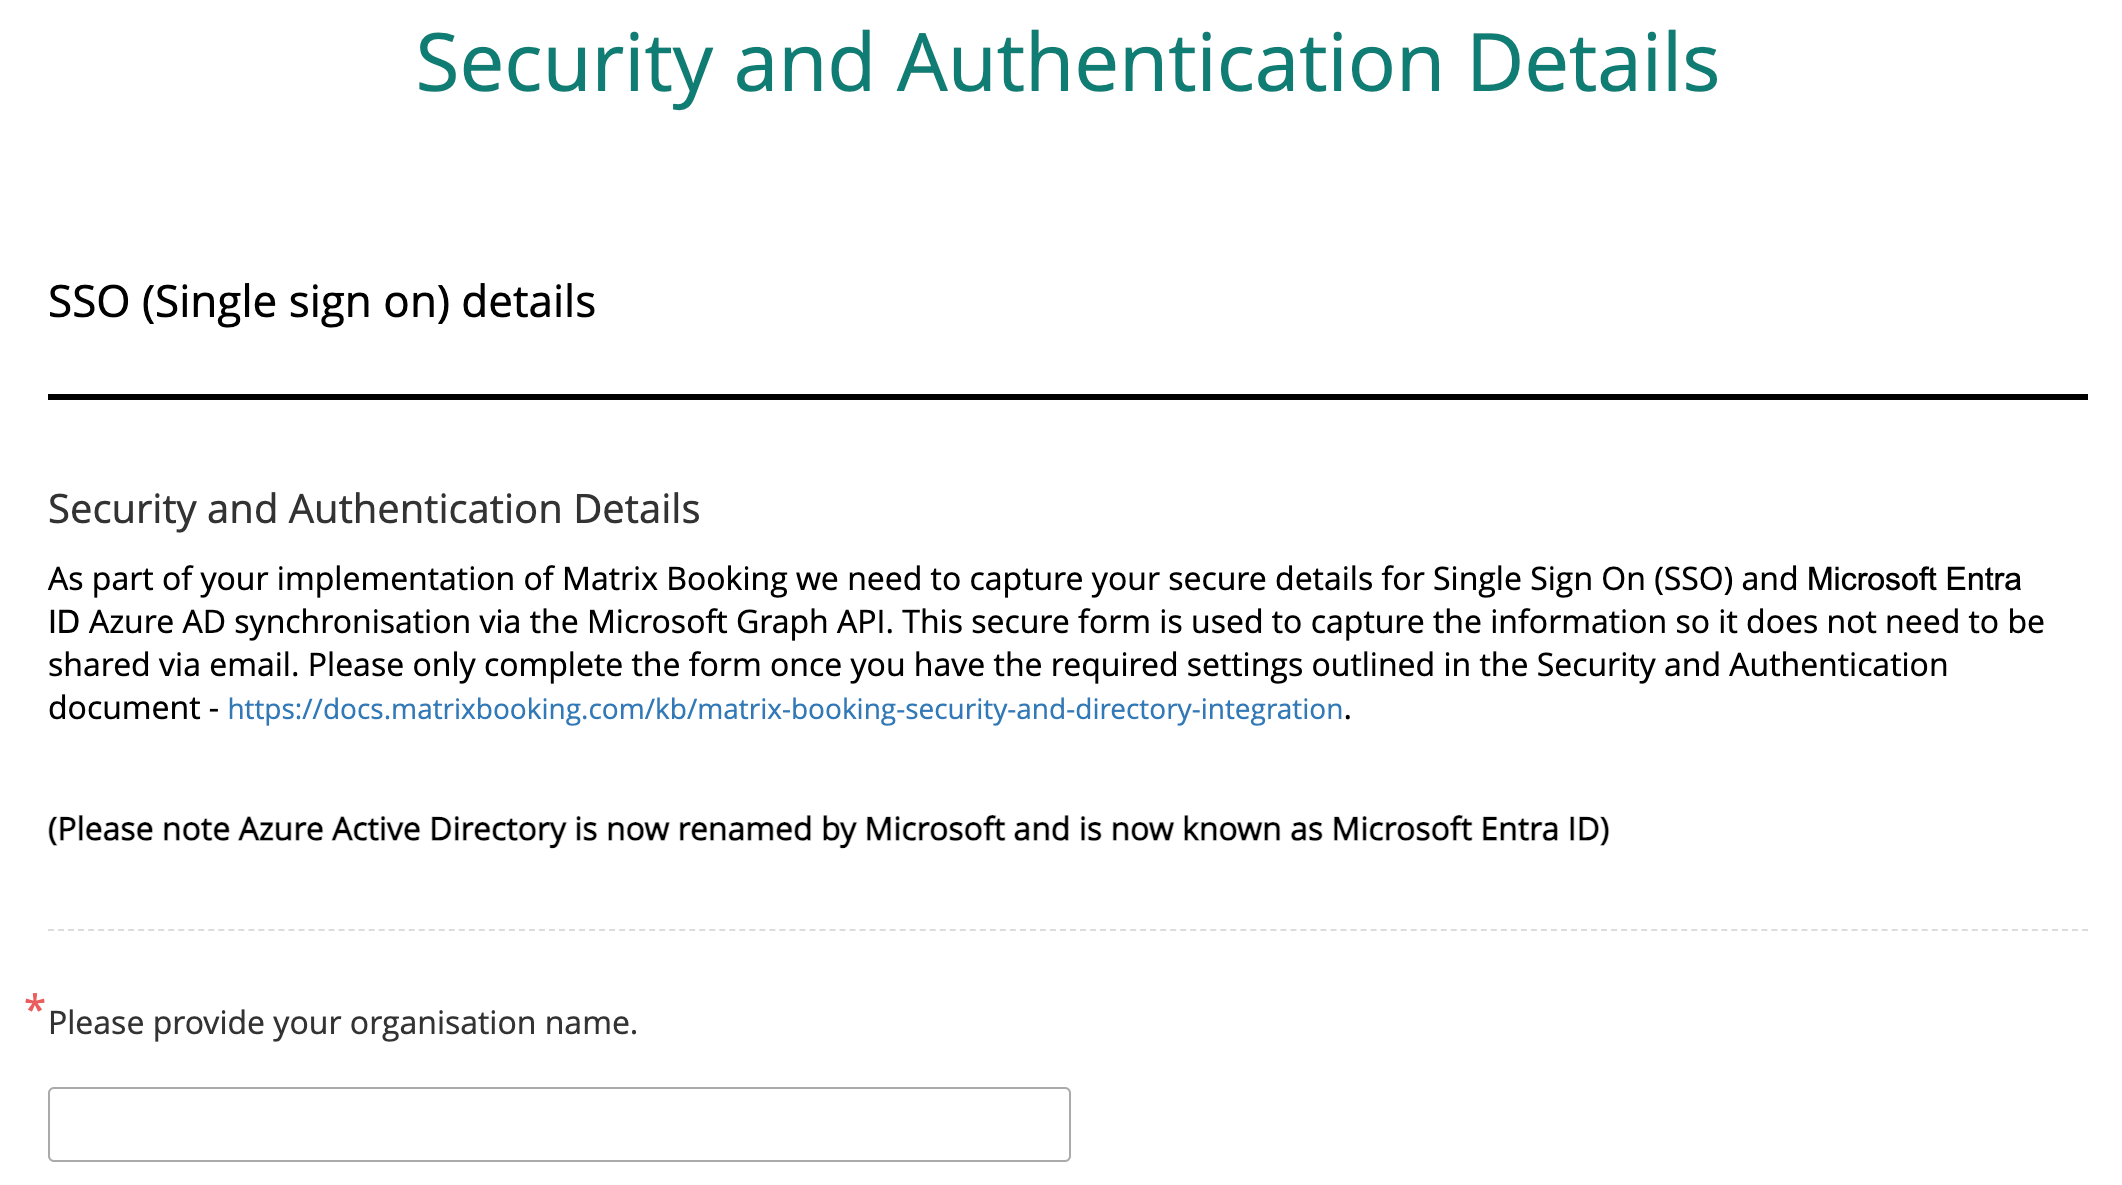
Give the required information to Matrix Booking
The steps you need to follow to set up a SAML SSO integration with Matrix Booking:
-
We’ll supply you with a link to an online form to complete, with this guide and the overview.
Set up our Microsoft Entra ID integration
If you have an Entra ID tenant and SSO in place, you can sync the Matrix Booking internal directory with Entra ID. Any changes made in Microsoft’s Azure Portal will be reflected in Matrix Booking. They can be easily searched for when assigning bookings or adding attendees. This integration is based on syncing with a single Entra ID group.
The directory sync uses the Microsoft Graph API to query the users in the Entra ID tenant. It will create, deactivate, or reactivate users within Matrix Booking. The sync can be either:
-
run manually by an Administrator from the Login Methods menu in Admin.
-
set up by our Support Team to run automatically once a day
If you’re live with Entra ID directory sync created against the Microsoft Graph API (rather than Microsoft Graph API), the existing setup can be updated to simply include the required API permission in the API permissions section below. Once these are in place, the next sync will use these without anything further required.
For completeness, the existing Microsoft Graph API permissions should be removed. “Default Directory” represents your Entra ID tenant. Your tenant may have a different name.

Notes:
-
We support:
-
Directory sync with Entra ID via the Microsoft Graph API, including where an on-premises Active Directory is synchronised with Entra ID via Microsoft’s connector.
-
SCIM.
-
-
We don’t support any other directory integrations.
There are several steps needed to set up our Entra ID directory sync integration, on both the Microsoft and Matrix Booking sides. Some steps need to be done by your IT team, some by your Matrix Booking Administrators, and some steps by our Support Team. To set up our Entra ID integration for your organisation if you’re live with Matrix Booking:
In Microsoft Azure, your IT team need to:
-
Add Matrix Booking to your Entra ID tenant as a client application.
-

-
Give the required information to Matrix Booking.
In Matrix Booking, your Matrix Booking Administrators need to:
Add Matrix Booking to your Entra ID tenant as a client application
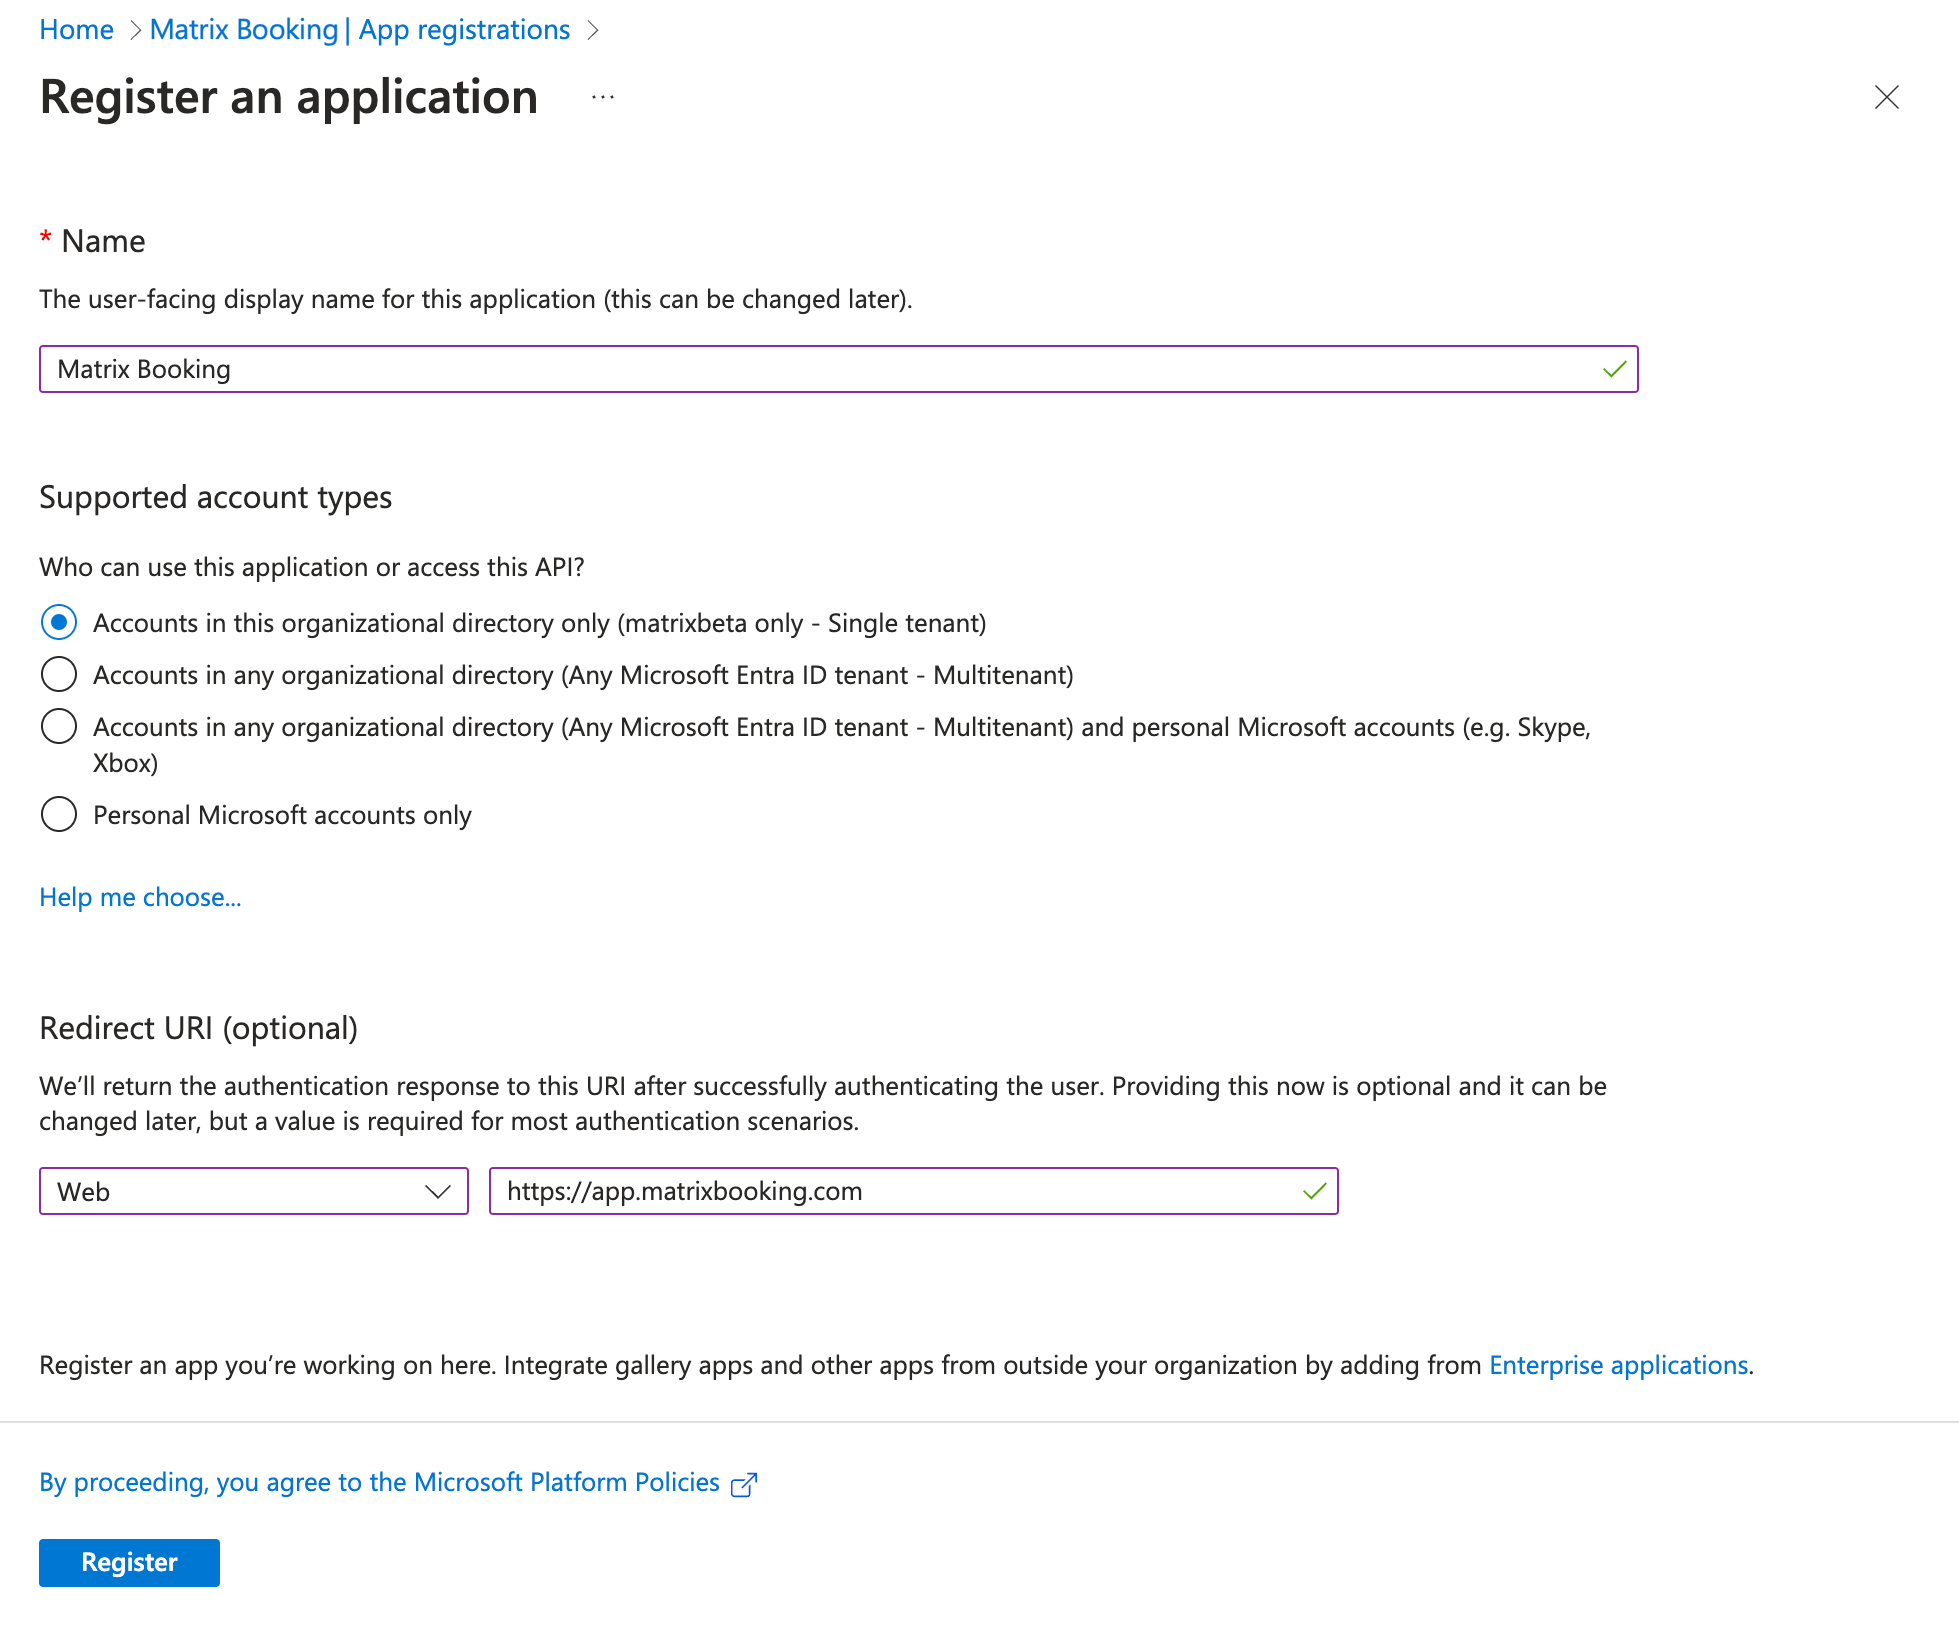
To add Matrix Booking to your Entra ID tenant as a client application:
-
Select Microsoft Entra ID from the side menu. The Overview screen will appear.
-
Select the + Add dropdown. The + Add dropdown will appear.
-
Select App registration from the Manage dropdown. The Register an application screen will appear.
-
In the Name text box, enter “Matrix Booking”.
-
Select the Accounts in this organisational directory only (single tenant) option.
-
Select the Select a platform dropdown. The Select a platform dropdown will appear.
-
Select Web from the dropdown.
-
In the Redirect URL text box, enter “https://app.matrixbooking.com”.
-
Select Register.

-
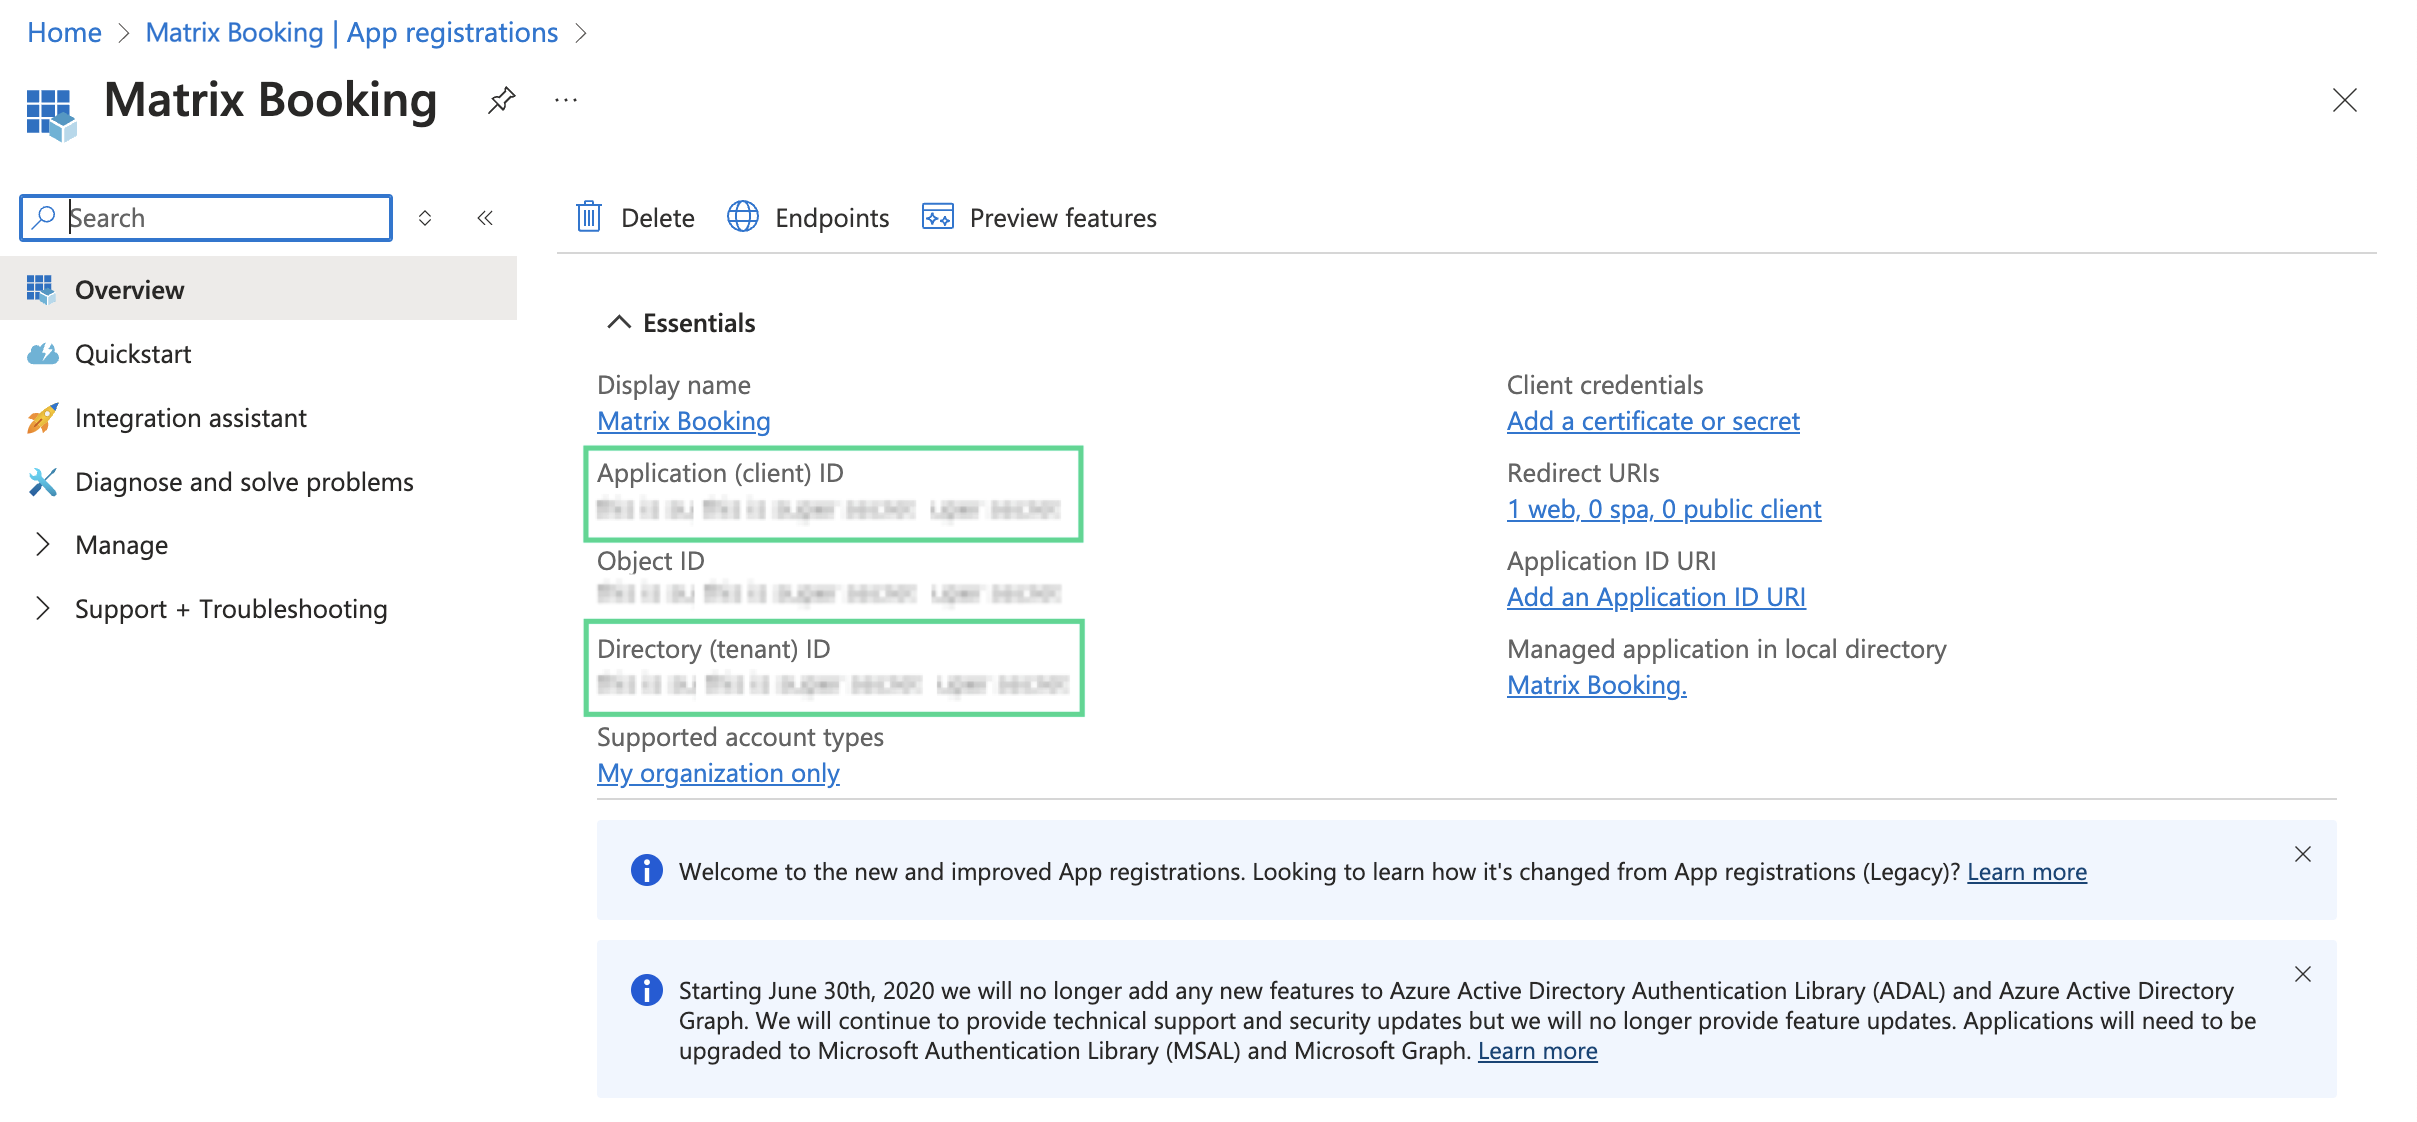
This will take you to the Matrix Booking Overview screen.
-
Take note of the:
-
Application (client) ID.
-
Directory (tenant) ID.

-
Note: for more information, see Microsoft’s guidance on registering an application.
Set the required permission
To add the permission for Matrix Booking to read the directory via the Microsoft Graph API:
-
Select the Manage dropdown from the side menu of the Matrix Booking Overview screen. The Manage dropdown will appear.
-
Select API permissions from the dropdown. The API permissions screen will appear.
-
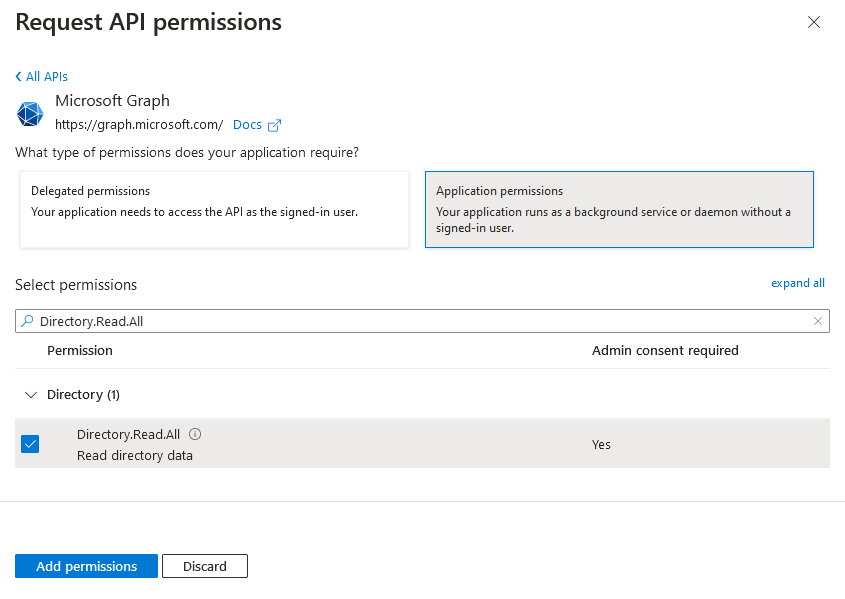
Select + Add a permission. The Request API permissions screen will appear.
-
Select Microsoft Graph.
-
Select Application permissions.
-
In the Start typing a permission to filter these results search bar, begin to enter “Directory.Read.All”.
-
Select the > Directory dropdown. The > Directory dropdown will appear.
-
Select the Directory.Read.All permission.
-
Select the Add permissions button.
-
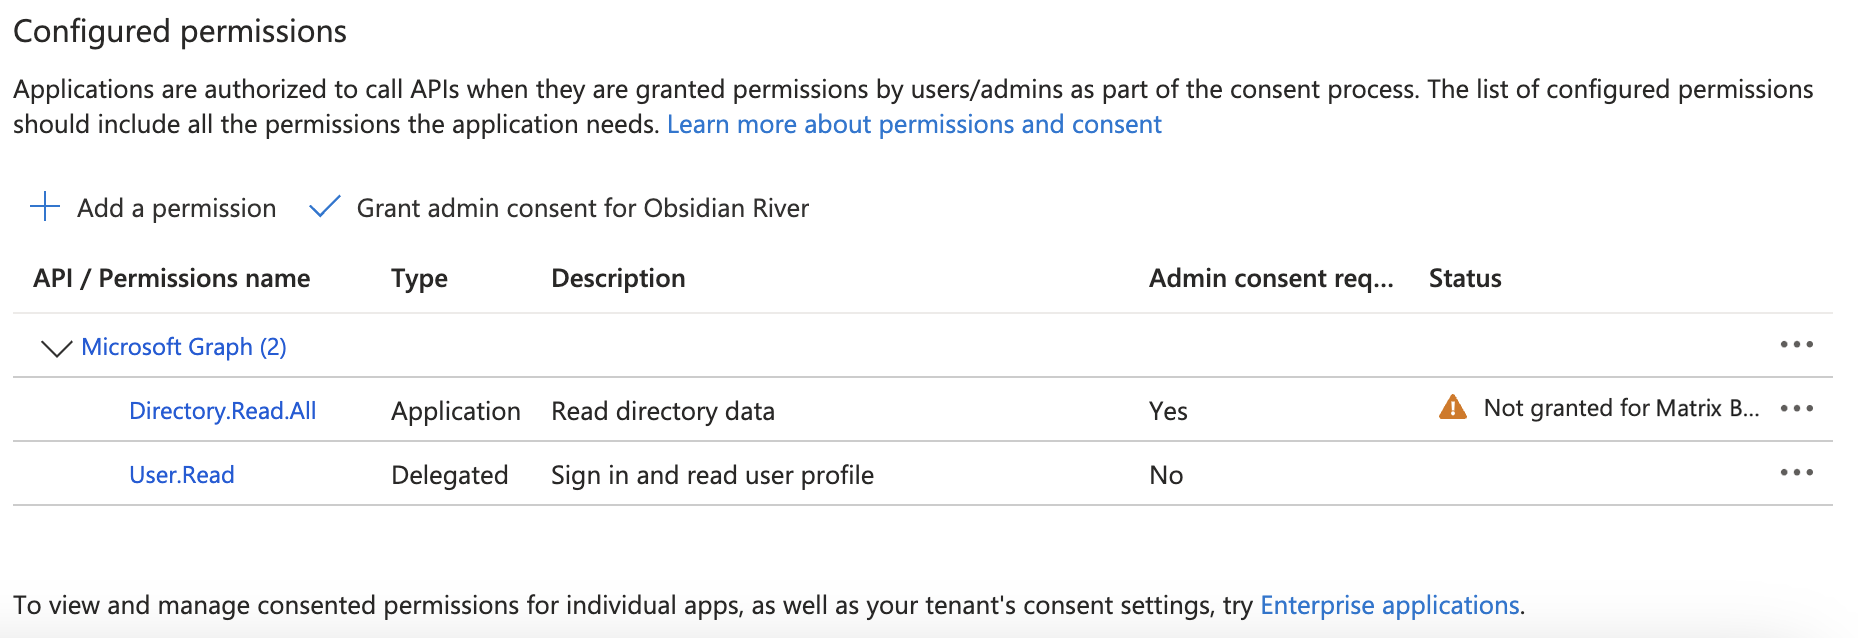
Select the ✓ Grant admin consent for [your organisation] button (for example, Obsidian River). The Grant admin consent confirmation dialog will appear.
-
When asked to confirm, select Yes.

Create a client secret
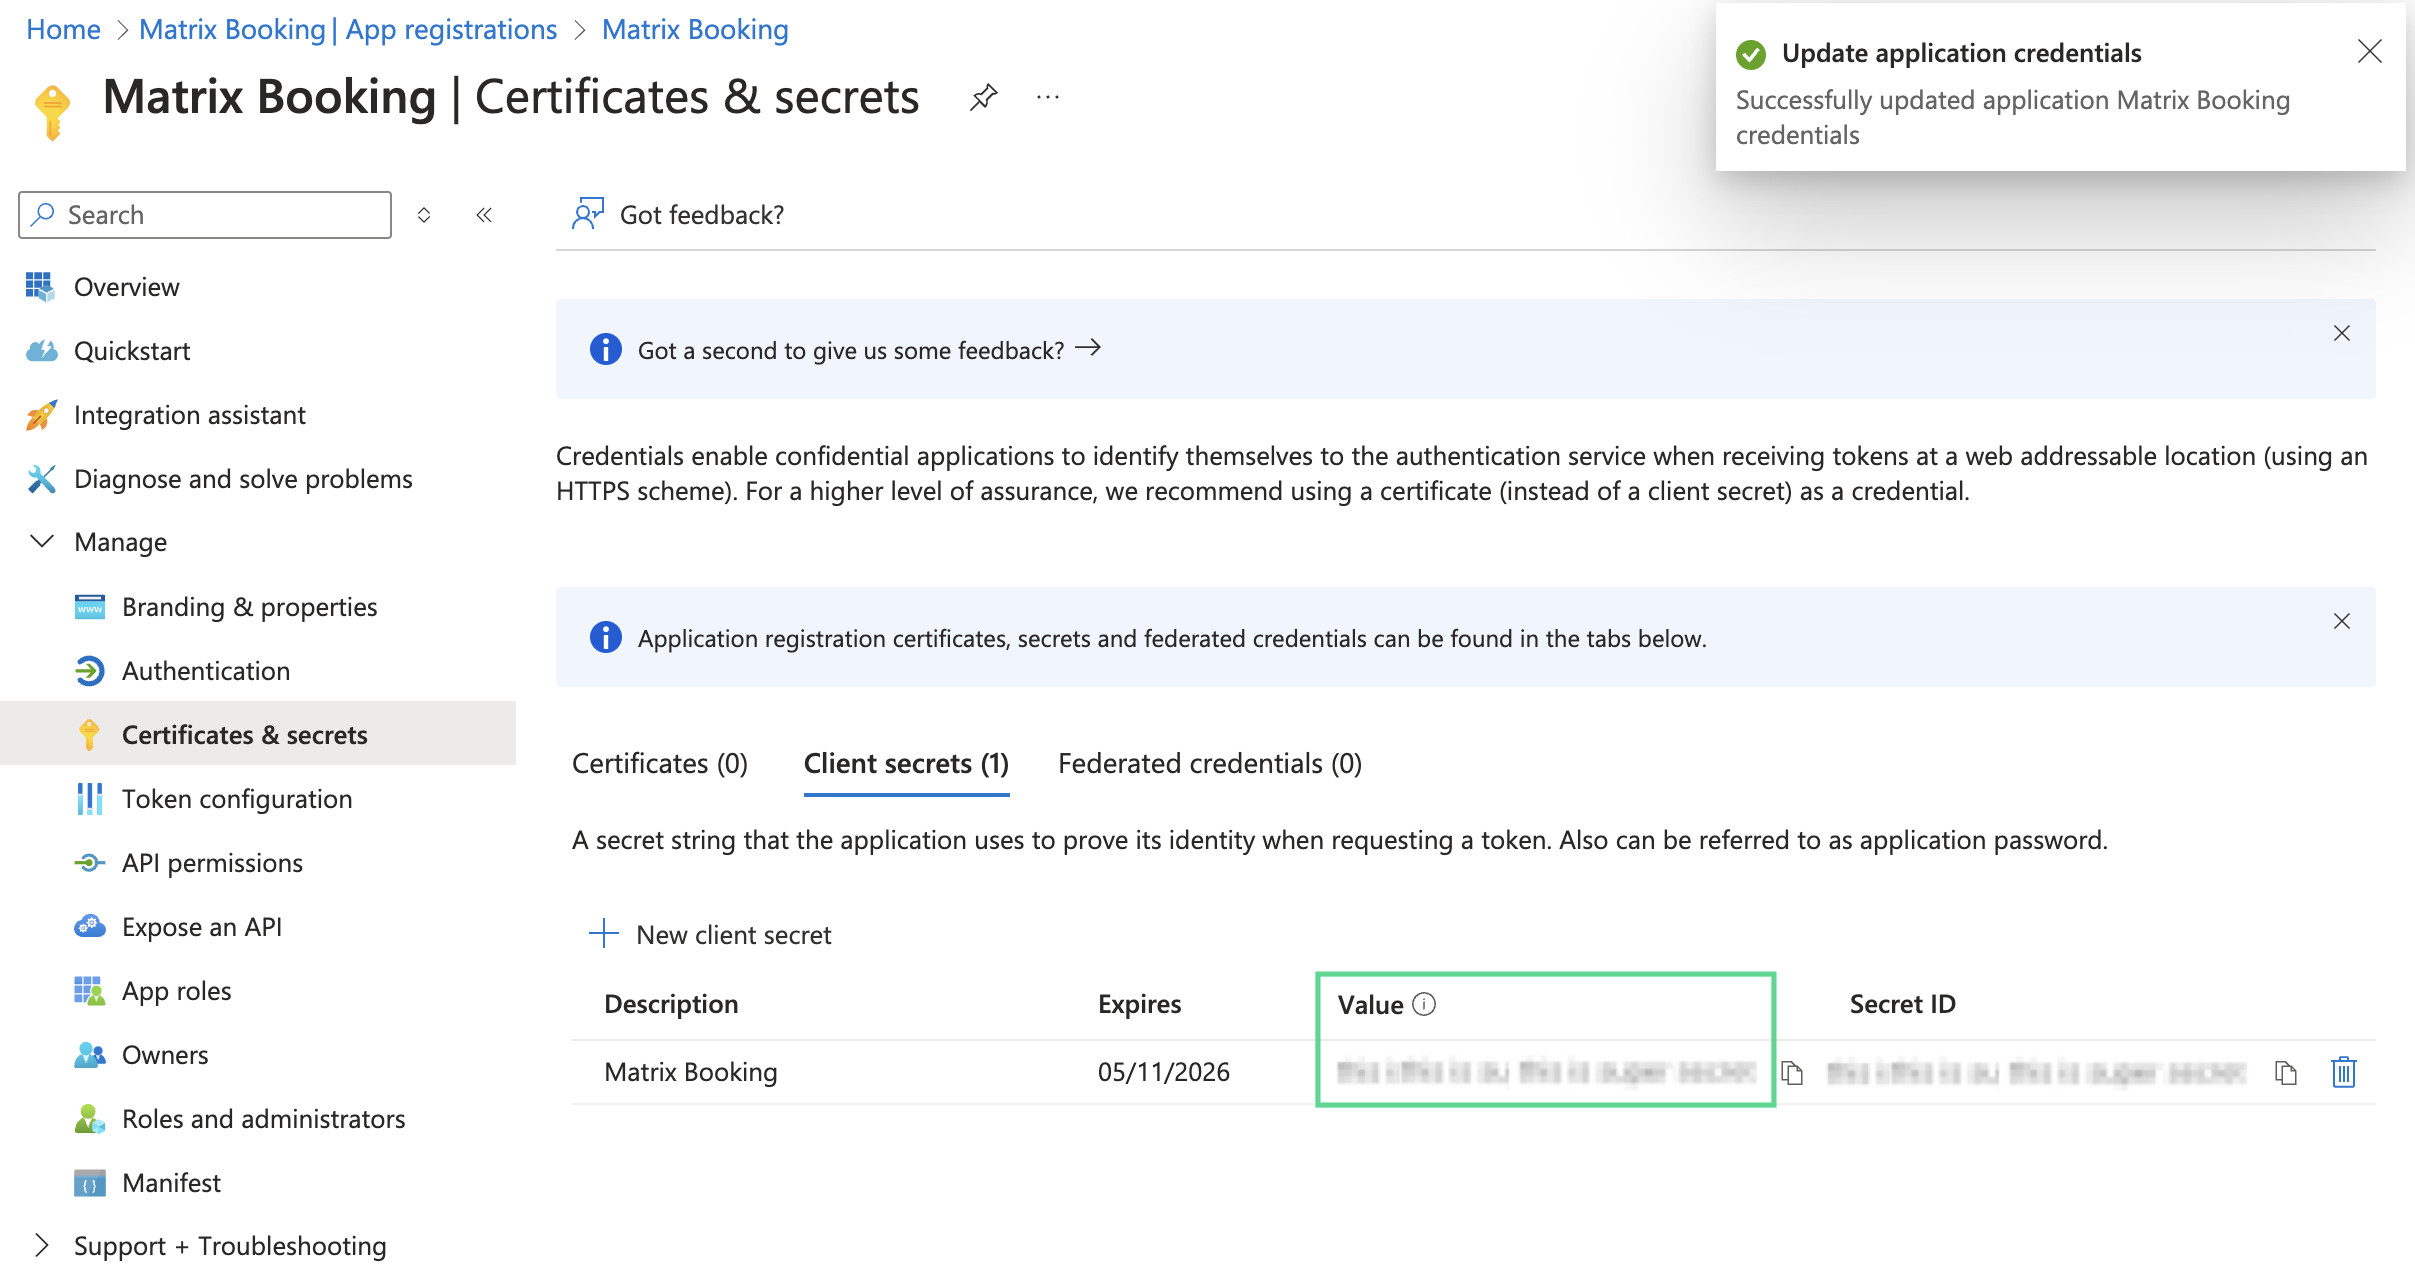
The last step within Microsoft’s Azure Portal is to create a client secret that allows Matrix Booking to securely read your directory.
-
Select Certificates & secrets in the side menu of the Matrix Booking Overview screen.
-
Select the + New client secret button.
-
In the Description text box, enter “Matrix Booking”.
-
Select the Expires dropdown. The Expires dropdown will appear.
-
Select 24 months (the longest expiry).
-
Select Add.

Give the required information to Matrix Booking
The steps you need to follow to set up an Entra ID integration with Matrix Booking:
-
We’ll supply you with a link to an online form to complete, with this guide and the overview.
If you also use Microsoft Azure for SSO, you can use the same Group for syncing that you used to grant access to the Matrix Booking SSO.
Notes:
-
For more information, see Microsoft’s guidance on how to add a client application.
-
If you can’t raise a support ticket, contact your Matrix Booking Implementation Manager.
-
The Client secret value won’t be displayed again. This information is needed to set up your Entra ID directory sync.
-
The Client secret value isn’t the same is as the Secret ID. The Secret ID can’t be used to set up your Entra ID directory sync.
-
These pieces of information should only be passed between your organisation and Matrix Booking and shouldn’t be passed to any other external organisations.
-
Anyone with these 3 values will be able to read your directory – if you’re concerned that these may have been compromised, you should immediately delete the client secret.
-
You can create a new secret and provide that to the Matrix Booking Support Team.
-
Sync user groups
In the Matrix Booking web app, your Matrix Booking Administrators need to:
When the directory integration with Entra ID is in place, an Administrator may add a Matrix Booking user group that synchronises with an Entra ID group. To do this:
-
Select Synchronised with Azure AD.
-
Select the directory from the dropdown.
-
Begin to enter the name of the group within your Entra ID.
-
Select the group from the dropdown that appears.
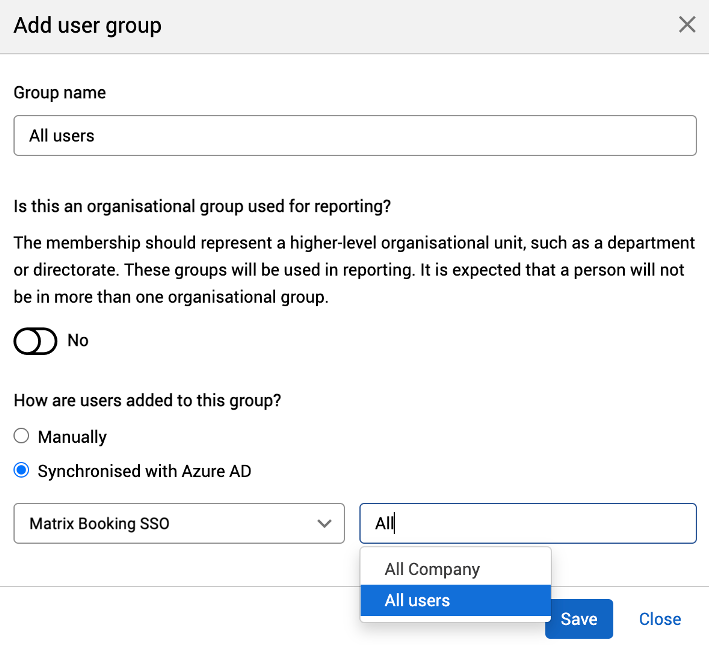
Note: this may not be present if you only have 1 directory.
Once the Entra ID user group is selected, the full list of corresponding Matrix Booking users will be synced. It will only show the first 500 users.
Update client secret value in Matrix Booking
To update the client secret value for our Microsoft Entra ID integration in the Matrix Booking web app:
-
Ask your IT team to get a new client secret value from Microsoft’s Azure Portal.
-
Log in to Matrix Booking as an administrator.
-
Select Admin in the navigation bar.
-
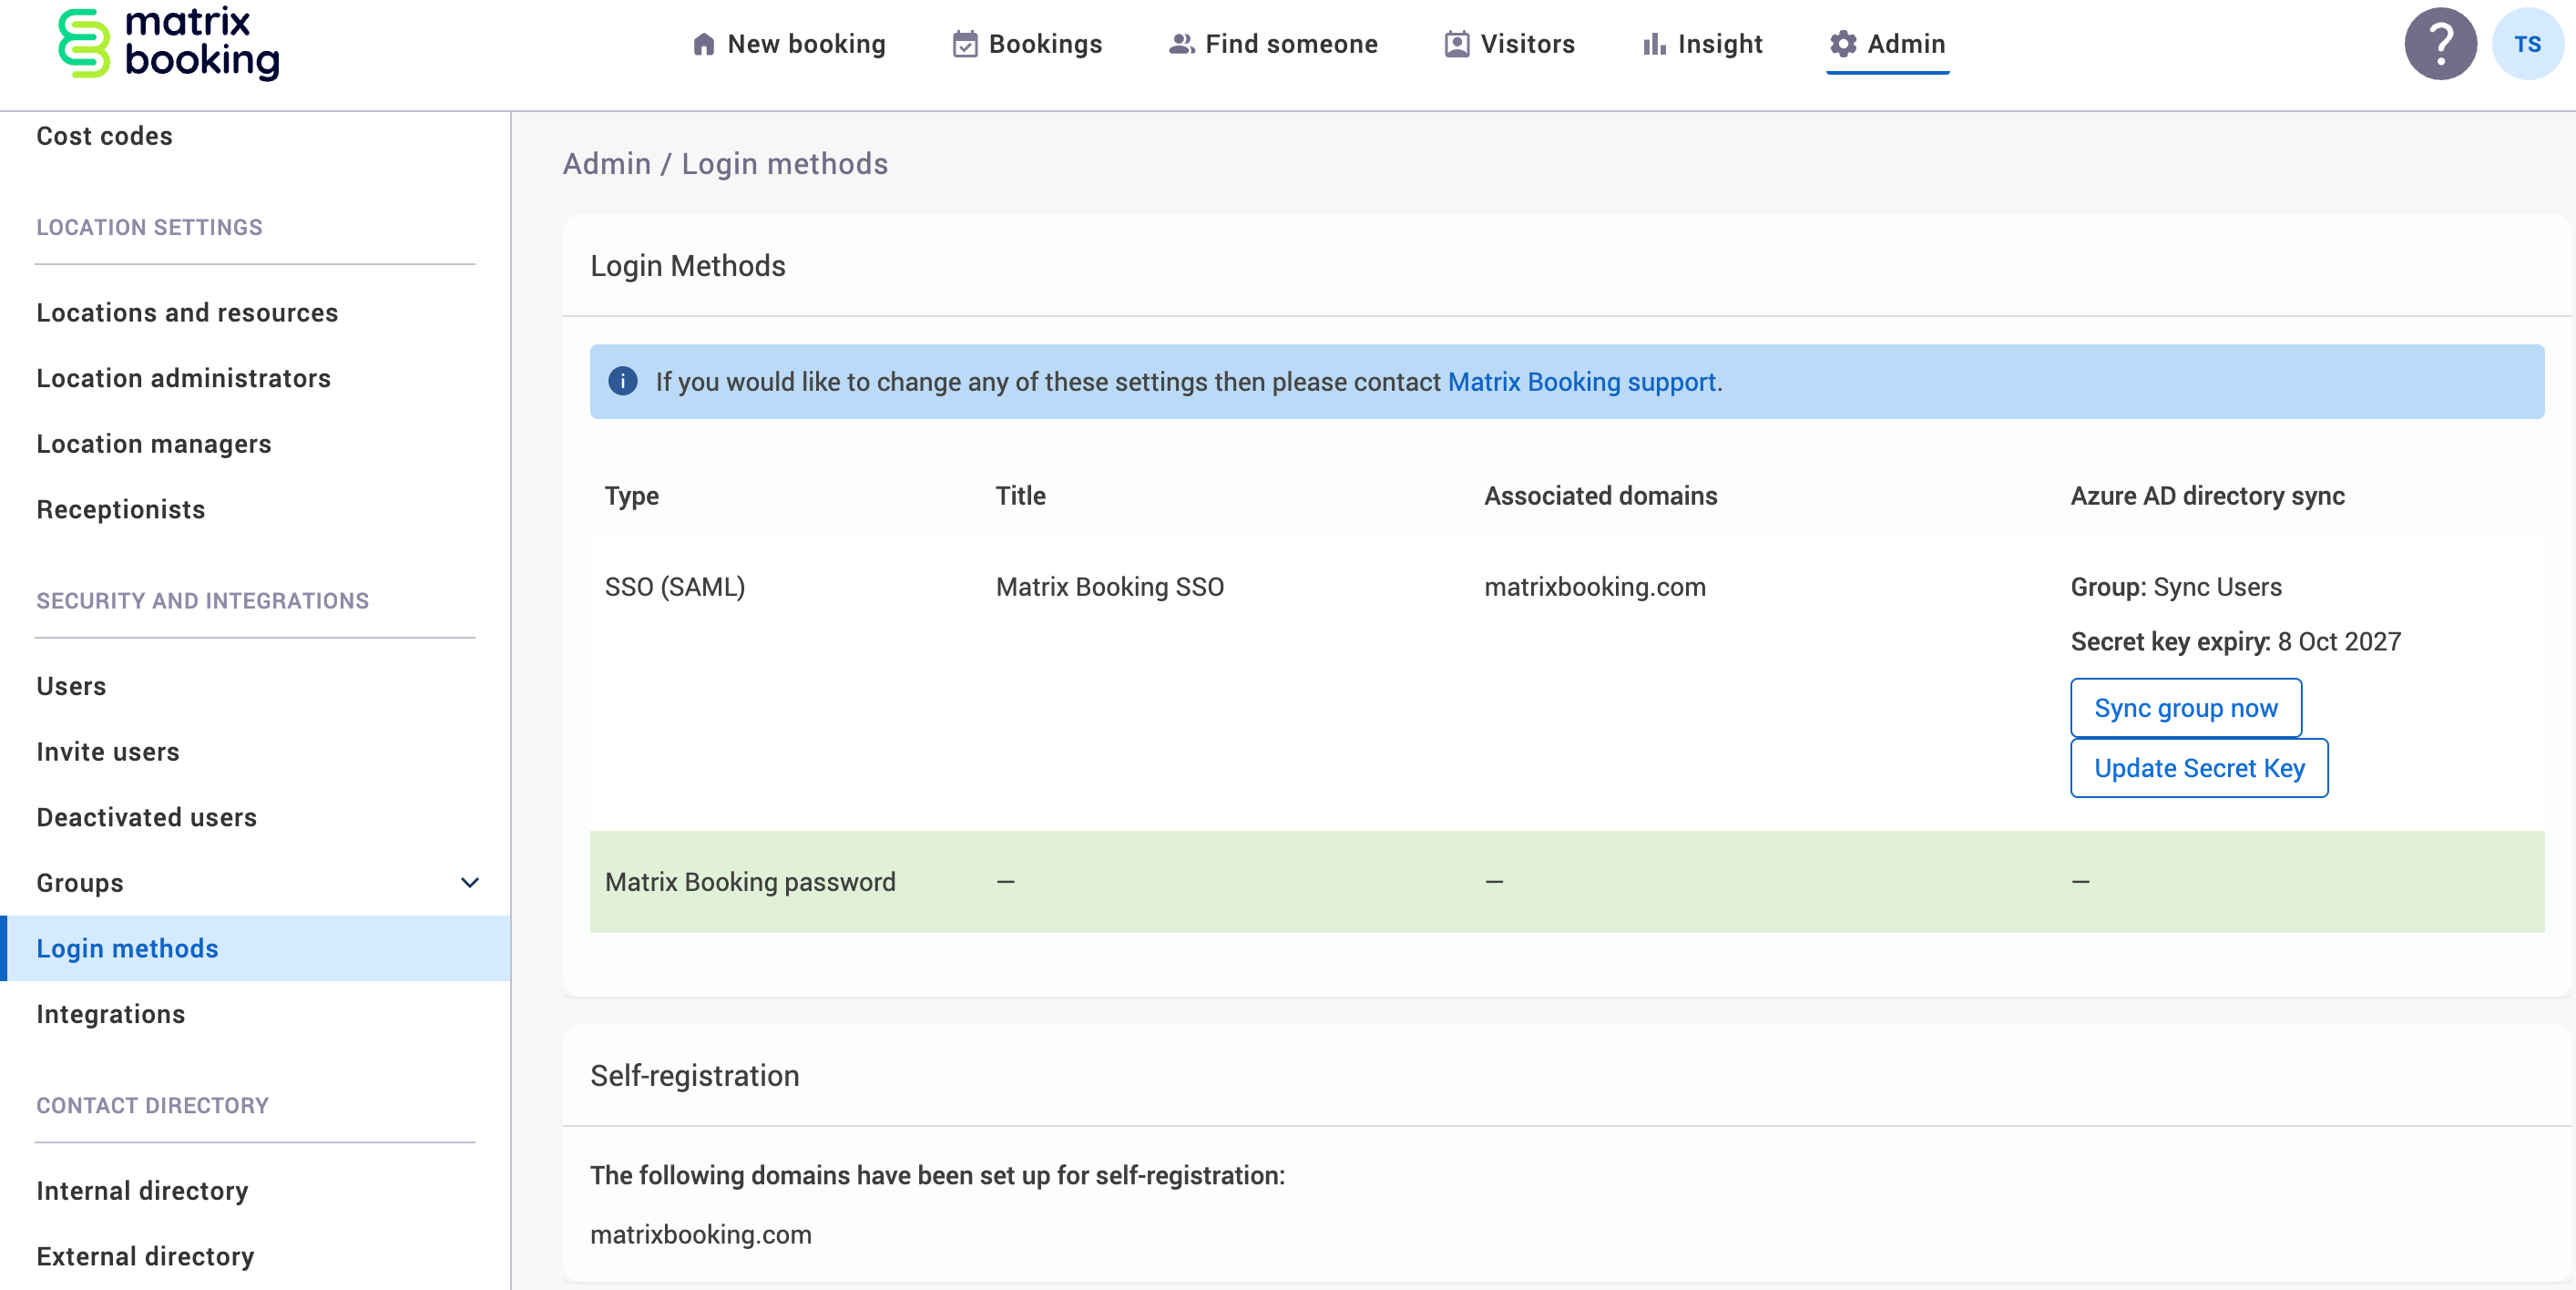
Select Login Methods under Security & Integrations section in the side menu. The Login Methods screen will appear.
-
Select Update Secret Key. The Update Secret Key dialog will appear.
-
In the Secret Key text box, enter your new client secret value that your IT team got from Microsoft’s Azure Portal.
-
Select Update. This should close the dialog automatically.

-
If the dialog doesn’t close and the Invalid secret key error message appears, check with your IT team that the value has been entered correctly.

-
If the error keeps occurring, raise a support ticket.