This page explains how to configure and use the Matrix Booking Signage application (app). This guide also shows you how to change the settings for the app regardless of whether you’re using a Matrix Booking supplied device or your own device:
Overview
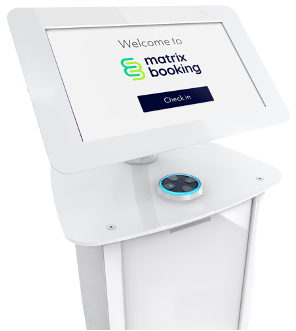
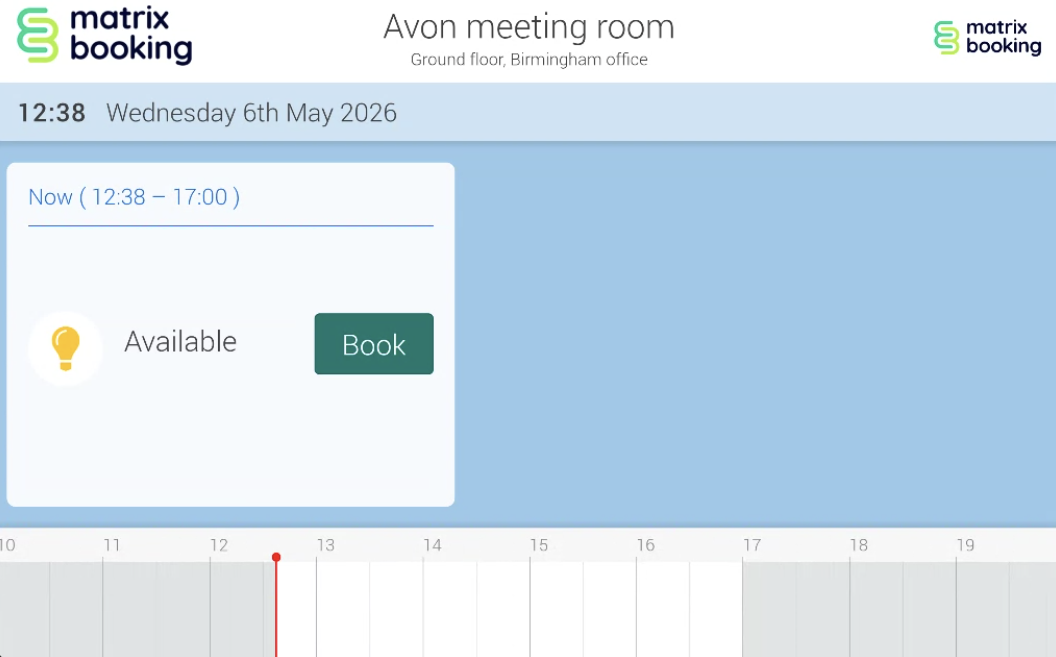
The Signage app displays today’s bookings and availability for all your resources (for example, meeting rooms or desks). It doesn’t show any advanced bookings. The app can run on a variety of screen sizes and is usually run on a mid-sized device that’s locked down and securely mounted outside the room.
The Signage app can be configured to allow people to check in (or starting a meeting). If after a certain amount of time no-one has checked in, the room is released automatically to avoid resource wastage. New bookings can be made with ease and speed directly on the device if desired, which is particularly useful for impromptu meetings.
The app will usually be configured to show the bookings and availability for a single room. However, it can be configured to a multi-view mode where an overview of a selection of resources in a common area is shown (for example, a collection of rooms in a zone or all the desks on a desk bank). In multi-view mode, the detailed resource (for example, room or desk) view is still available by selecting to see that resource’s bookings and availability.
Requirements
This section includes:
Device requirements
The Signage app is an Android and iOS app. Devices must support:
-
a screen with 16:9 or 16:10 aspect ratio
-
internet access
-
a minimum operating system of Android 8.1 – although we strongly recommend Android 9.0
For the best user experience, choose devices that have a crisp, high-definition display and low-latency response to touch gestures. If you’re mounting them on walls or glass, you need to ensure the devices you choose are capable of being mounted.
Note: the sleep timer setting is only available on Android device. iOS don’t support the sleep timer setting.
USB cable requirements
USB cables vary wildly in quality. Consider carefully where your device is in relation to the power sockets. The longer the cable, the more electrical resistance there will be in the cable. For all tablet connectivity, we recommend the following:
-
Use the lowest possible rating of USB cable, especially when using longer lengths of cable. Cable rating should be as close to 20 American Wire Gauge (AWG, for power) as possible, where 20, 22 or 24 AWG are fine to use. A higher rating than this will mean that a large portion of the power will be lost over the cable distance. All USB cables will have a rating expressed in the following format XX/YY AWG (where XX is the data rating, which isn’t important for this, and YY is the power rating).
-
Maximum USB cable lengths are generally dictated by the USB standards, where the absolute maximum is 5 metres.
Note: where external facilities contractors haven’t followed these guidelines, they have been forced to replace cabling (as the low-quality cables don’t deliver the power that tablets need over distances). Make sure to consult with if there is any deviation from the guidelines.
Power for tablets
Depending on how long you want to keep the tablets running for during the day and how bright you need the screens to run at, the power usage can vary significantly. To make sure that your devices always charge faster than they use power, we recommend the following:
-
The charger that came with your device may not be the best for it because of how your device will be used. Look for alternatives if you expect your device to use more power.
-
Make sure a minimum 2 A power supply is used. They are all 5 V, but they vary in the power rating from 400mA to 2.2 A.
-
If power supplies are fitted to surfaces (for example, ceilings or walls), they need to be PAT tested in accordance with the Health and Safety at Work Regulations and Acts.
PoE, switches, and cable runs
If you’re using PoE to supply power or data to your tablets or devices, this is generally a much more resilient method. However, there are still things to watch out for:
-
Make sure that at least Cat5 cables are used.
-
Check with the installation team that the integrity of the cable is good and reliable, as often when cables are installed, they can be “stretched” to make them long enough. This can their affect performance and reliability.
-
Make sure whatever switch you might be using is able to supply enough power for the devices. If many tablets are being connected, make sure the switch can deliver the correct power level (in watts).
-
Whatever switch you use shouldn’t be set to a super-low power saving or economy mode as this may sometimes dip the power below what is needed. This can cause the devices to shutdown or reboot.
-
If you’re using MAC address security, always make sure the MAC address of the device is listed in your network. Otherwise, the device will power on but won’t be allocated an IP address This will cause the “connection lost” error message.
Domains and endpoints to approve
The table below shows the full list of application endpoints that you need to include in the allowed or trusted list to fully utilise the Matrix Booking applications on a closed network. If any endpoints aren’t in your allowed or trusted list, you may have issues with the service related to the endpoint.
|
Rule |
Server name |
Direction |
Port and protocol |
Notes |
|---|---|---|---|---|
|
Matrix Booking app endpoints |
|
Outbound |
443/TCP (HTTPS) |
Matrix Booking data. |
|
|
Outbound |
443/TCP (HTTPS) |
Organisation logo. |
|
|
|
Outbound |
443/TCP (HTTPS) |
Event based communication. |
|
|
Android NTP |
|
Outbound |
123/UCP (NTP) |
Time and date server. |
|
Hexnode MDM |
|
Outbound |
443/TCP (HTTPS) |
Hexnode app updates. |
|
|
Outbound |
443/TCP (HTTPS) |
Hexnode client portal. |
|
|
|
Outbound |
443/TCP (HTTPS) |
Hexnode app updates and delivery. |
|
|
Hexnode remote view |
|
Outbound |
443/TCP (HTTPS) |
Hexnode remote view. |
|
|
Outbound |
443/TCP (HTTPS) |
Hexnode client portal. |
|
|
twilio.com |
|
Outbound |
3478/TCP
|
Hexnode remote view. |
|
|
Outbound |
3478/TCP
|
Hexnode remote view. |
|
|
Hexnode push notifications |
|
Outbound |
1883/TCP
|
Hexnode remote view: receive push notifications via MQTT. |
|
|
Outbound |
1883/TCP
|
Hexnode remote view: receive push notifications via MQTT. |
|
|
|
|
Outbound |
5228/TCP
|
Remote view persistent connection. |
|
|
Outbound |
5228/TCP
|
Remote view push notifications. |
Note: single sign-on (SSO) isn’t supported by the Signage app.
Device settings
If your devices were set up by our team, skip this section. If you're using your own devices, follow the steps below to ensure they function correctly:
Exit kiosk mode
All newly purchased signage devices are sent out in “kiosk mode.” This means that the device will automatically launch the Signage app after it’s switched on. The kiosk mode also prevents Signage users from exiting the app and navigating around the device.
Learn how to take your devices out of kiosk mode
Time and date settings
If you have your own device, ensure the default time zone is correct, as it may be set to the device manufacturer's time zone. Devices supplied by us are pre-configured with the correct time zone and use 2.android.pool.ntp.org as the NTP server, which is included in the standard endpoint or firewall list.
If your device uses a different time server, make sure it’s approved through your firewall so devices can maintain the correct time.
Security to prevent exiting the app
To prevent users from accidentally exiting the app, consider one of these options:
-
Matrix Booking MDM kiosk software – contact your customer success manager to arrange this.
-
Your organisation's MDM kiosk software.
-
Android native PIN or password or see our iOS kiosk mode guidance.
These options aren’t mandatory, but skipping them may leave devices unsecured. Check your IT security policy to confirm whether one is required.
If you’re using MDM or kiosk software (either Matrix Booking’s or your own) or our Hardware as a Service (HaaS) offering, install it before the app. A password or PIN won’t be needed as access is restricted automatically and it will also interfere with our remote support capabilities.
To prevent navigation away from the app:
-
Close all other apps:
-
For iPads:
-
Go to the Home Screen
-
Swipe up from the bottom of the screen.
-
Pause in the middle of the screen.
-
Swipe right or left to find the app that you want to close.
-
Swipe up on the app’s preview to close the app.
-
-
For Android tablets:
-
Tap the square icon at the bottom of the device.
-
Tap the X button on each apps.
-
-
-
Open the Settings app.
-
Go to the Security section (may be called different names depending on the OS).
-
Go to the Screen locking sub-section. This may be called a different name depending on the OS (for example, Guided Access on iOS).
-
Set a password or PIN.
-
Go to the Screen pinning option (may be called different names depending on the OS).
-
Tap the Screen pinning checkbox or slider.

-
You’ll notice a pin button in the bottom-right of the Arrivals app.
-
Tap the pin button. A dialog will appear asking you to confirm.
-
Tap Confirm.
Learn more about Guided Access for iOS devices
Turn off Android Debug Bridge
If your network isn’t configured to block port 5555 and you don’t have your signage and kiosk devices running on a separate VLAN, we recommend disabling the ADB over Wi-fi, LAN, or Power over Ethernet (PoE) on your devices.
Learn more about how to turn off the Android Debug Bridge
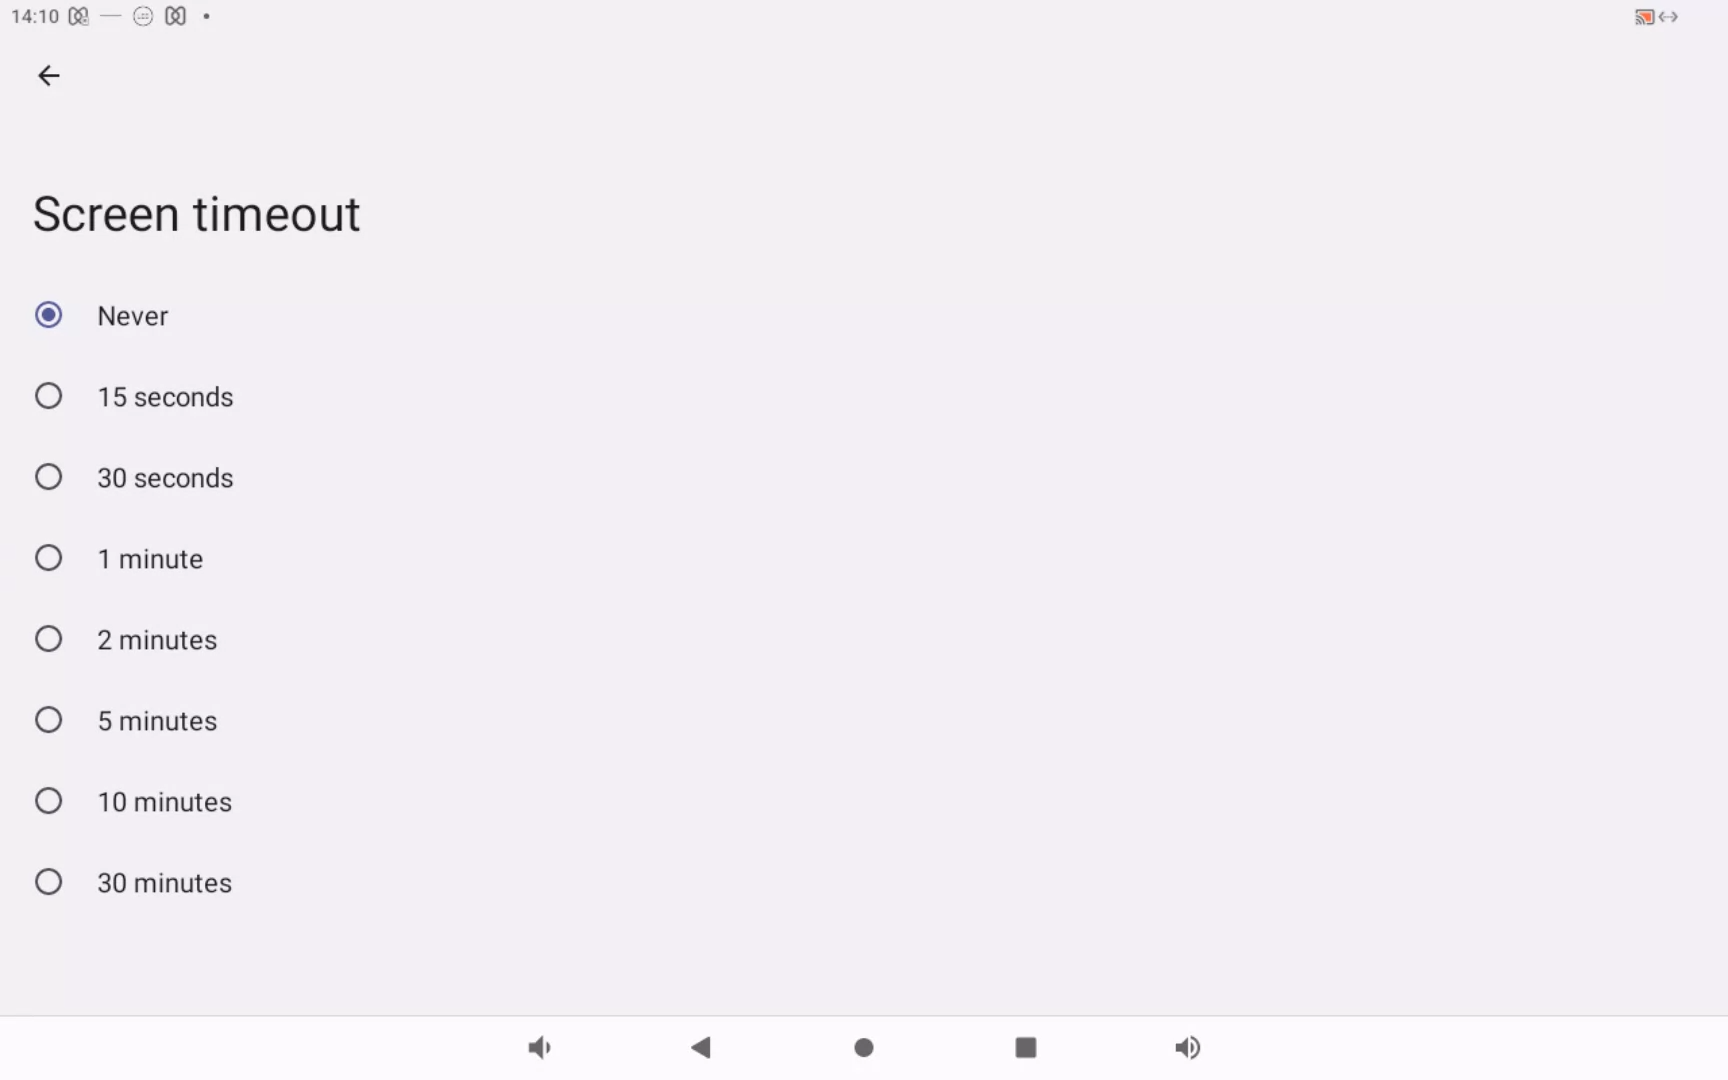
Device sleep or screen timeout settings
The Signage app allows you to set a sleep period for the device (for example, overnight). In the settings area of your device, you’ll need to ensure the device is set to sleep after a period of time. As long as this isn’t set to “Never”, we can put the device to sleep temporarily. In this display area, ensure that the “daydream” type screensaver is off.
Set up a kiosk user
Before downloading, installing, and setting up the app, you need to:
-
Add a Signage app user as a new System/API user.
This is so that you can log in to the app as that user on your device and the account can be used to book on behalf.
Add a Signage app user
To add a System/API user:
-
Select Admin in the navigation bar.
-
Select Users under the Security & Integrations section in the side menu.
-
Select New User in the filters ribbon. The New User dialog will appear.
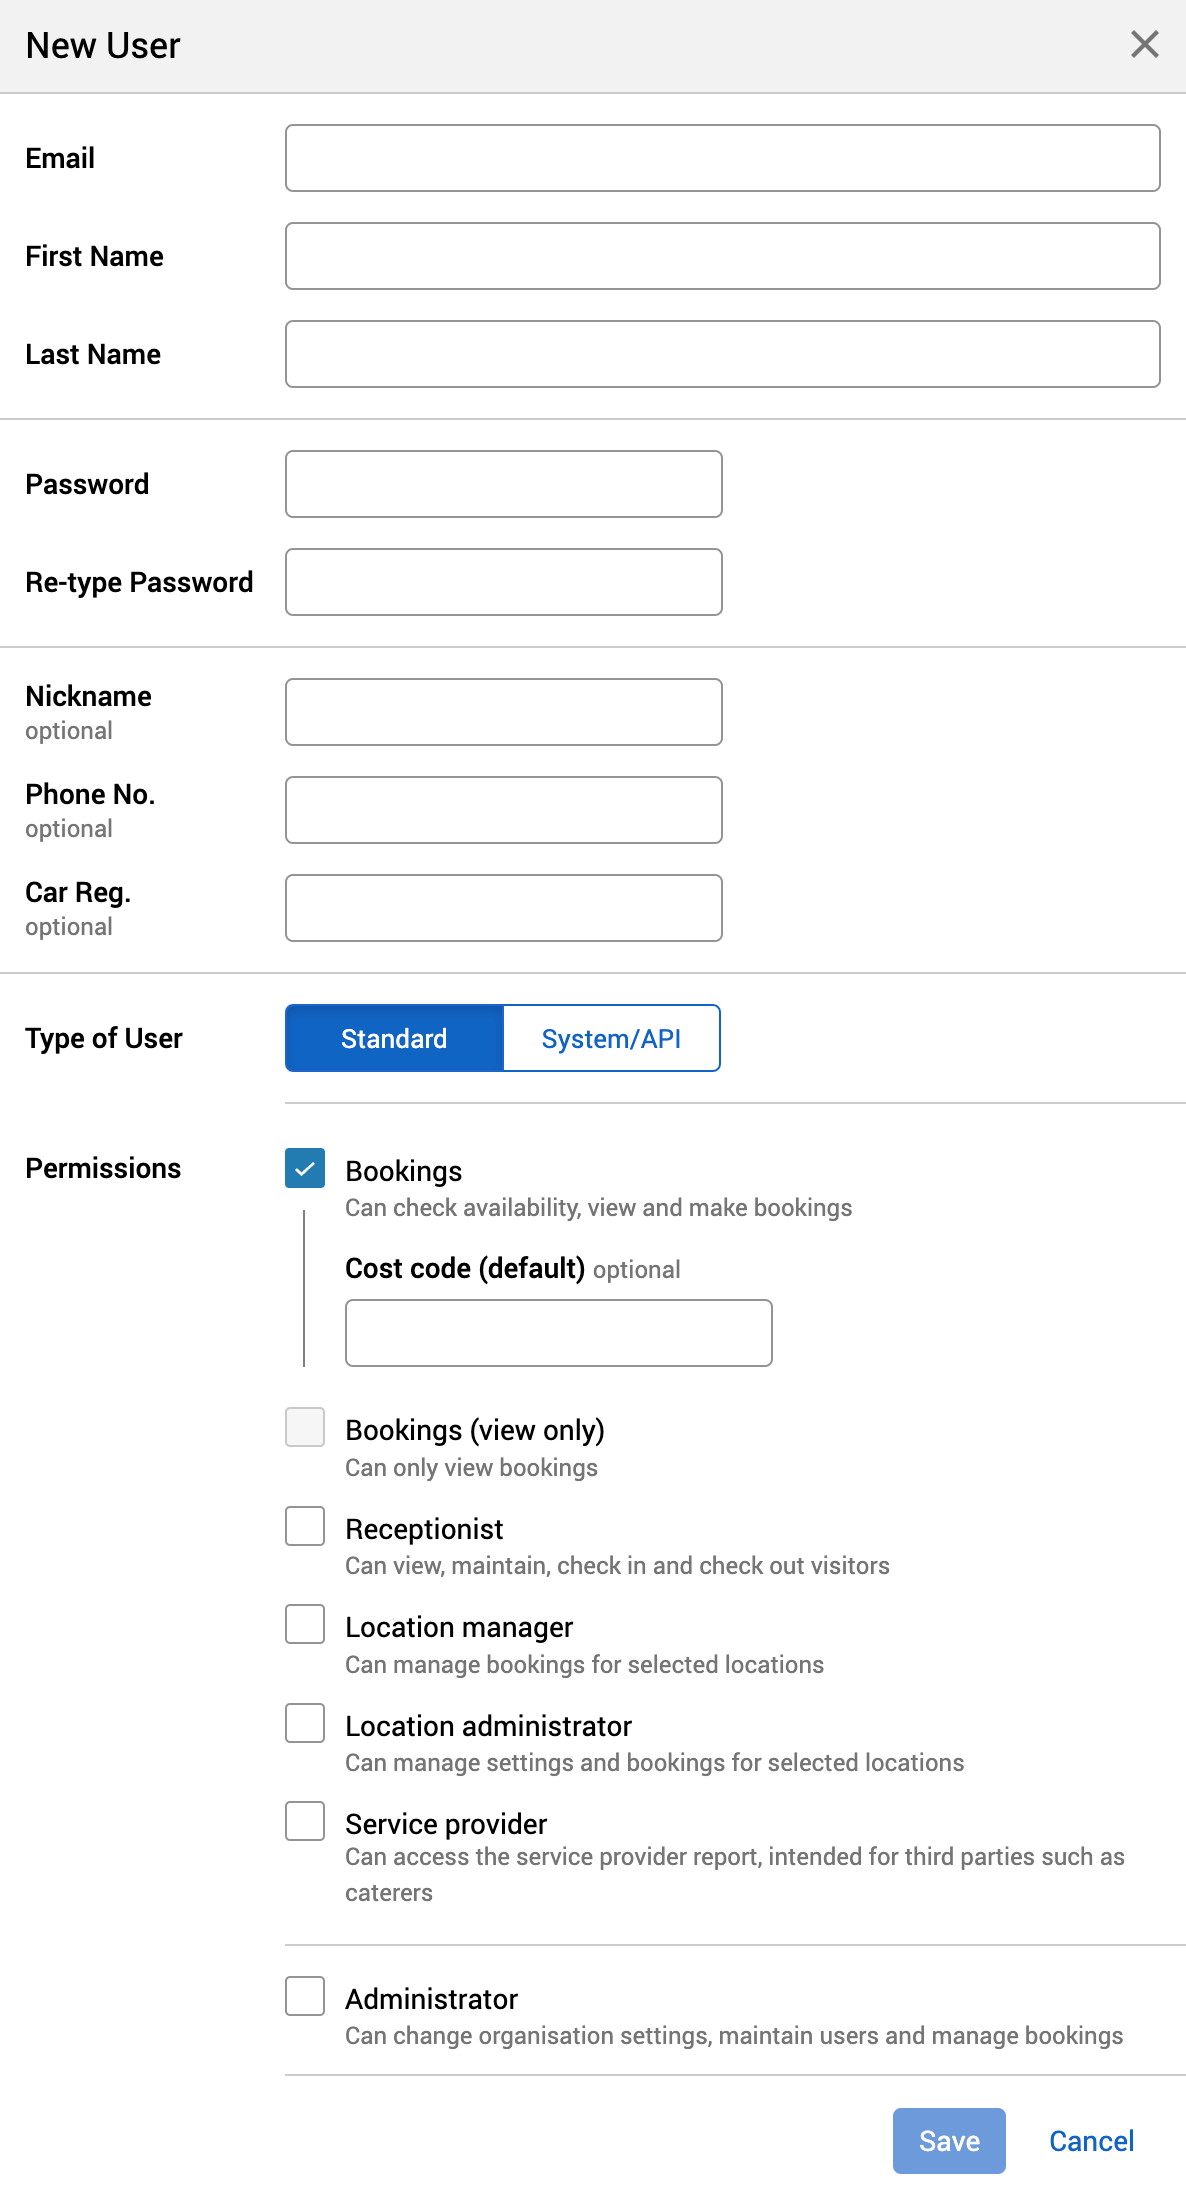
-
Enter their email address.
-
If the first and last names can be extracted from the email address, they will be auto populated.
-
Enter their first and last names if the auto populated results are incorrect.
-
-
Enter and re-enter a password for them.
-
Enter their other details you have available (for example, phone number).
-
Select System/API.
-
Select Save.
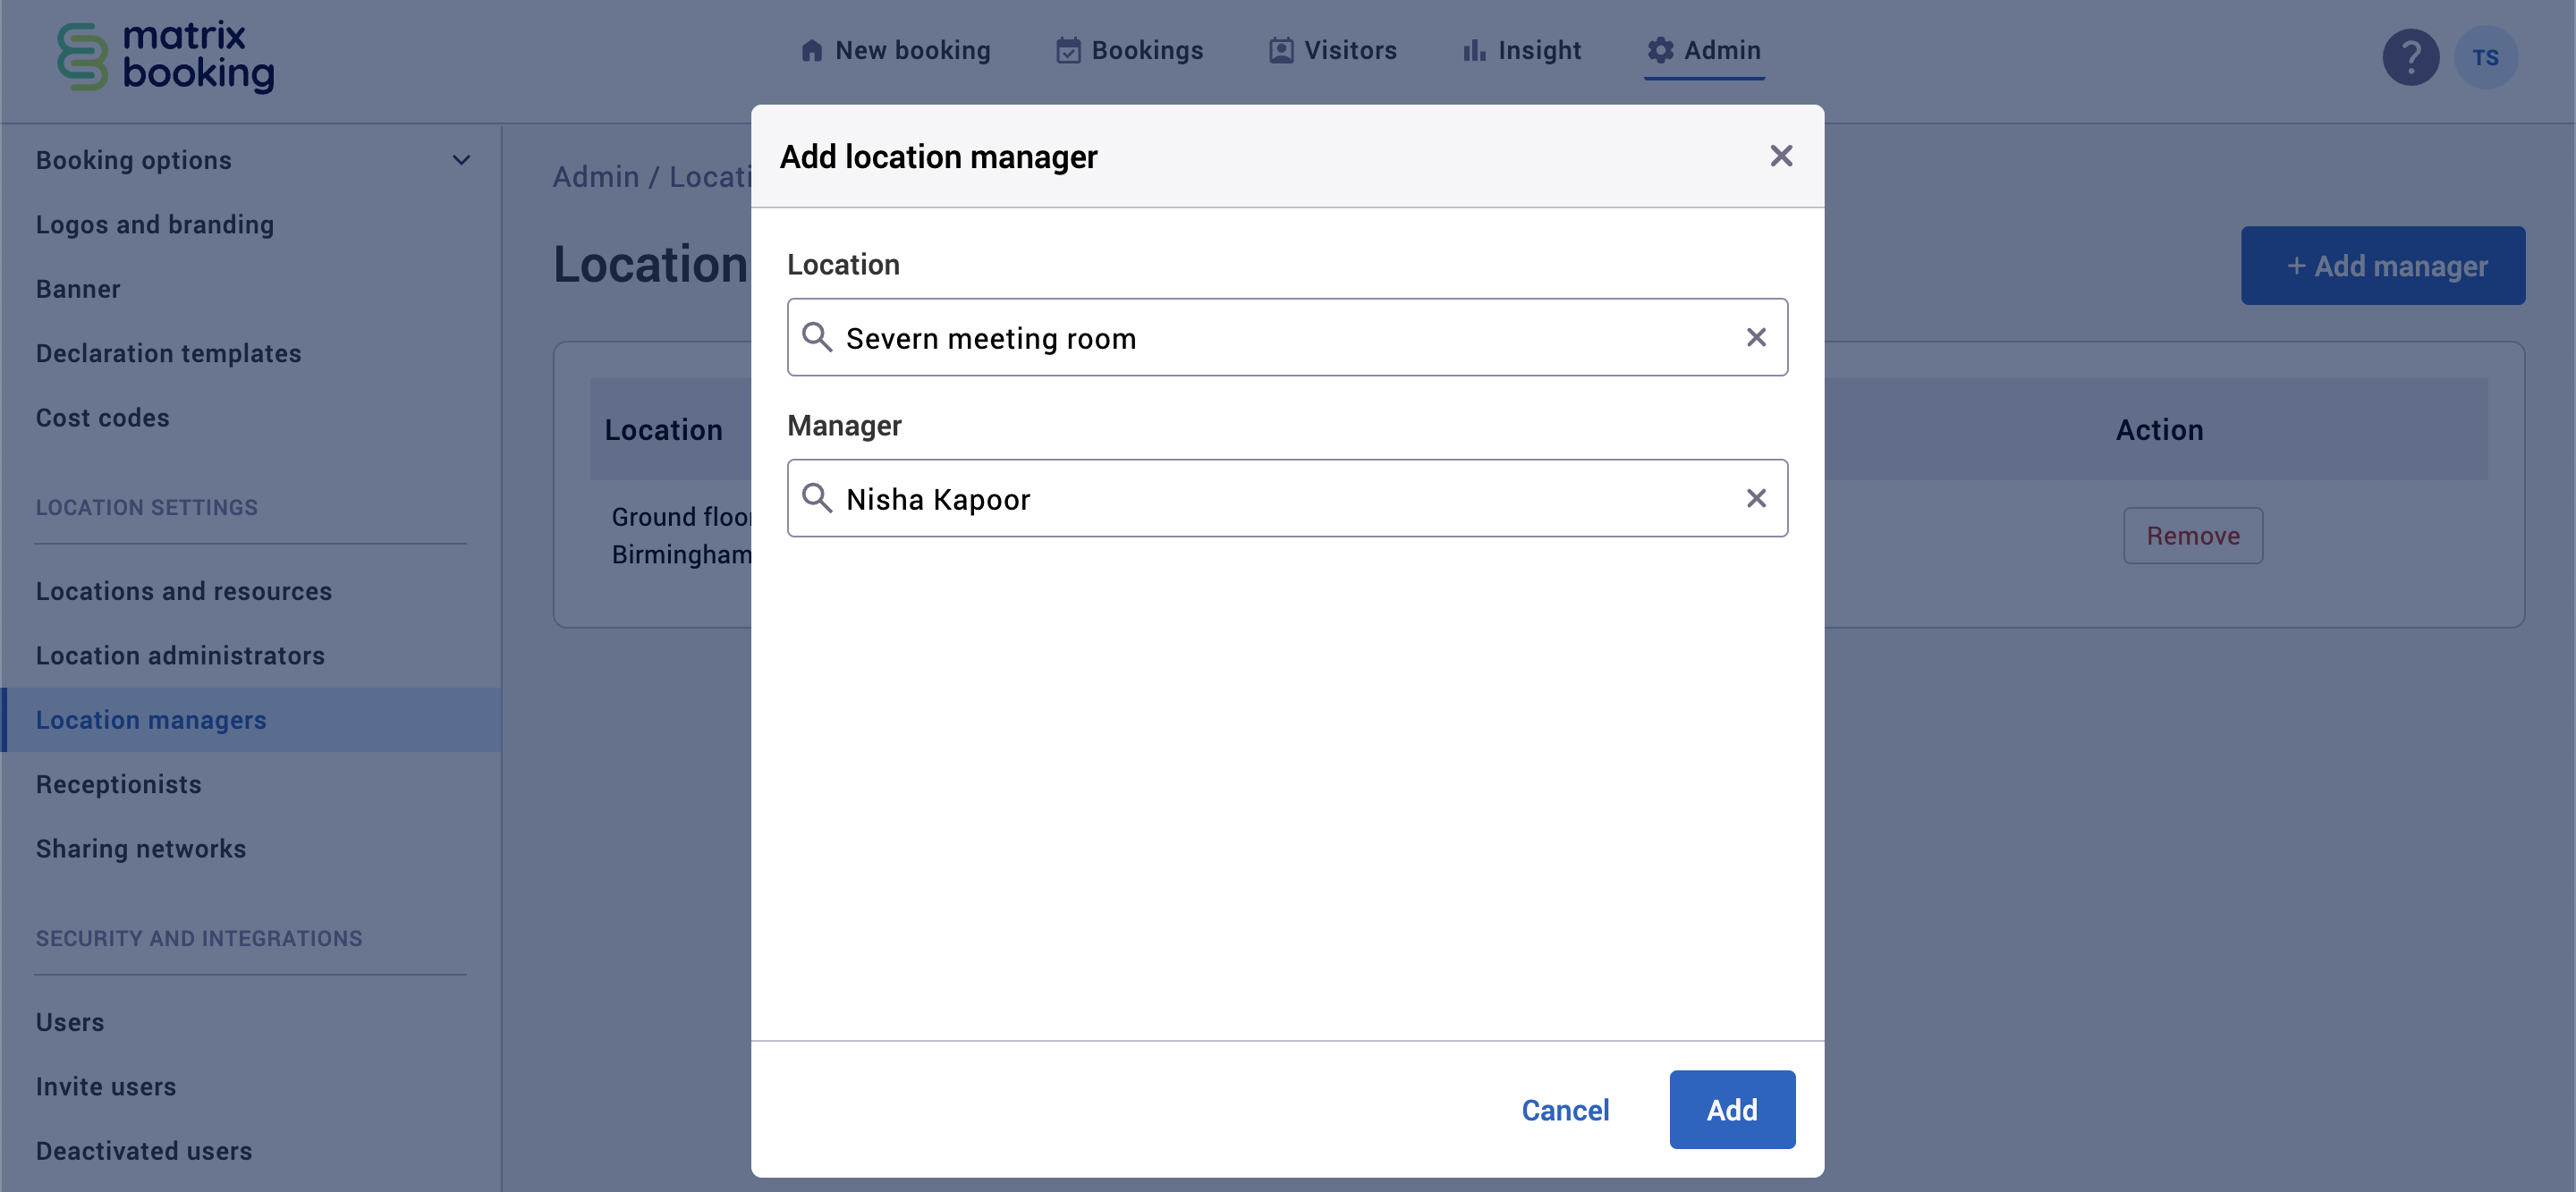
Assign the Signage app user as a location manager
To assign a location manager to a location:
-
If you haven’t already:
-
Select Admin in the navigation bar.
-
Select Location managers under the Location Settings section in the side menu.
-
Select + Add manager. The Add location manager dialog will appear
-
Begin to enter the specific location they are going to be a manager of into the Location text box. A dropdown will appear.
-
Select the location.
-
Begin to enter the name of the person in the Who text box. A dropdown will appear.
-
Select the manager’s name.
-
Select Add.
Notes:
-
If you have multiple buildings that use the Signage app, you should create a kiosk user account per building. Each kiosk user account needs to be a location manager of that building.
-
Setting up user accounts and assigning location managers are all covered in the Administrator training and in the .
Download and install the app
Google accounts and Google Play
Within a corporate environment, it’s better to avoid adding a Google account to the device. This will prevent updates from being downloaded and installed automatically.
Many commercial devices are supplied with a “locked-down” version of the Android OS that prevents the use of Google accounts, Google Play and mobile services. On such devices, the Welcome app must be loaded directly onto the device. This is the same as the Matrix Booking standard supplied devices.
Download and install steps
The Signage app is a licensable product, and therefore, you’ll need to contact your customer success manager to ensure this software is part of your subscription package.
Note: if you have MDM, you won’t need to manually download and install the app. Your MDM solution should do this for you automatically.
To manually download and install the app:
-
Download the latest version of our Signage app (APK, 11.5 MB) using the onboard browser app.
-
Select the file it to open it.
-
A prompt will appear for you to install the app.
-
Select INSTALL to begin the installation process. You may need to select Allow files of this type to be installed.
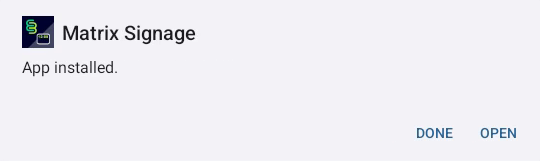
Open the downloaded file to install the Signage app on your device.
Notes:
-
The Signage app is available on the Google Play store.
-
You can only get the Signage app on the iPad version of the App Store.
Set up the app
This section includes:
-
Initial setup
-
Wallpaper and screen pinning
-
Further configuration
-
Automatic staff check-in
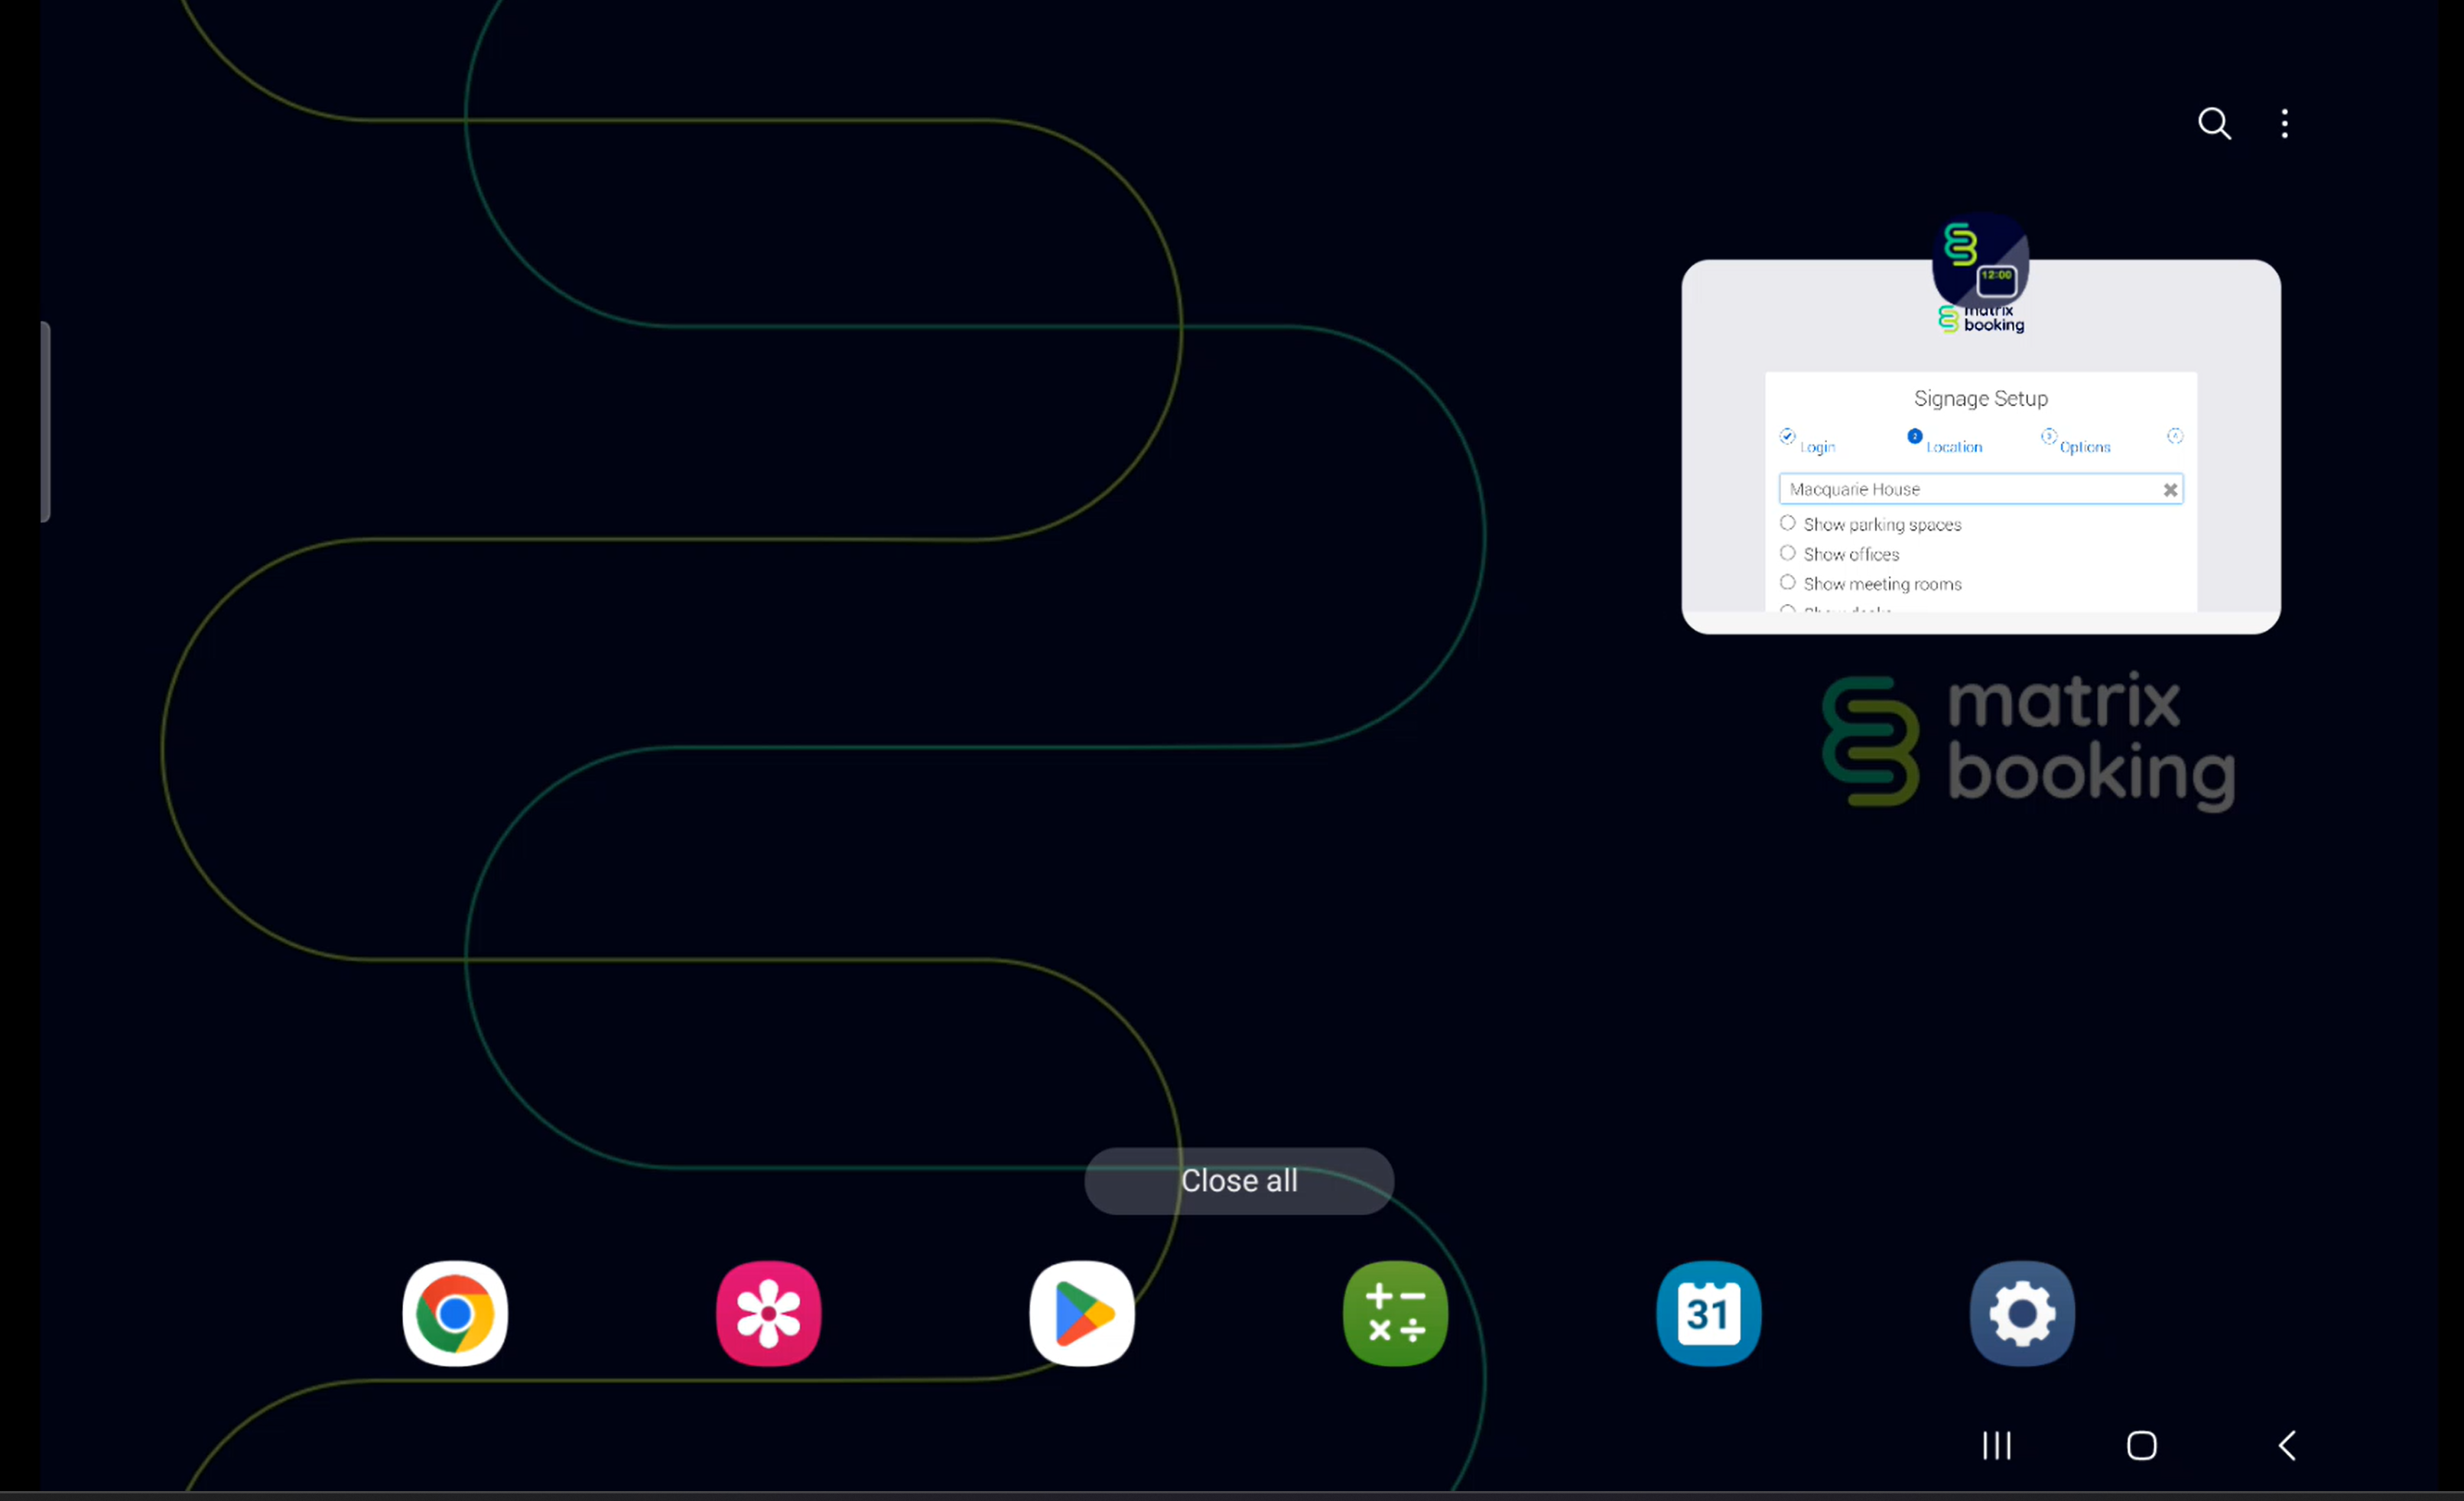
Initial setup
Before setting up the app, you must first on Matrix Booking.
Ask your Matrix Booking administrator to to log in to the Signage app. If you’re doing this yourself, remember that this system user must also be given Location Manager level access to allow it to start and book the room on behalf of others.
To set up the app:
-
Open the app. If the app is on a device that hasn’t already been configured, a login screen will appear and you will need to log in using your Signage user account’s credentials.
-
Enter your Signage user account’s email address and password.
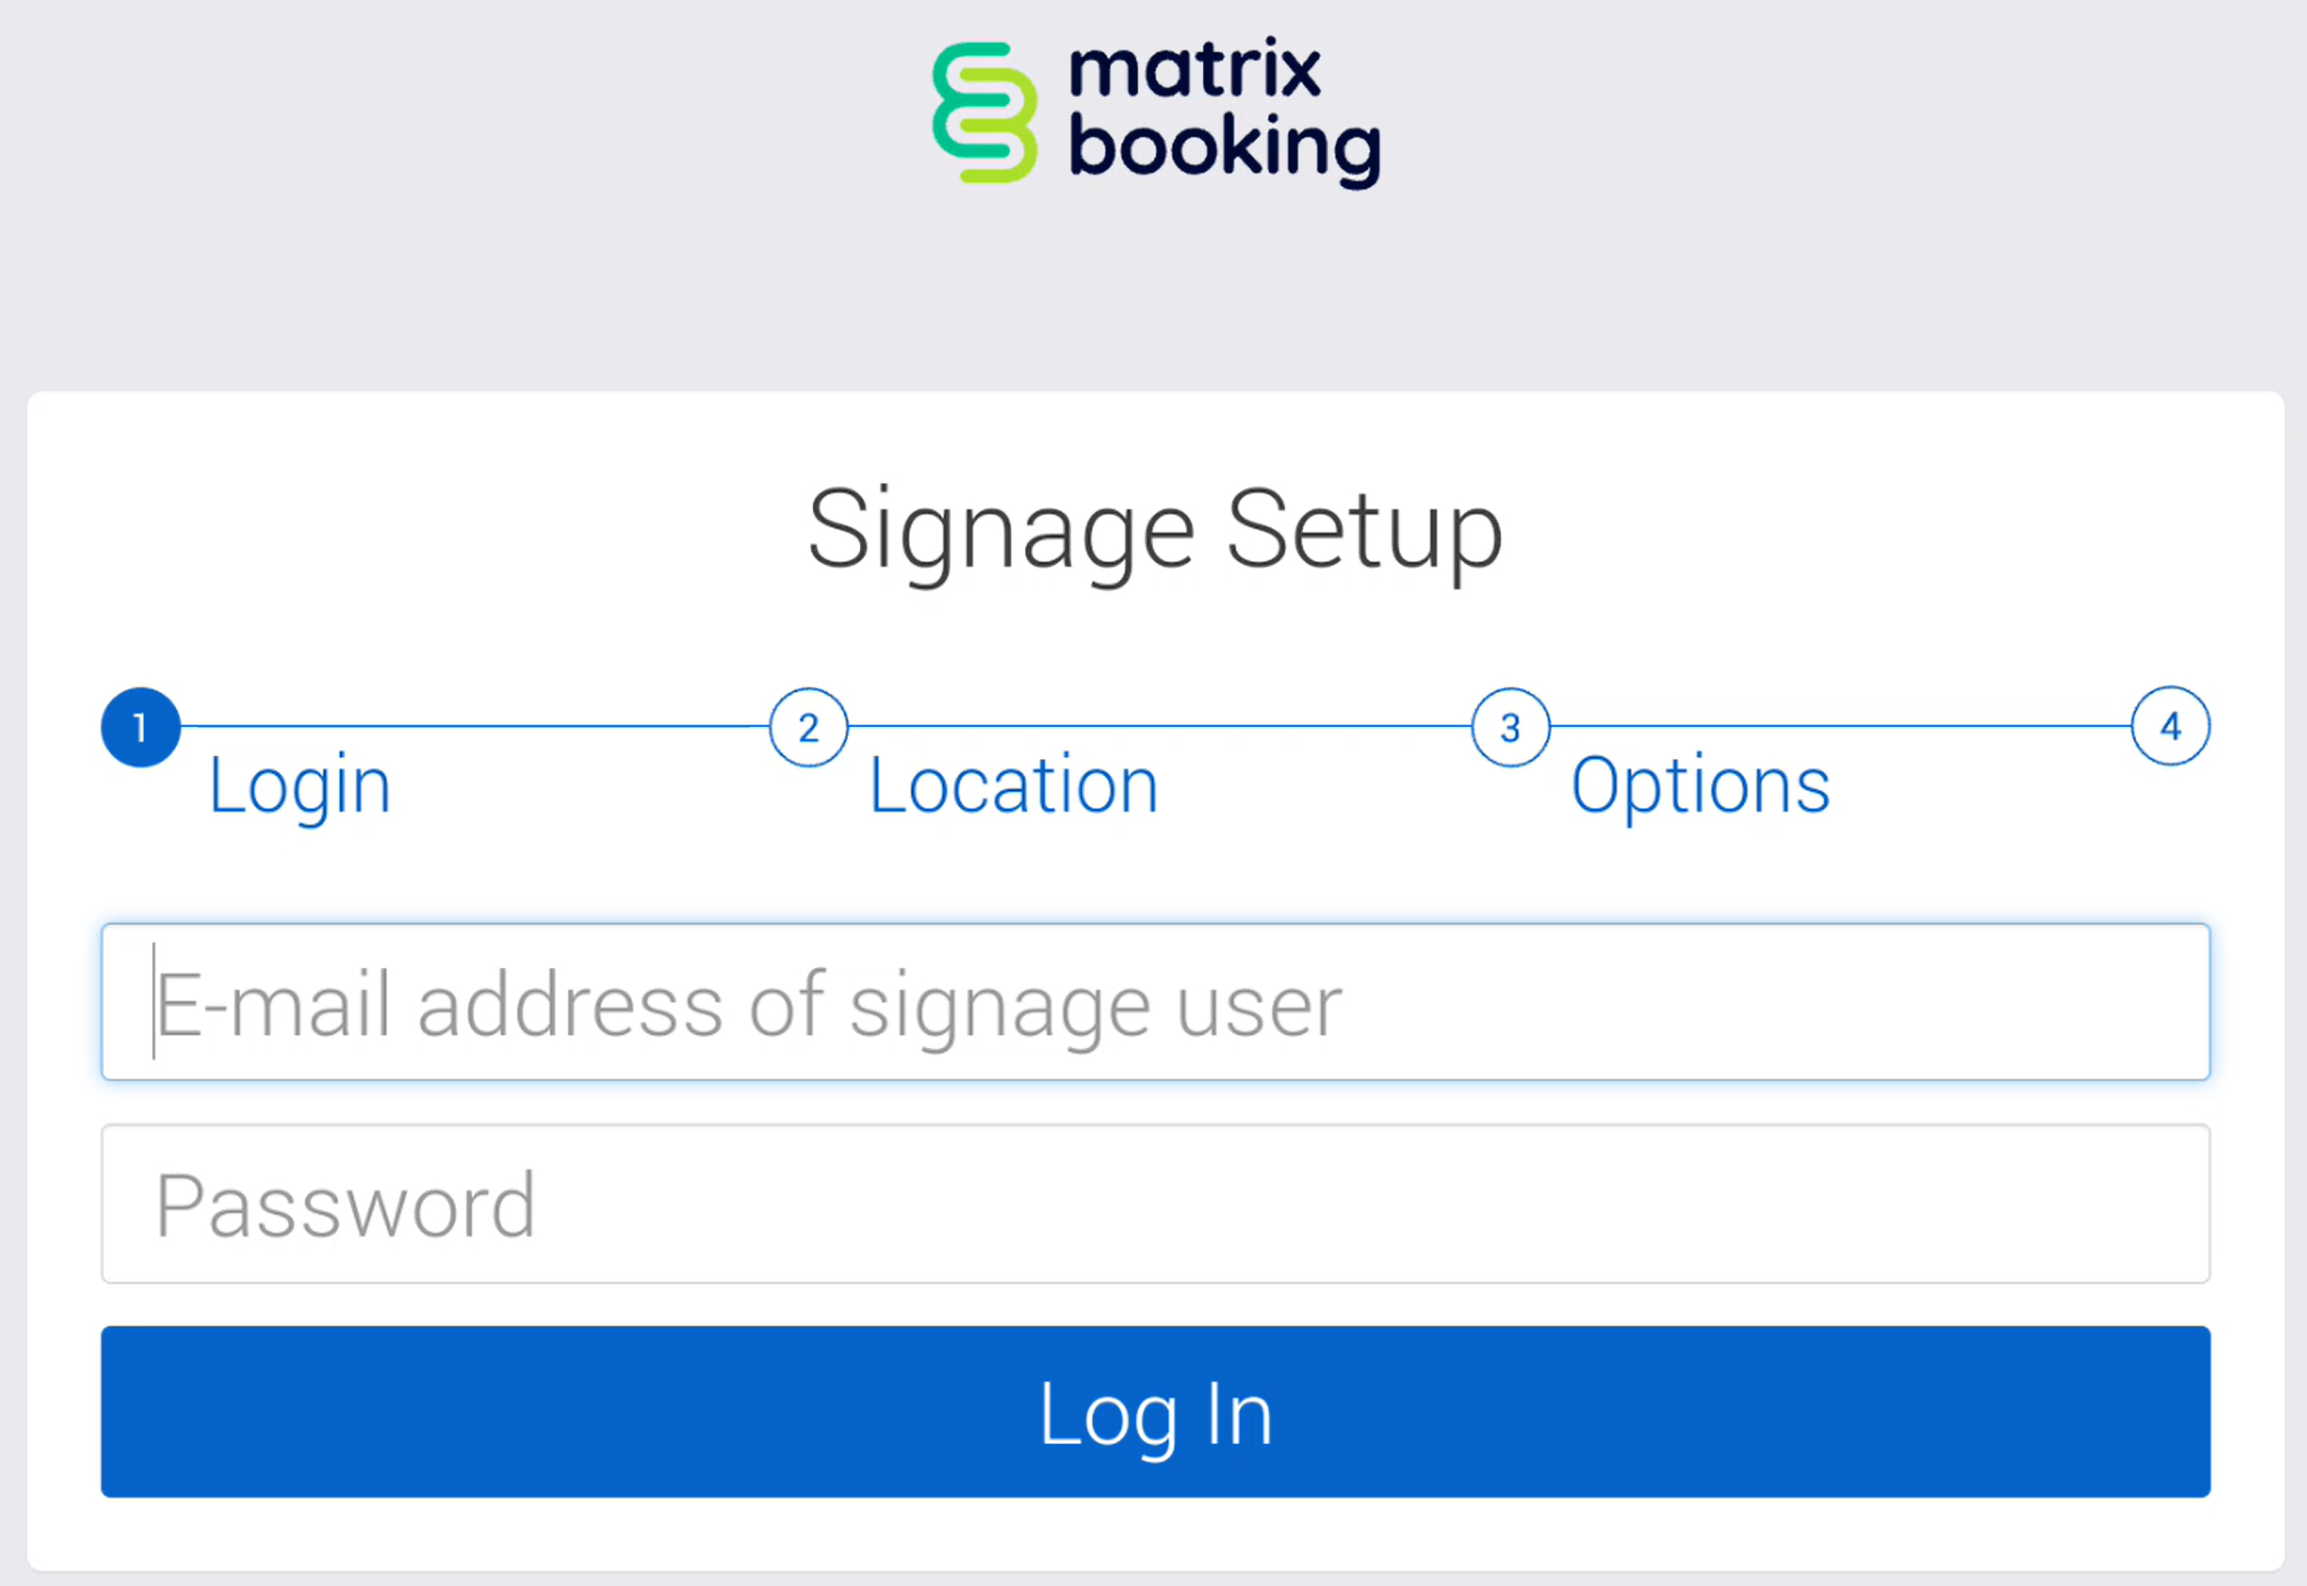
-
Tap Log In.
-
Begin to enter the name of the location or resource for your signage device.
-
Tap it from the dropdown.
-
If you selected a resource, you won’t have to choose what resources you want to show (as there’s only the one resource you selected..
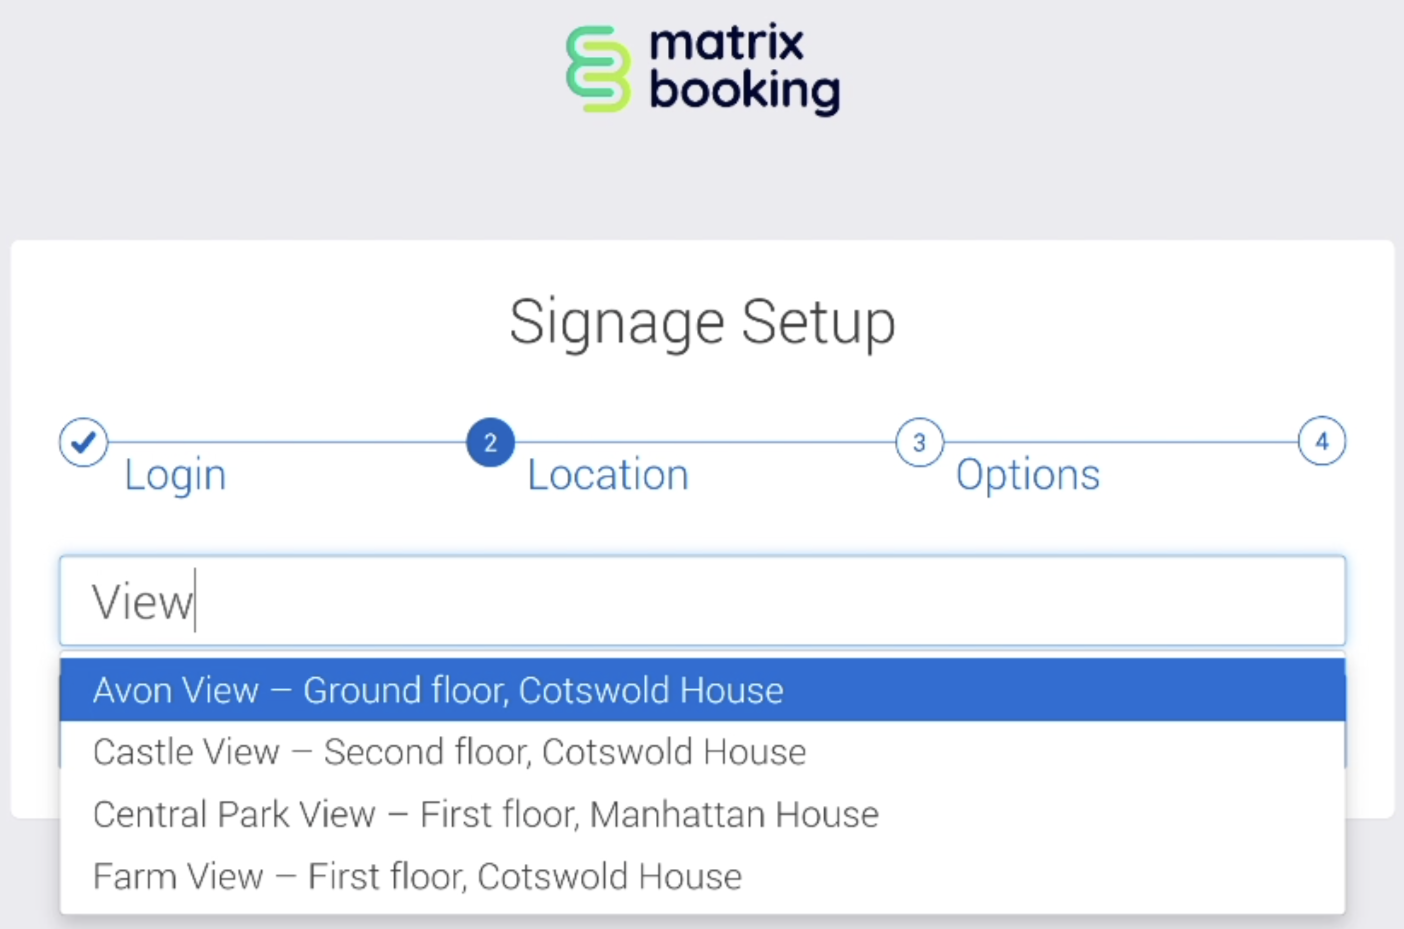
If you selected a location, tap the type of resources you want to show and the specific resources you want to show. This is called “multi-view mode”.
-
Tap NEXT.
-
Tap Show the resource location in the header if that’s how you want your display configured.
-
Tap Allow sleep between and enter the start and end times to allow the device to sleep between certain hours of the day or night.
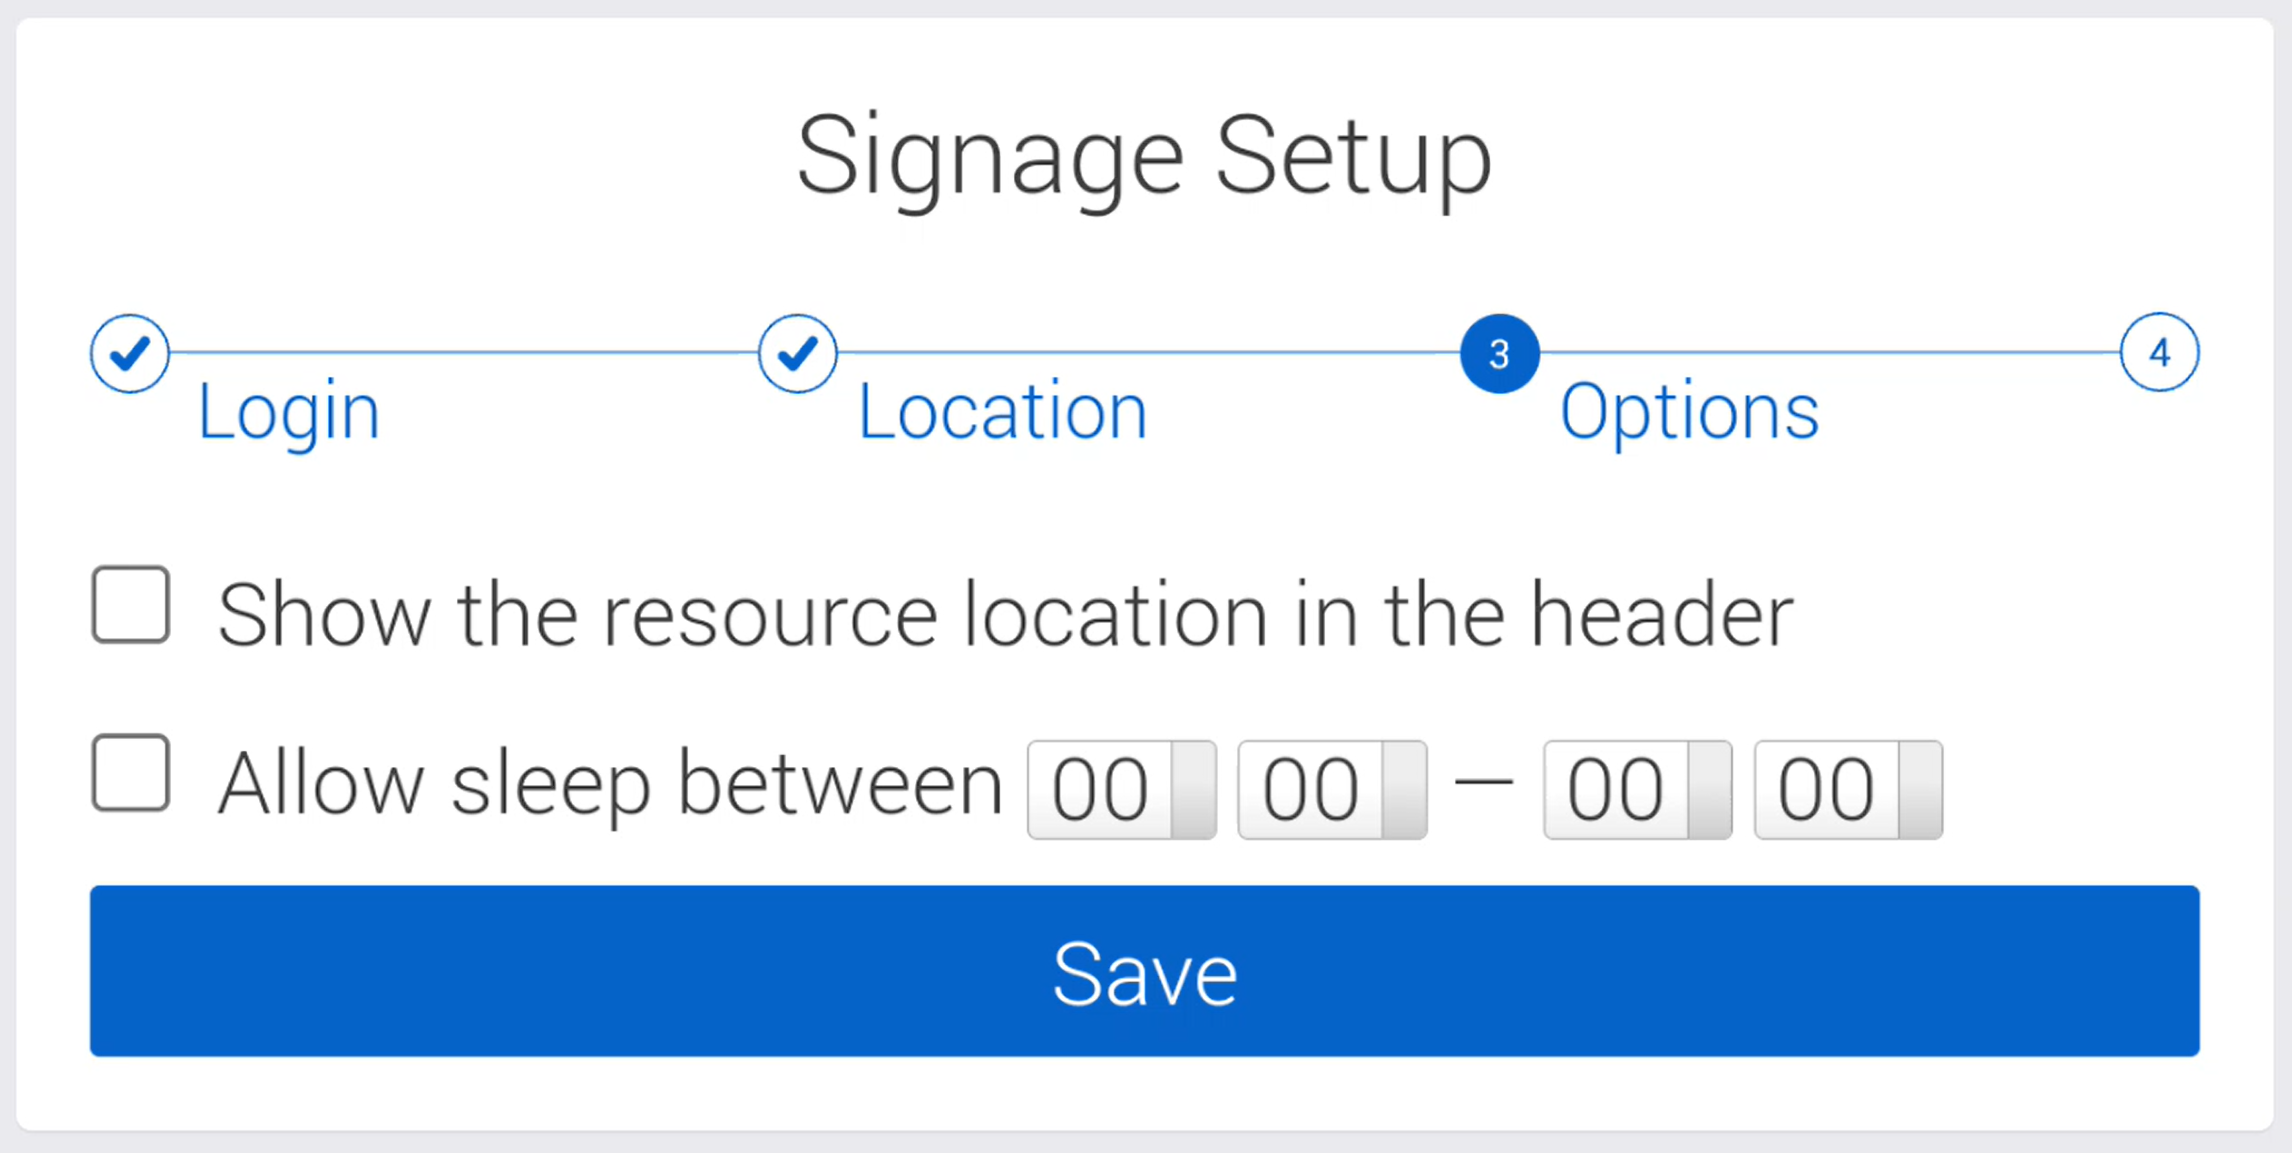
-
Before powering off the device ensure to wait a minimum of 1 minute for the login credentials to be saved to the device.
Notes:
-
If you don’t wait for the minimum time to elapse, your signage device won’t remember the login details and you’ll have to reconfigure the device again.
-
If you book a resource on behalf of someone else and they don’t have access to that resource, the booking will be successful as it’s the booking organiser’s access to the resource that’s considered by Matrix Booking.
Wallpaper and screen pinning
To download the Matrix Booking wallpaper to the device, go to the following link:
https://media.matrixbooking.com/software/signage/Wallpaper-NEW.jpg
When the wallpaper has been downloaded:
-
Go to the device’s settings.
-
Add the downloaded image as a wallpaper for both the lock screen and home screen.
If you’re using screen pinning, you can set the Signage app to the foreground by pinning it. To do this:
-
Tap the button at the bottom of the screen that shows you all the running apps (usually a SQUARE icon).
-
Close all other apps leaving only the Signage app running.
-
Tap the “pin” icon and this will pin the app to the foreground. A dialog will appear asking you to confirm this.
-
Tap Got it.
If you accidentally close the Signage app when doing this, tap the Matrix Booking icon again and it will relaunch and automatically login. Press the running apps button again.
To turn screen pinning off, reboot the device.
Further configuration
Remaining Signage configuration (for example, enabling anonymous bookings or requiring meetings to be started) is maintained using the Admin screens in Matrix Booking. Since such settings tend be based on policies at an organisational or building level, it’s easier to set them from a single place rather than setting them on each device. Changes to any Signage settings that are made in Matrix Booking are applied within 1 minute due to the refresh rate of the app on the devices. There’s no requirement to restart the Signage app on each device.
The app remembers the configuration settings between restarts, so no action is required when the app or device restarts.
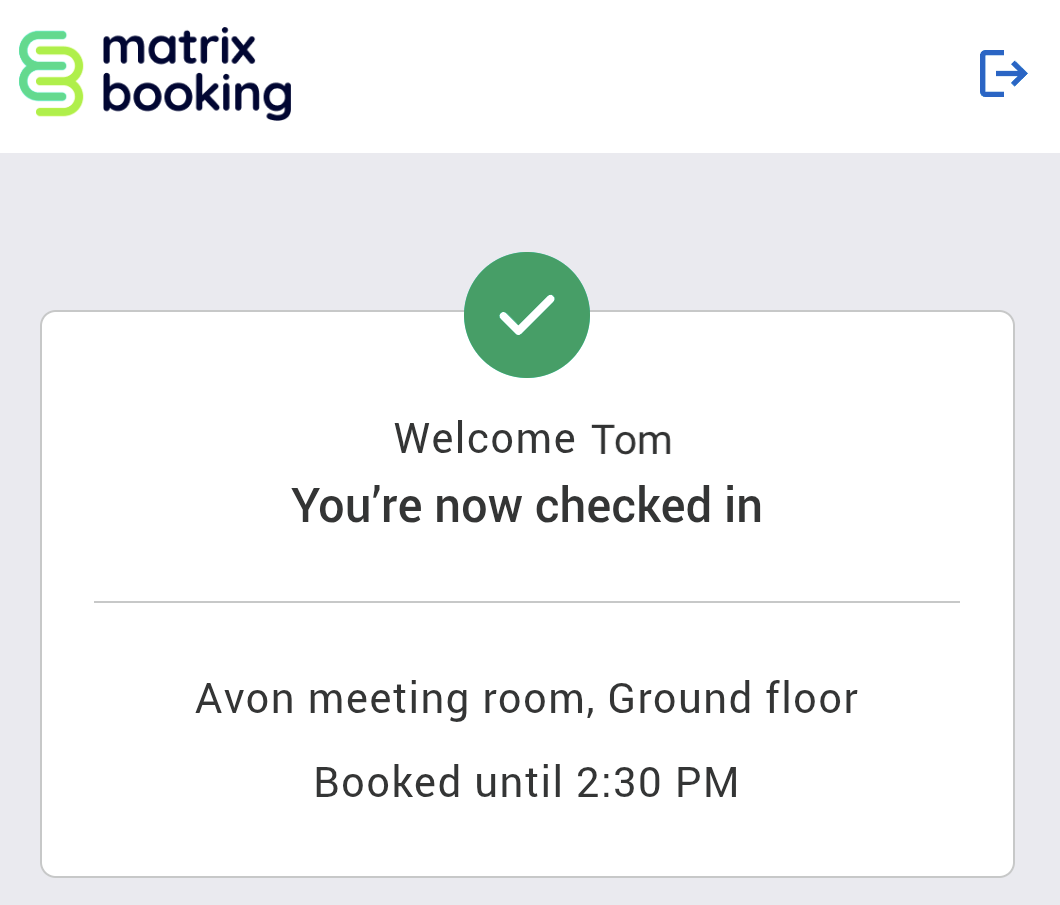
Automatic staff check-in
If you want your staff to be automatically checked in to your building when they check in to their first booking of the day, raise an administrator support ticket to get this feature switched on for you. It will also update the Visitor list and Visitor summary dashboards in Matrix Booking Insight.
Set up QR codes to check in to bookings
Checking in to a booking can be done on the Signage app using QR codes. To set this up:
-
Make sure your signage device has Signage app 1.14.1 or above installed.
-
Raise a support ticket to ask for the Signage QR code feature switch to be switched on for your organisation.
-
Tap Start Meeting on the Signage app. The QR code screen will appear.
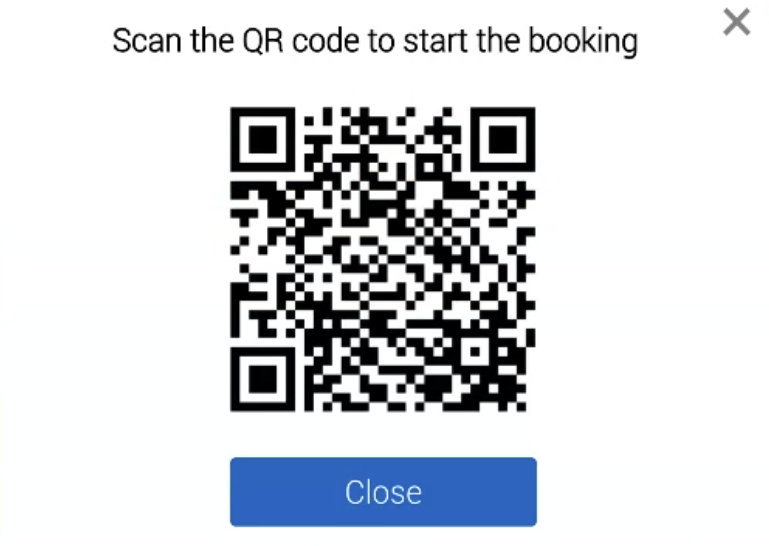
-
Scan the QR code with your phone’s camera app.
-
Tap the link that appears to redirect you to Matrix Booking.
-
If you haven’t already, log in to Matrix Booking on your phone (this will appear automatically from the redirect).
-
After logging in, your booking will be checked in to.
Notes:
-
You don’t need to have check-ins on each resource that has the Signage app on.
-
The QR code overrides the manual check in method on the signage device. If this feature switch is turned on, your colleagues must use their phones to be able to check in to bookings as the QR code check in method will be the only check in method for the Signage app. Any resource Signage settings related to logging in or not logging in will be overridden by the QR code feature switch.
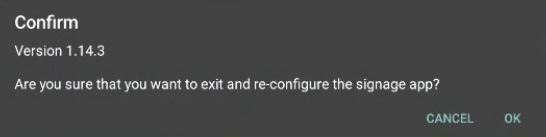
Change the settings
You can reconfigure the app (for example, pointing to an alternative room) on a device that has already been configured:
-
Tap the Matrix Booking logo in the top right hand corner 5 times consecutively within 3 seconds.
-
A prompt will appear displaying the installed version of the Signage app. It will ask you to confirm that you want to exit.
-
Tap OK or Exit.
-
Reconfigure the app.
Notes:
-
After going through the reconfiguring process, any existing configuration will be cleared and the initial setup steps can be followed again.
-
If you’ve forgotten the password, your Matrix Booking Administrator can help you with this.
Check version number
Tap 5 times consecutively in the top-right corner of the app. The app version will appear in the Reconfigure settings dialog.
Log the kiosk user out
To log out of the Signage app:
-
Tap 5 times consecutively in the top-right corner on the Matrix Booking logo. The Log out dialog will appear.
-
Tap OK. The dialog will close and you’ll be redirected to the Log in page.
Troubleshooting
This is the list of our troubleshooting articles:
-
Software-related troubleshooting:
-
Hardware-related troubleshooting: