This page explains how to manage user accounts:
This page will also give information on what happens to bookings that a user has made and becomes deactivated (for example, a member of staff leaves your organisation). These are called orphaned bookings.
Self-registration
You can check if your organisation has self registration switched on and which domains are set up for your organisation:
-
Contact our Support Team to get self registration switched on for your organisation.
-
Log in to Matrix Booking as an administrator.
-
Select Admin in the navigation bar.
-
Select Login Methods under the Security & Integrations section.
-
Navigate to the Self-registration section.
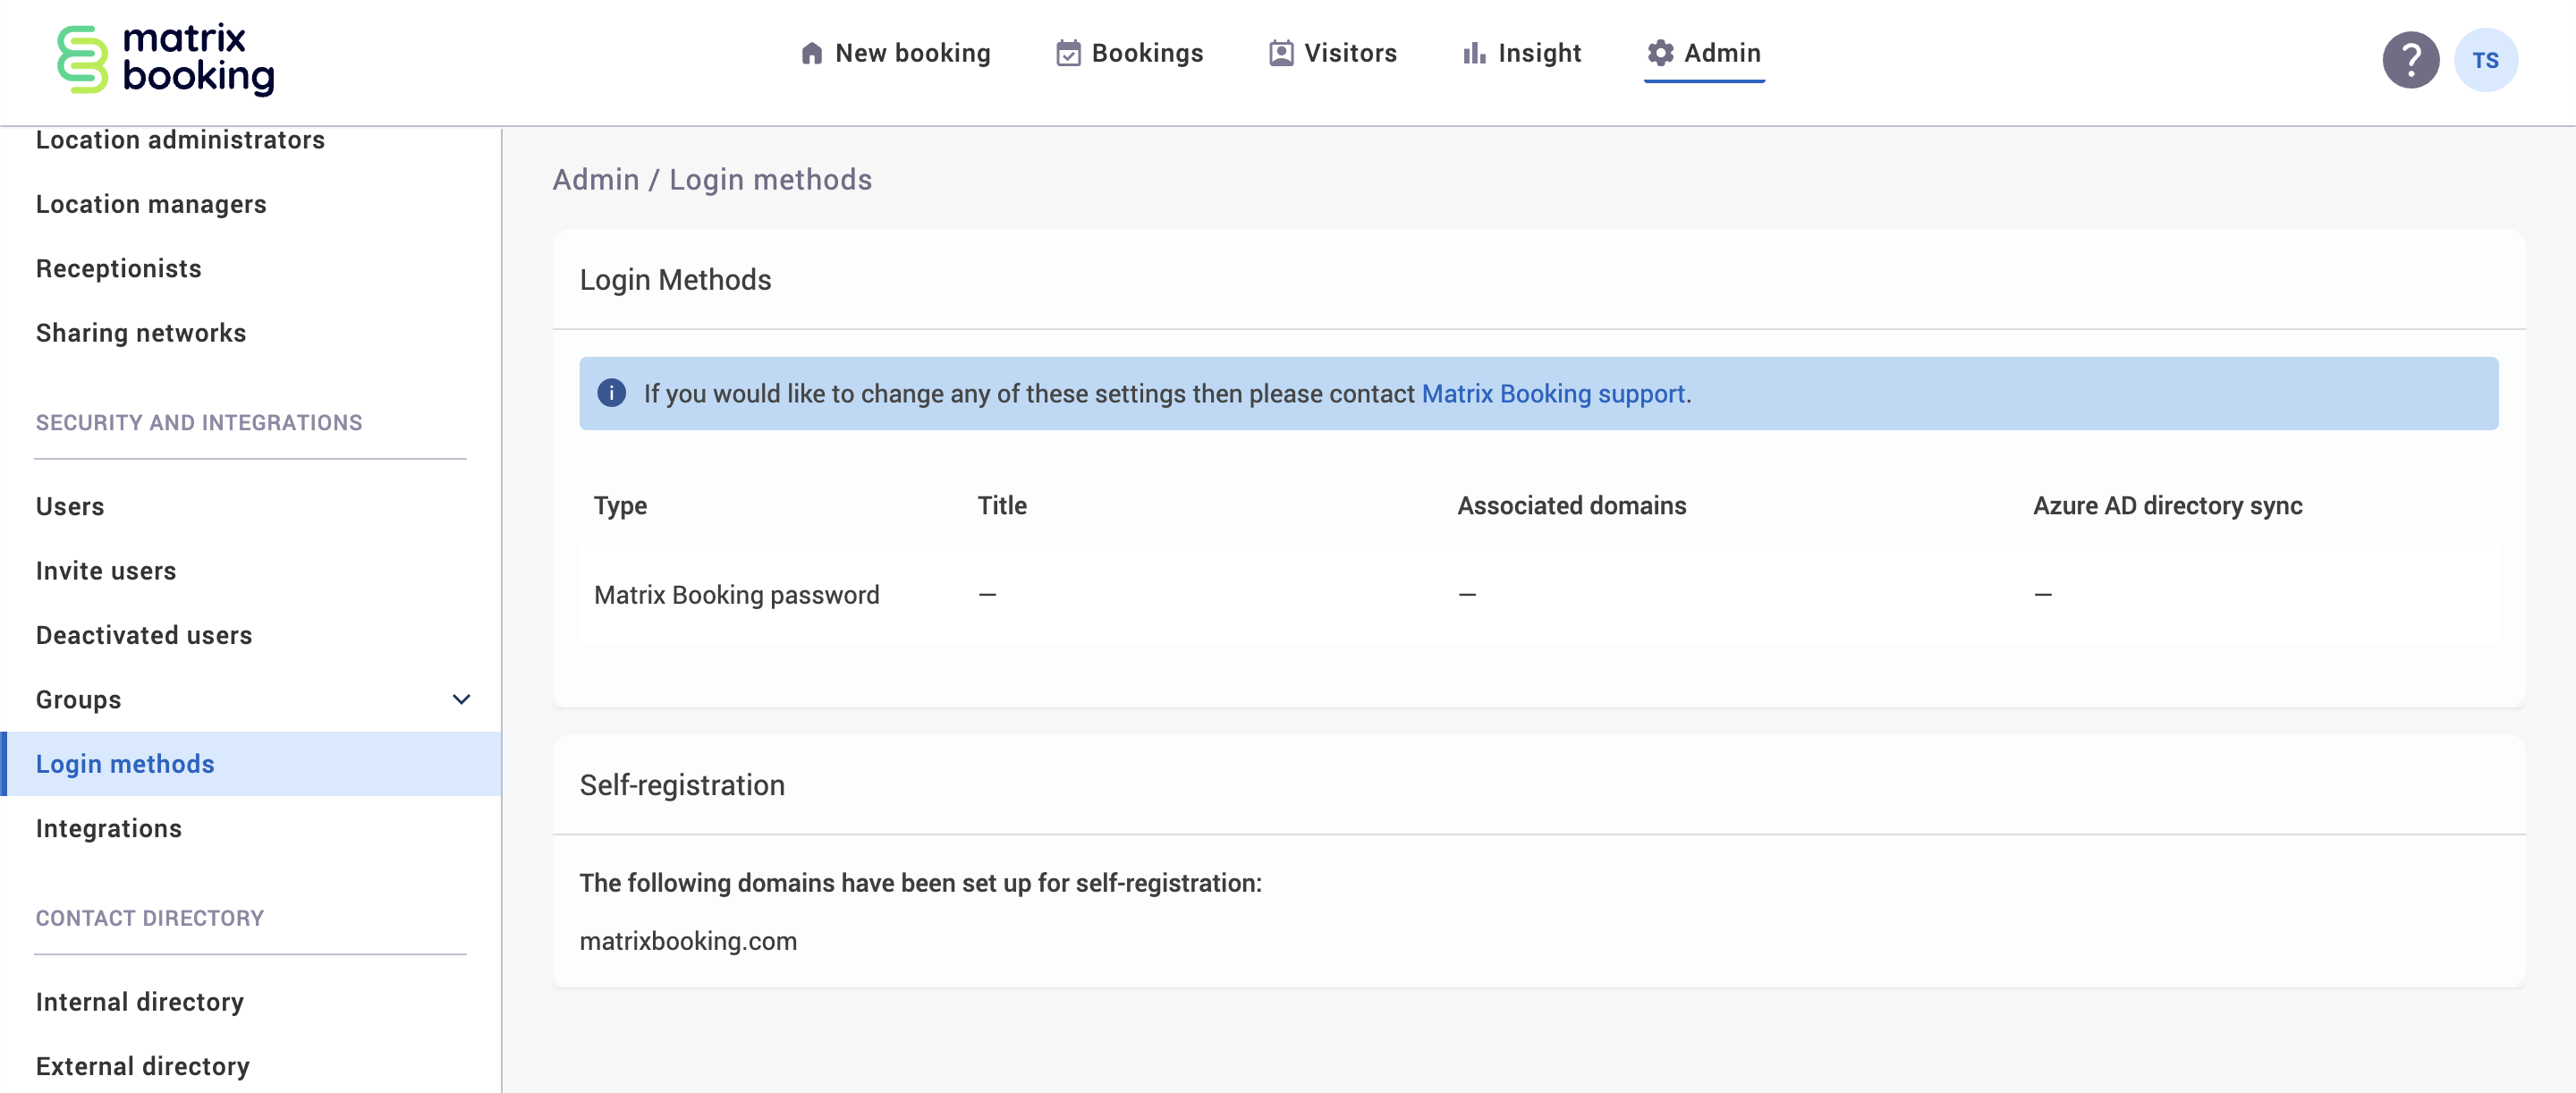
Provided the email address matches 1 of the allowed domains set up for your organisation, users can self-register to Matrix Booking. They need to:
-
On the login screen, select Not registered? Click here to sign up.
-
Enter their email address.
-
Select Sign-up.
The user will be sent an email with a link that allows them to complete the sign-up process. If they select the email link, it will take them to Matrix Booking where they can provide their contact details and create a password.
Notes:
-
The email link for self sign-up is only valid for 7 days.
-
To add allowed domains to your setup, contact our Support Team.
-
Email domains that span beyond your intended user base aren’t permitted. For example, an organisation called Matrix Booking should only have domains ending in
@matrixbooking.com.
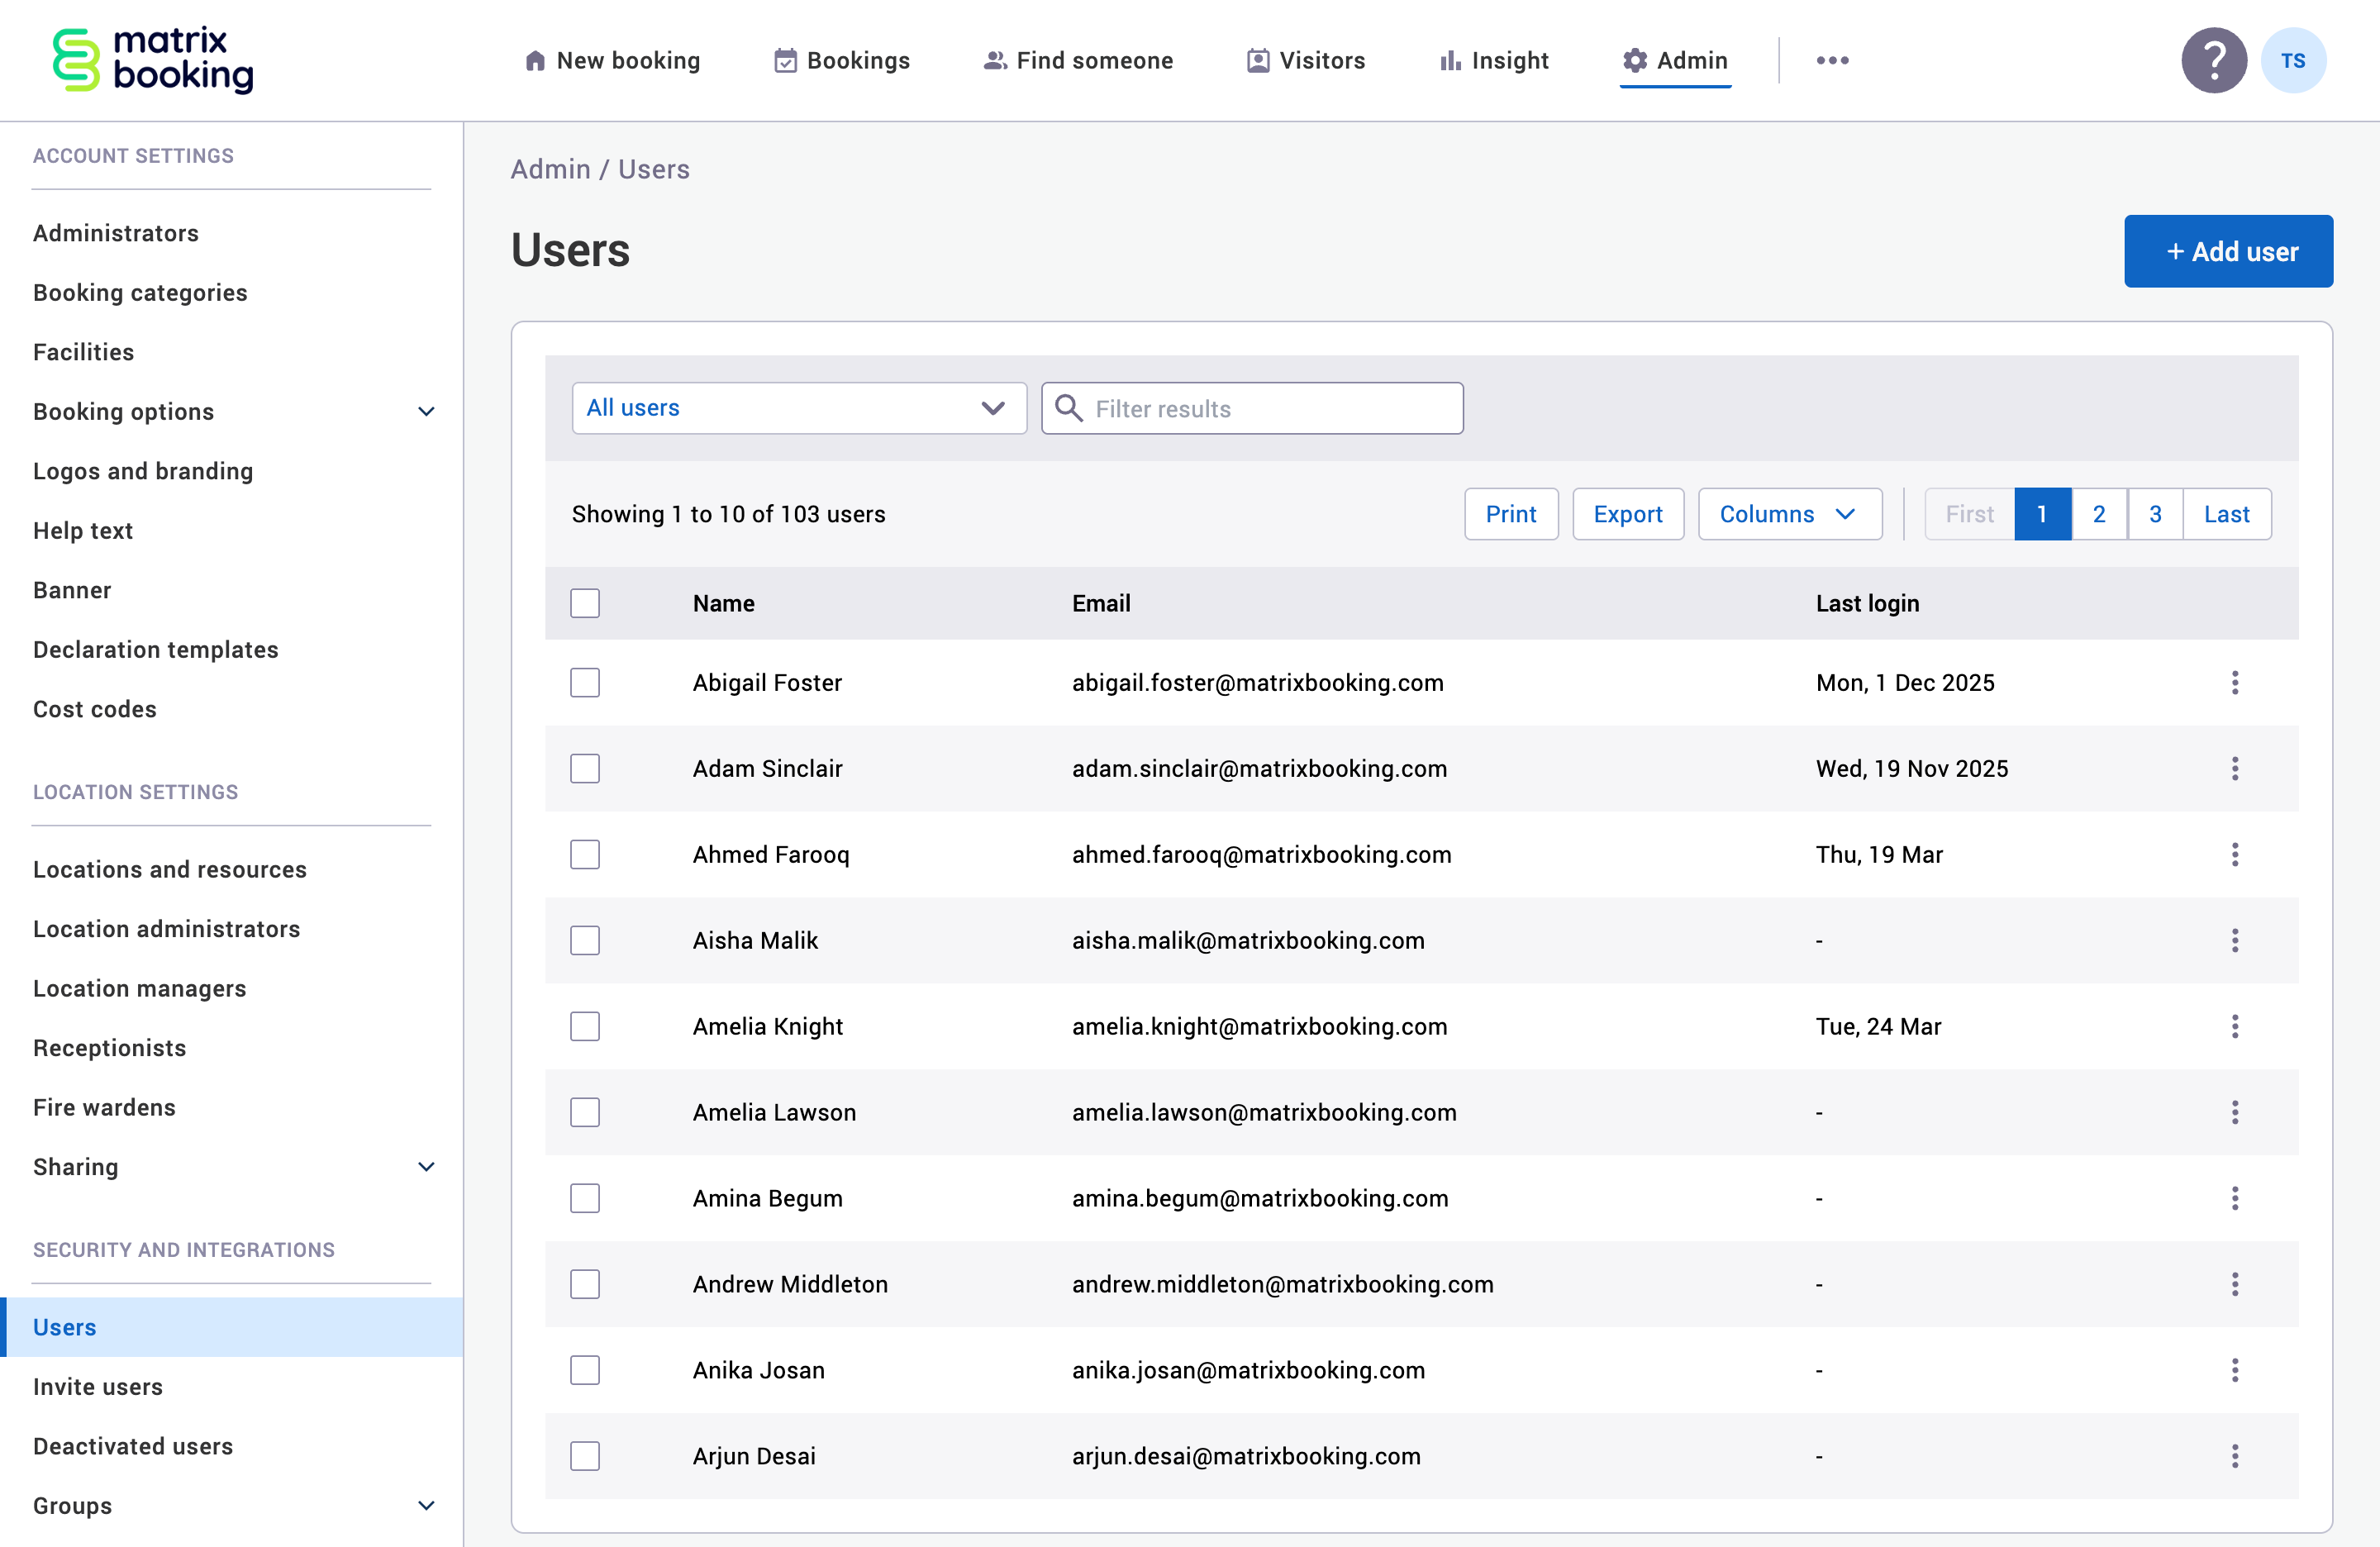
Access the Users screen
To access the Users screen:
-
Select Admin in the navigation bar.
-
Select Invite Users under the Security & Integrations section in the side menu.
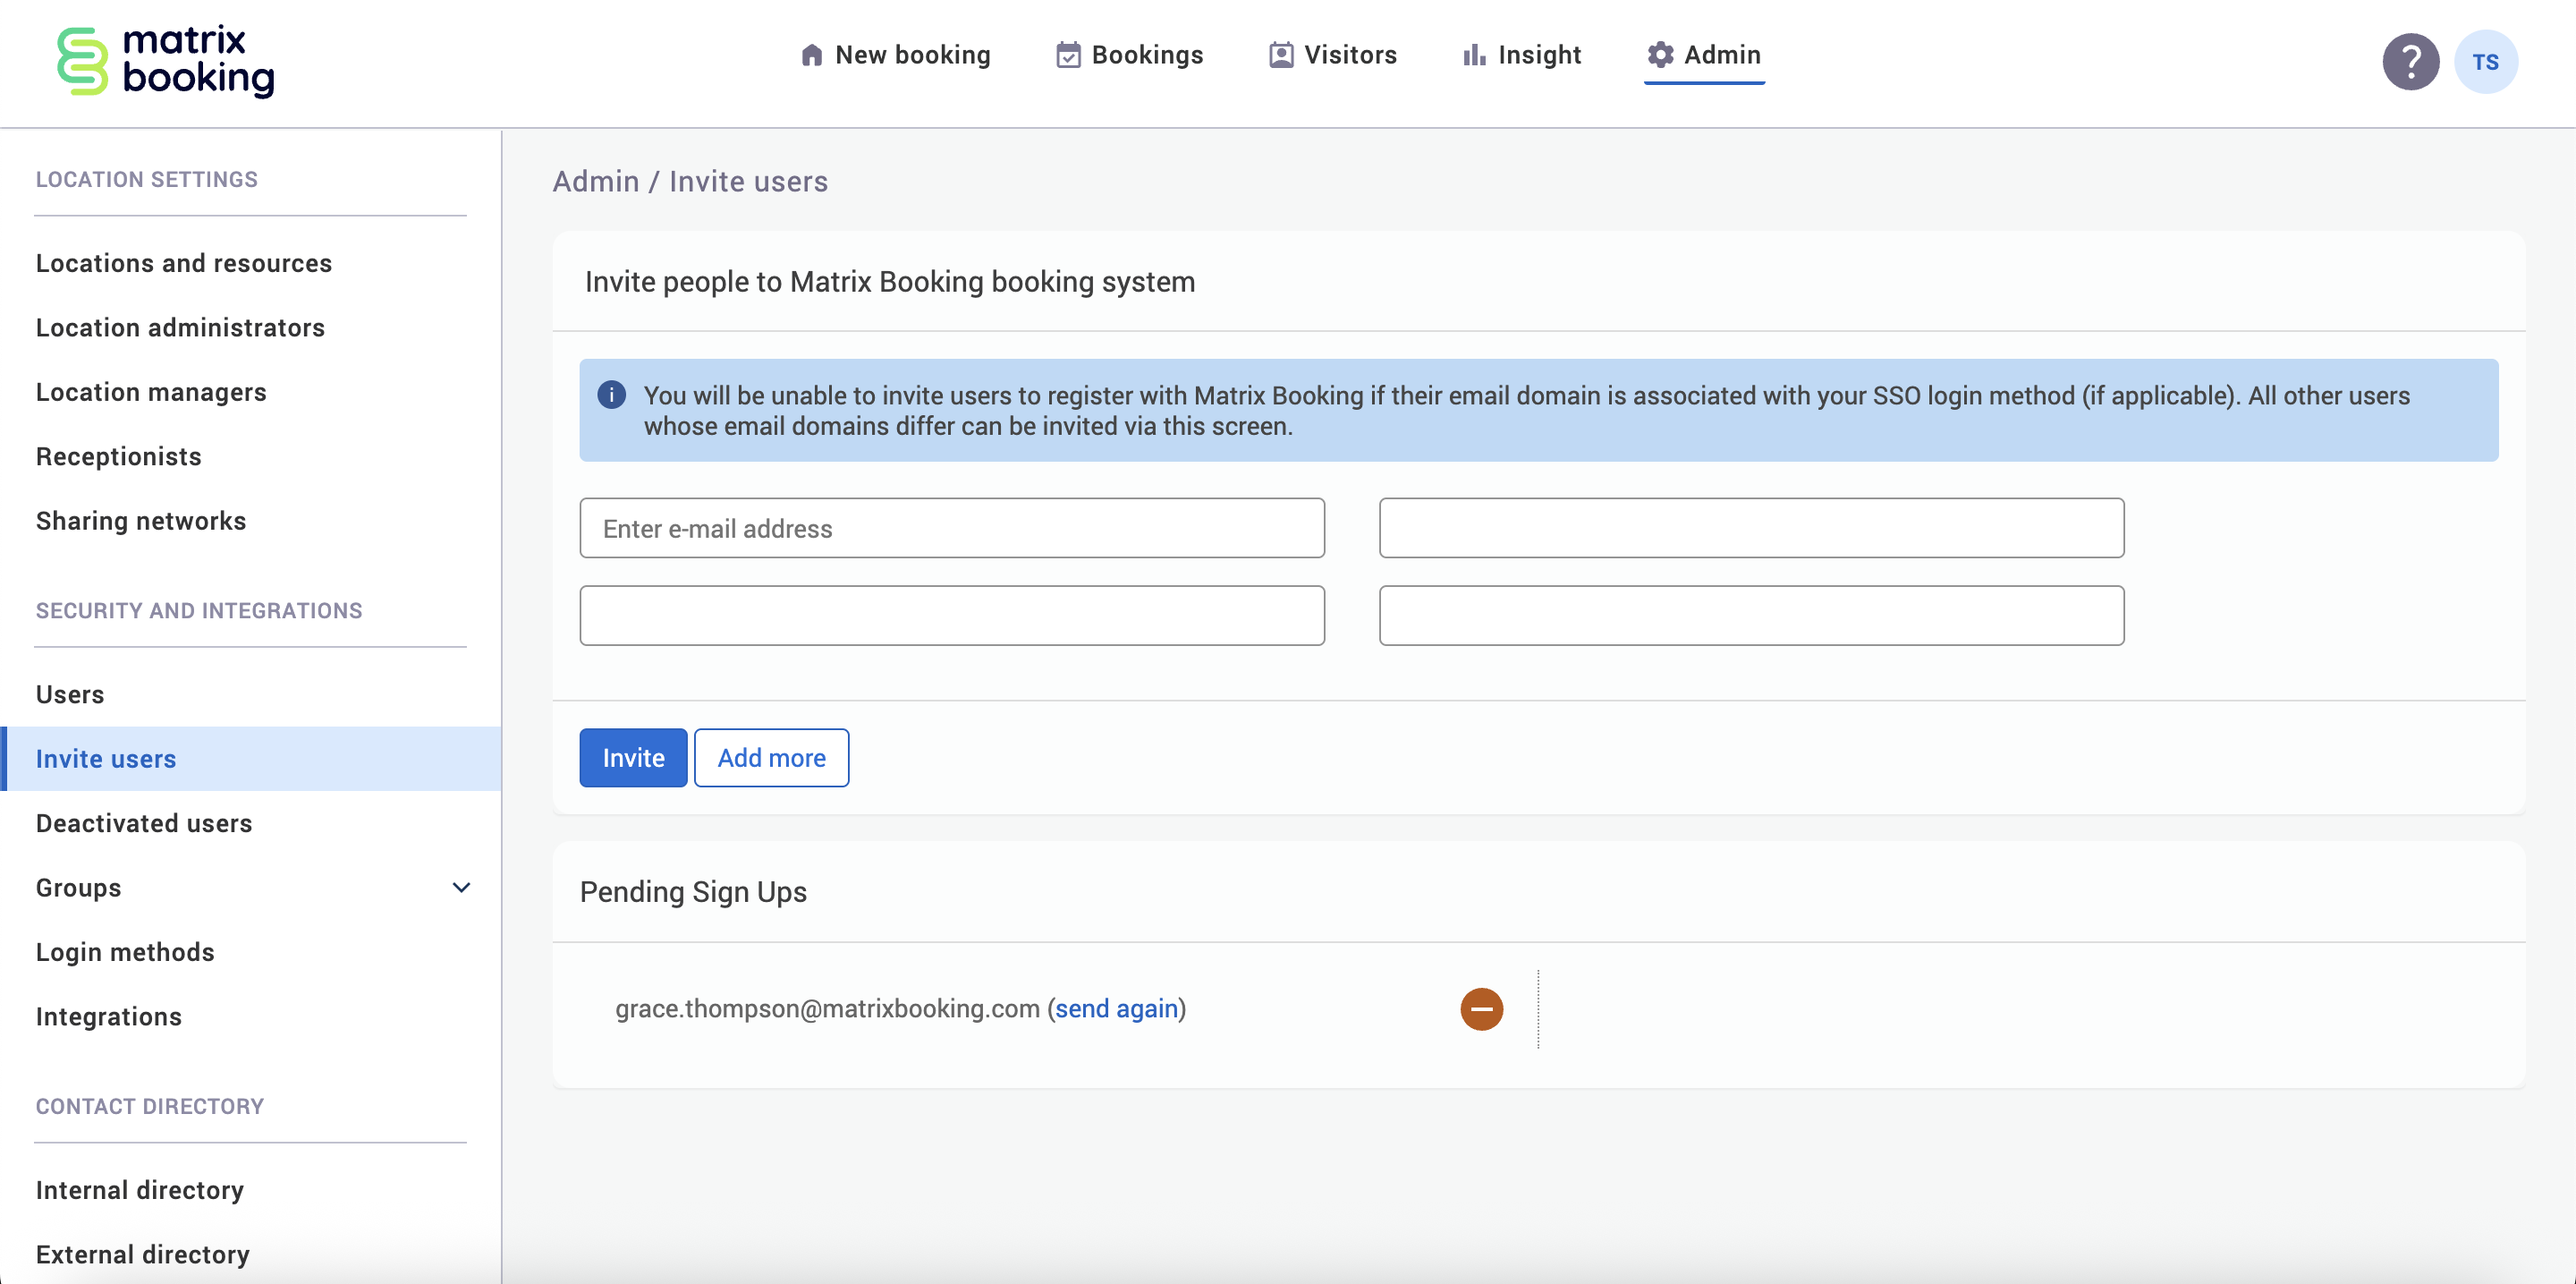
Invite a new user
Administrators can invite people to register as a user or connect to your directory. To invite a new user:
-
Select Add more to add more rows for more people.
-
Enter the email addresses of the people you want to add into the Enter e-mail address text boxes.
-
Select Invite.
-
An invitation email will be sent to their inboxes and they will appear in the Pending Sign Ups section.
-
Select send again to resend the invitation email.
-
Select the – Remove button to take that user off the list. They won’t be able to register with Matrix Booking.
Notes:
-
Invitation emails expire after 7 days. After that, a new one will need to be sent out.
-
The invitation email may end up in the invitee’s junk folder. Ask them to check if the email doesn’t appear in their inbox.
-
Users can’t be invited to register with Matrix Booking if their email domain (for example,
@matrixbooking.com) is associated with your single sign-on (SSO). All other users whose email domains differ can be invited using this screen. For more information, see our troubleshooting article.
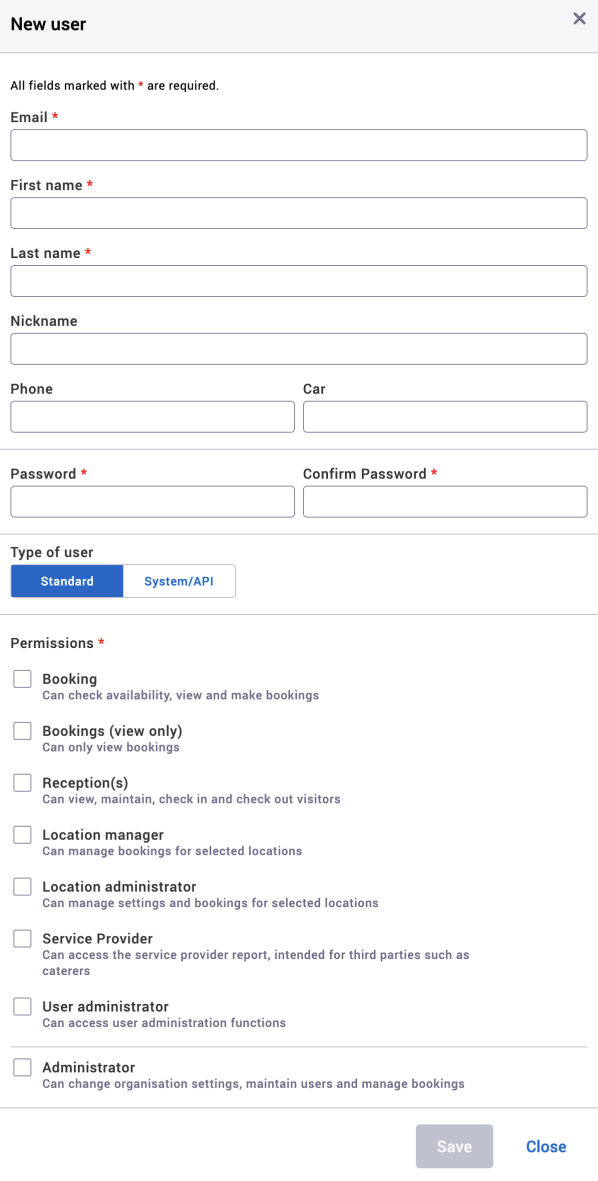
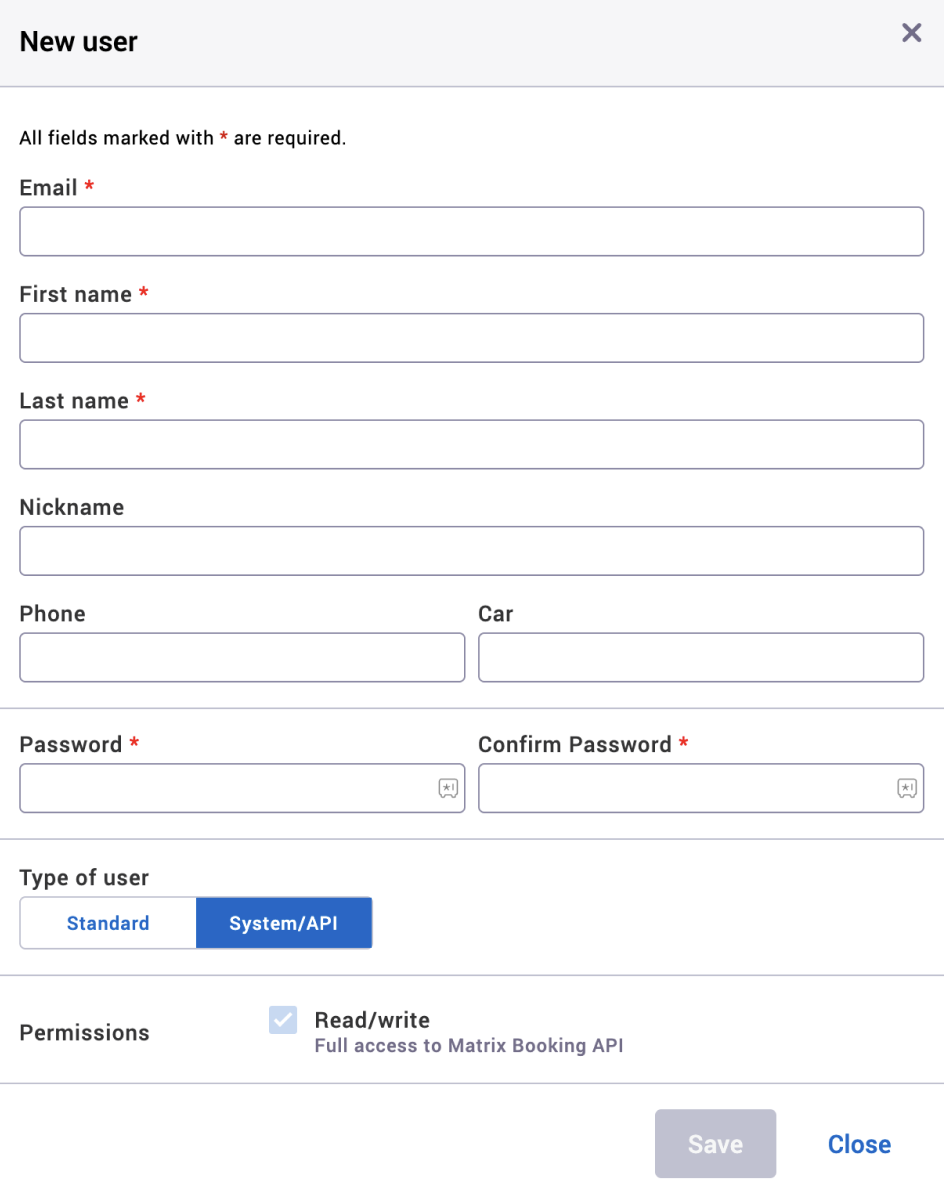
Add a new user
To add a new user:
-
Select New User in the filters ribbon. The New User dialog will appear.
-
Enter their email address.
-
If the first and last names can be extracted from the email address, they will be auto populated.
-
Enter their first and last names if the auto populated results are incorrect.
-
-
Enter and re-enter a password for them.
-
Enter their other details you have available (for example, phone number).
-
Select the type of user they need to be based on the type of access they need (see Access profiles and user accounts).
-
For a normal user, select Standard.
-
For an app account (for example, Signage app), select System/API.
-
If required, enter the cost code and access card number.
-
-
Select Save when finished.
Note: the user can change their password once they log in for the first time.
After adding a new user
Once you have set up the new user:
-
Email them their user email and password.
-
Ask them to log in.
-
Their email address and login will be immediately active.
Optional text boxes
The optional (not required) text boxes are:
-
nickname
-
phone number
-
car registration
-
cost code
-
access card number
Warning: all other text boxes are mandatory and required.
Add a signage or kiosk user account with SSO
If you’re using signage or kiosk devices with our apps, normally these will have been set up for you in advance. However, if you’re providing your own hardware and just licensing the software only, you may need to set up your own login for the signage or kiosk apps on your devices. As this user account will never be used for sending or receiving emails, it doesn’t need a genuine email address.
To set up a signage or kiosk user account:
-
Select New User in the top-right. The New User dialog will appear.
-
Enter the email address.
-
If your domain is
@matrixbooking.com, we suggest using an email domain like this:room.signage@matrixbooking.com -
If you have multiple buildings, you can add the building name to the email prefix like so:
room.signage.hq@matrixbooking.com -
If the first and last names can be extracted from the email address, they will be autocompleted.
-
Enter the first and last names if the autocomplete is incorrect.
-
-
Enter and re-enter a password for them.
-
Select System/API in the Type of User section.
-
Enter any optional details that may be required.
-
Select either of the following and the dialog will close to return you to the Users screen:
-
Save to keep your changes.
-
Cancel to discard your changes.
-
-
Select Location managers under the Location Settings section in the side menu.
-
Assign this account as a location manager for the building it will be managing.
Note: users are expected to update their profile page when required (for example, name or detail changes).
Add a Signage or Kiosk user account without SSO
If you don’t use an SSO product with us, the process is the same as above, but you can use your organisation’s email domains.
Import users in bulk
If you have a lot of users in your organisation, you can import them in bulk. By default, this functionality is switched off. Additionally, to import users, a template is used.
To import users in bulk:
-
Raise a change setup support ticket to get the Import user feature switched on.
-
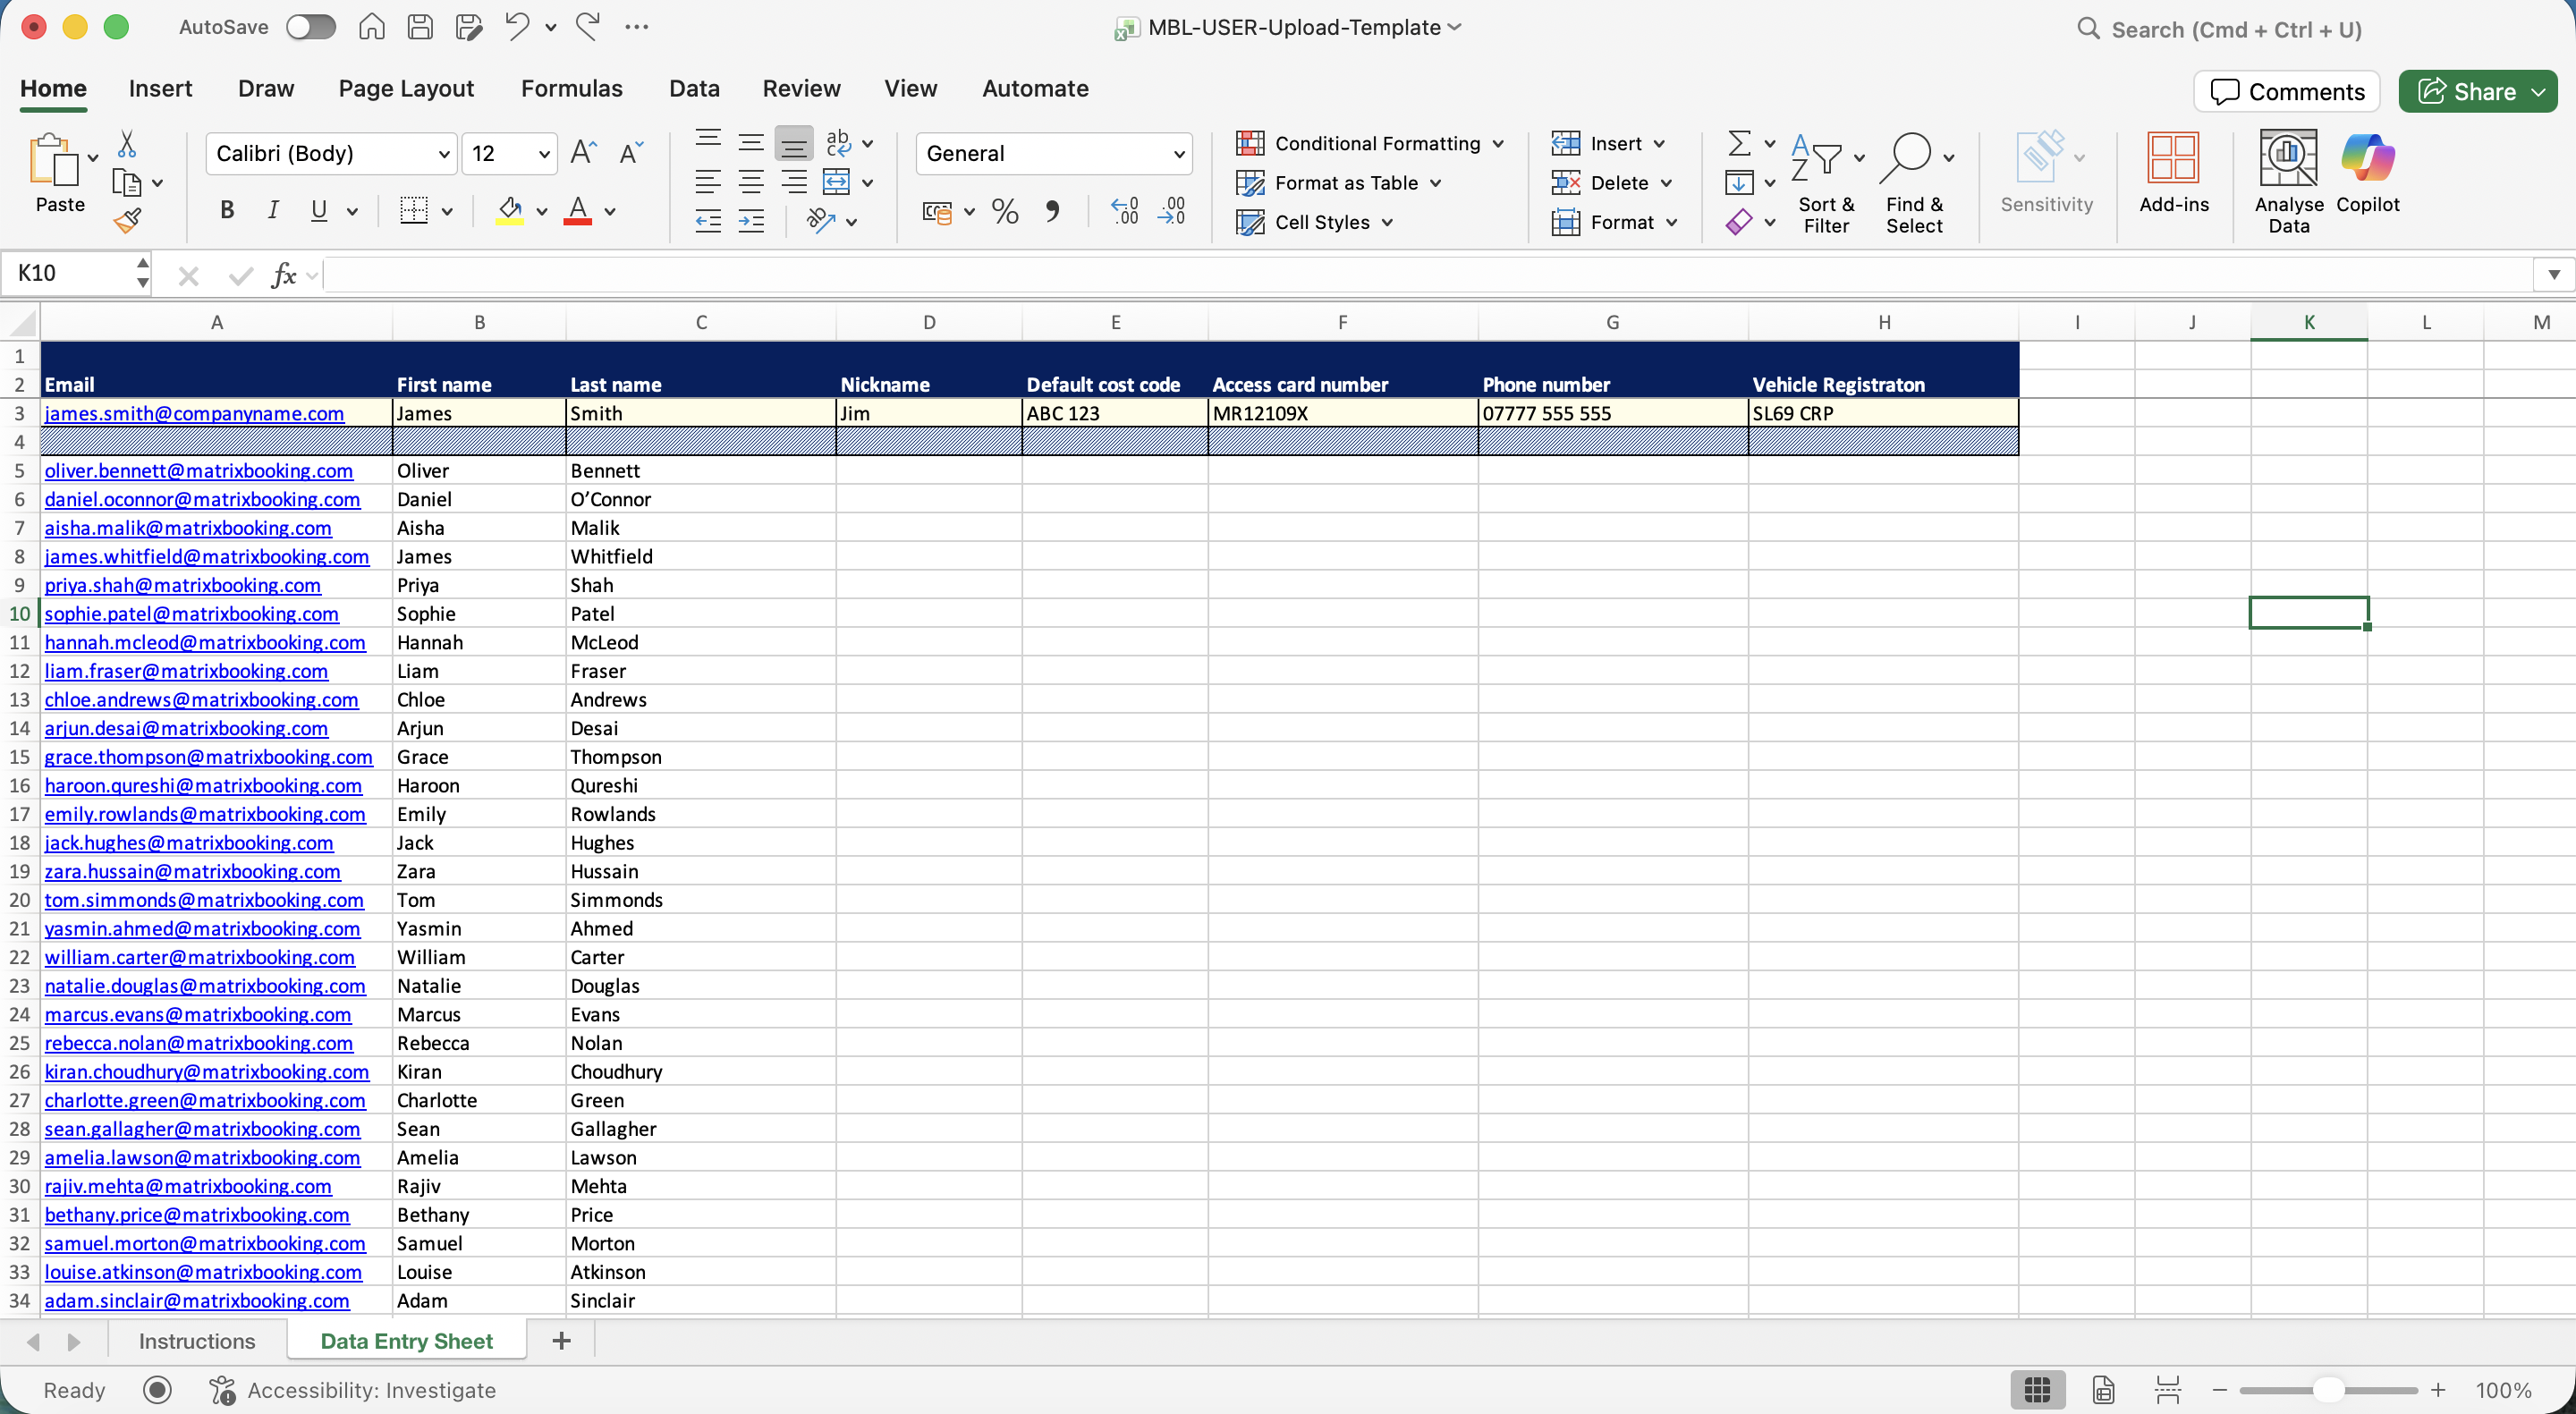
Open the template to the Data Entry Sheet tab.
-
Enter the details for each user in the spreadsheet. The first 3 columns are mandatory (email address, first name, and last name). All other fields are optional and can be left blank.
-
Delete the row with the example user (James Smith) at the top of the spreadsheet.
-
Delete the Instructions tab.
-
Once the template is complete, save the file as a
.csvfile.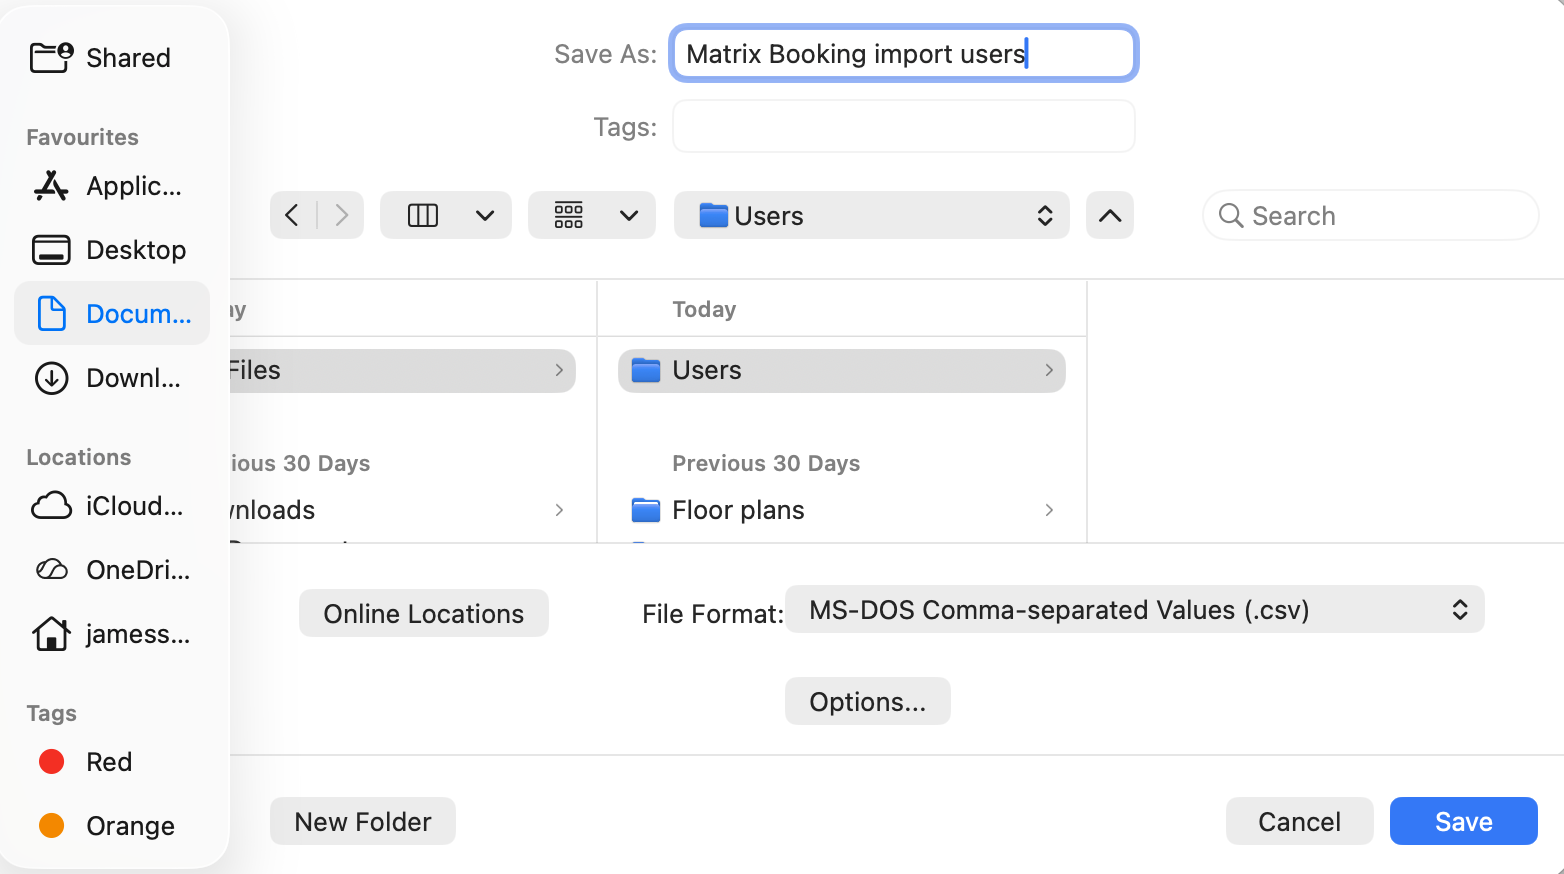
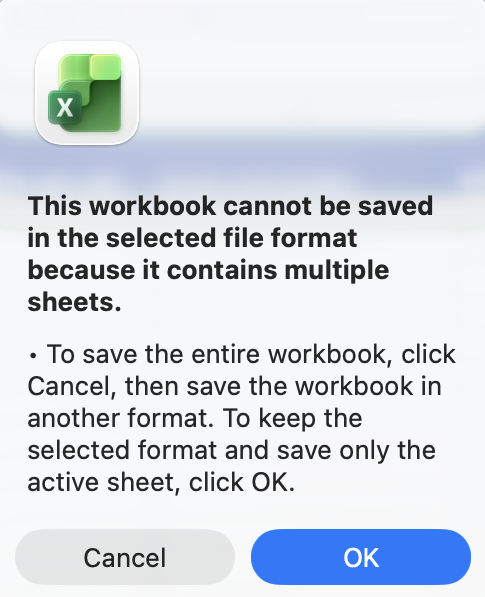
-
Microsoft Excel may state that you can only save the currently active worksheet. If this happens, select OK (or equivalent).
-
Once saved, avoid opening the file again in Microsoft Excel. The programme will attempt to reformat it.
-
Open the file with a text editor (for example, Notepad on Windows or Textedit on Mac). Microsoft Word or Notes on Mac add formatting which interferes with the
.csvfile. -
Delete the commas (,,,,,,,) on the top line and the column header row underneath.
-
If there are any commas (,,,,,,,) or spaces underneath your user list, delete them too.
-
Make there aren’t any spaces after the final user’s entry in the list
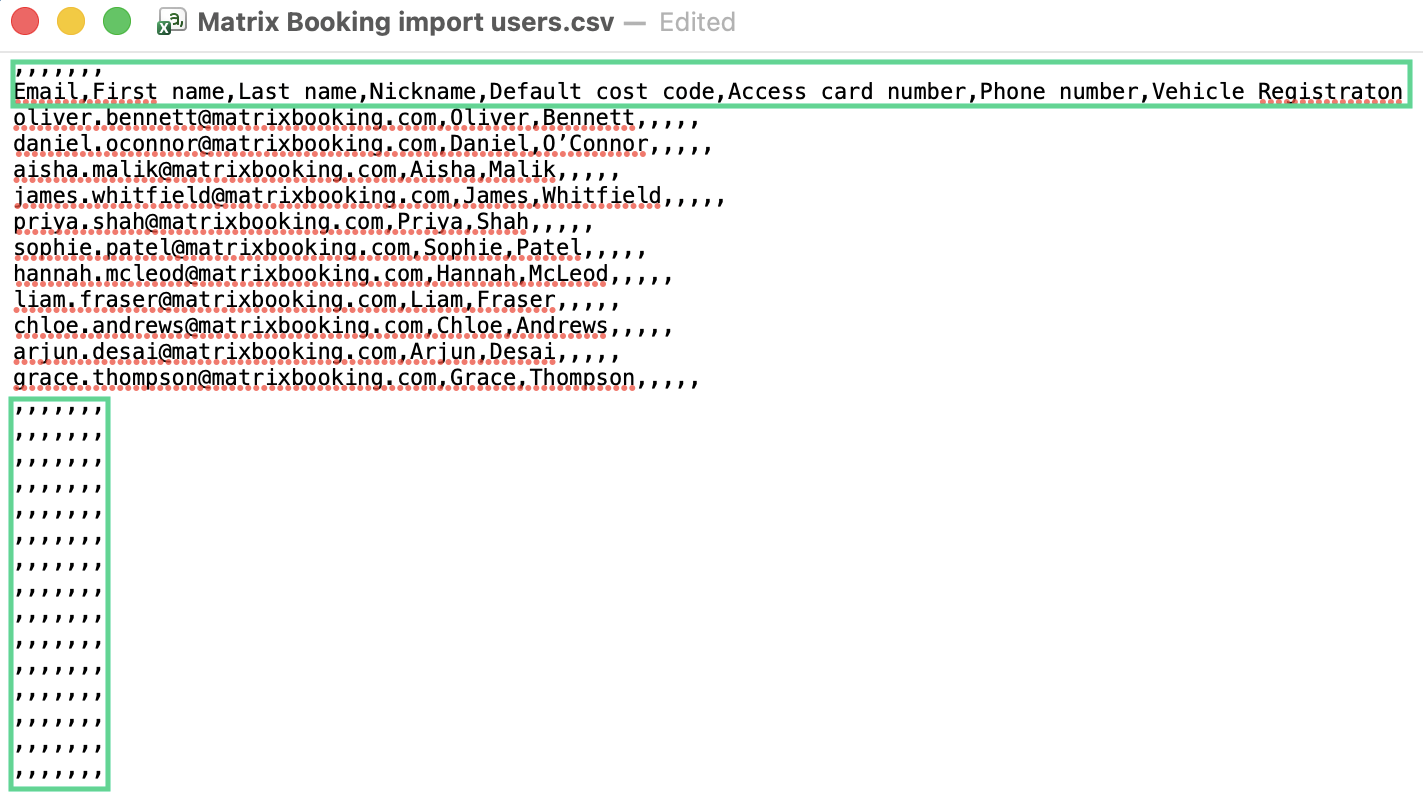
-
Save the text editor file. This may have saved automatically.
-
Select Admin in the navigation bar.
-
Select Import users under the Tools section.
-
Select + Upload a file. The Upload a file dialog will appear.
-
Select Import from CSV. The file explorer will appear.
-
Locate your
.csvfile and select Open (or equivalent). The file explorer will close.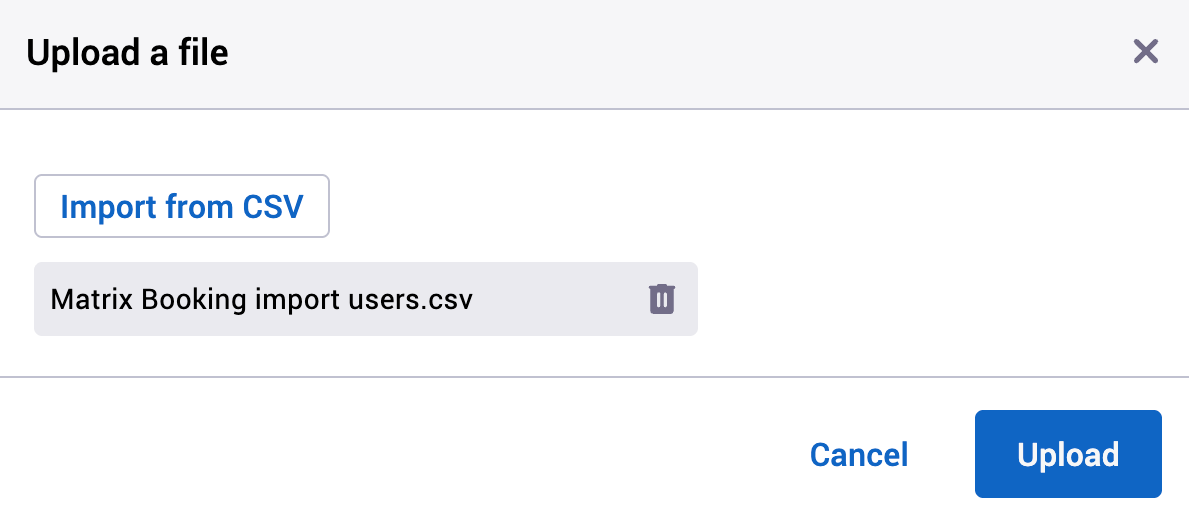
-
Select Upload. Your file will begin to upload and Matrix Booking will import your users. You’ll be redirected to the File details screen
-
Depending on how many users you had in the file, it may take some time.
-
Once the upload has finished, the STARTED status will have changed to COMPLETED. The imported users can be found on the Users screen.
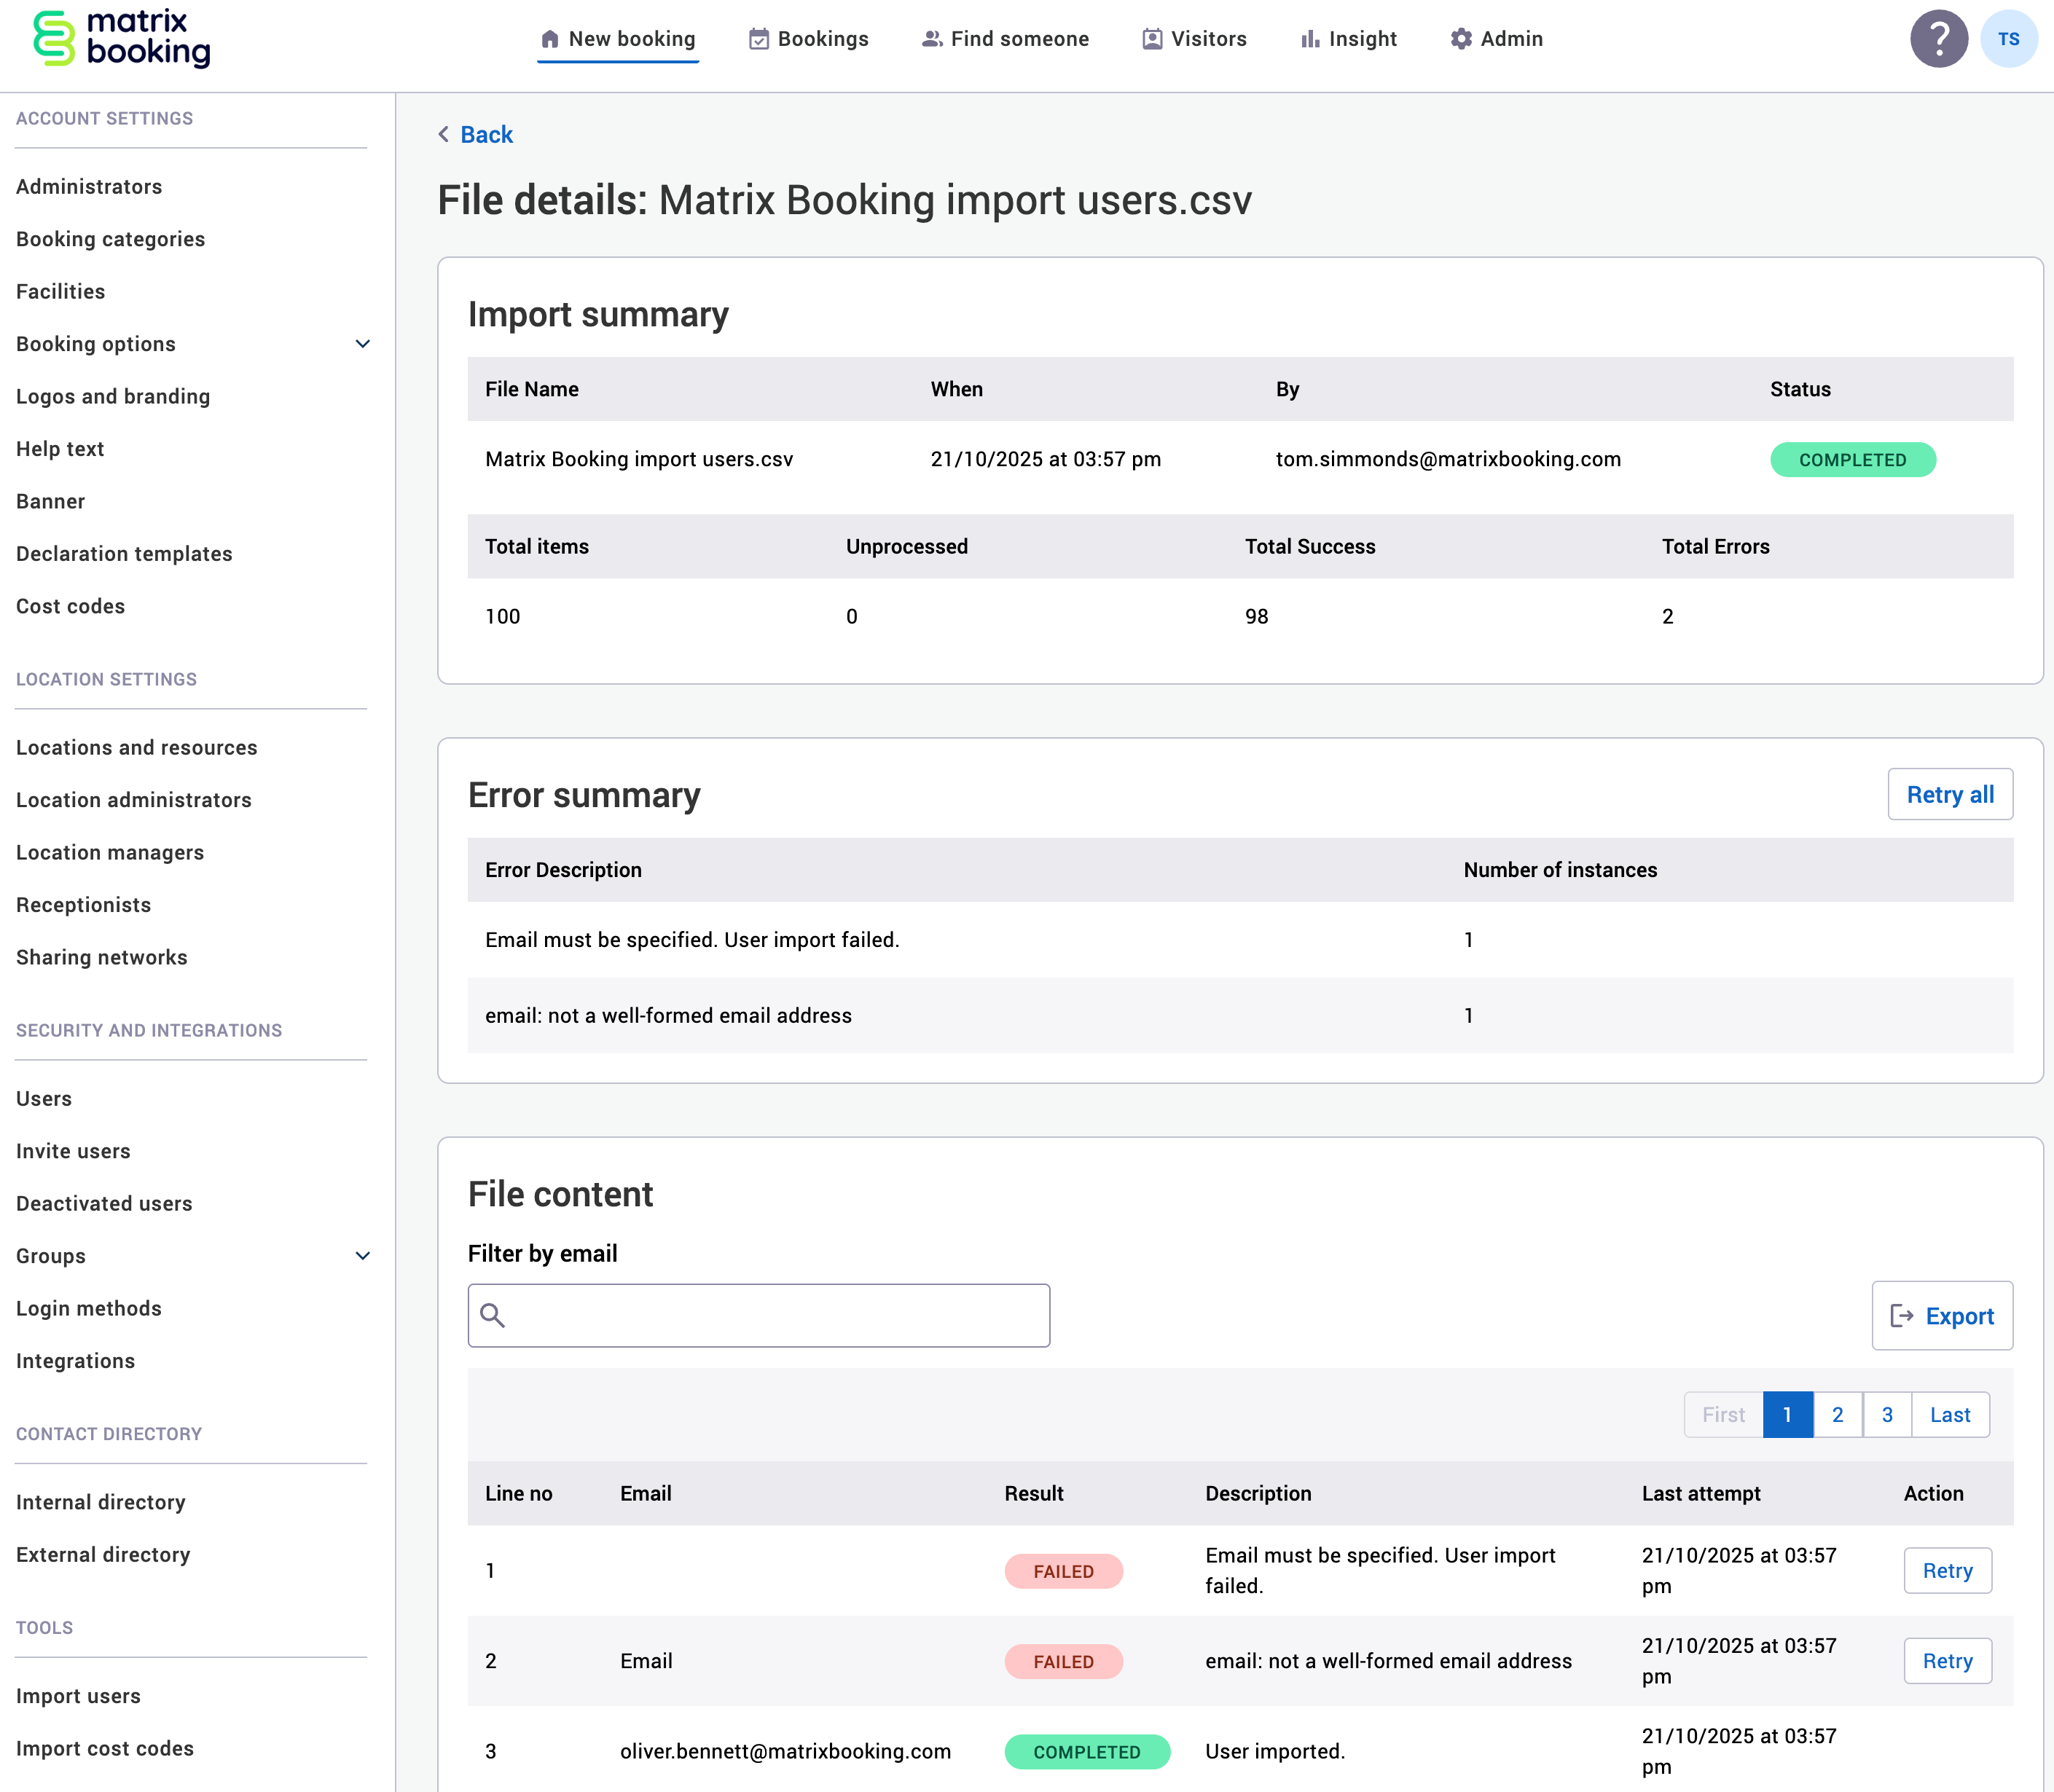
-
If the status has changed to FAILED, the error messages will guide you on what the issues may be (for example, not removing the commas on the top line or column header row will produce the error messages above).
Notes:
-
If you only have a few users, we recommend inviting users or adding users manually.
-
We strongly recommend that the template and its formatting are followed exactly. If other columns are added or the formatting is changed, the import will fail.
-
If your import has failed, we recommend that you start the process again with a fresh spreadsheet to avoid errors being carried forward from the previous spreadsheet.
-
If you have any issues with the import, raise an administrator issue support ticket and attach both the
.xlsxfile you edited and the.csvfile you uploaded. -
The upload users function will only override a user’s information if it has been entered on the import file you uploaded. For example, if a user has a default cost code in Matrix Booking, but it isn’t included in the file, their default cost code won’t be overwritten.
-
The upload users function can’t be used if your organisation has 1 of our directory synchronisation integrations. If your organisation uses our Microsoft Entra ID integration or our SCIM integration, see our guidance:
Edit a user
To edit a user:
-
In the Filter results search bar, enter the user’s name or other identifying details.
-
Select the vertical three-dots icon next to the user to open the more options menu.
-
Select Edit [user]. The Edit [user] dialog will appear.
-
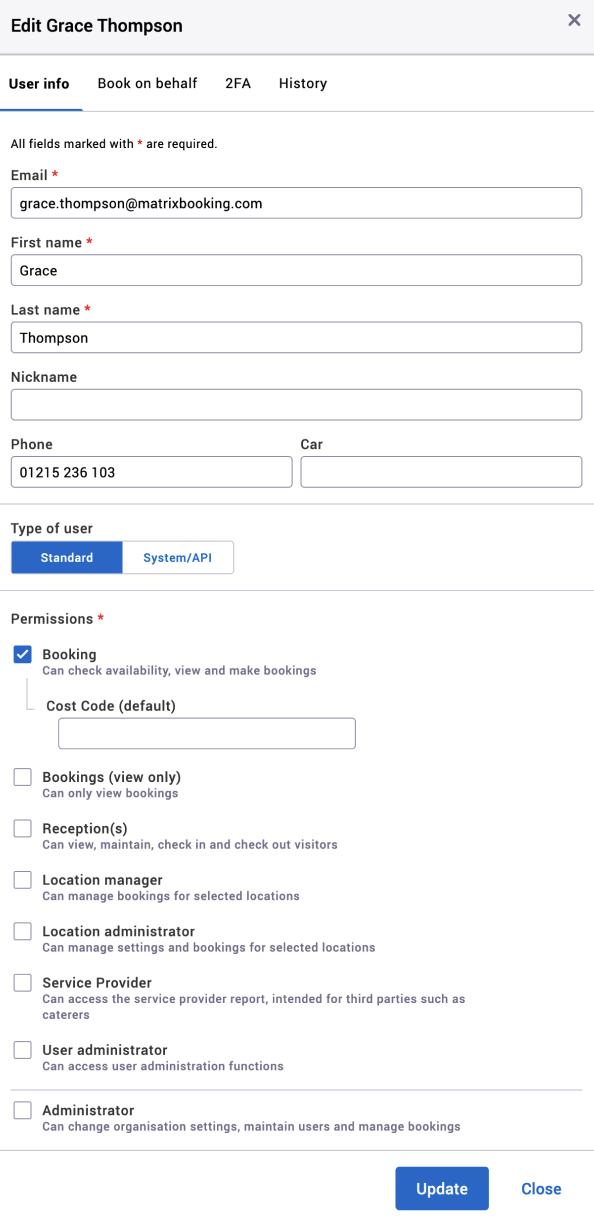
Make the changes you need to on the User Info tab:
-
Update their email address.
-
Select Change Password to update their password.
-
Enter any optional details that may be required.
-
Change their permissions and account type if required.
-
-
Select the Book on behalf tab.
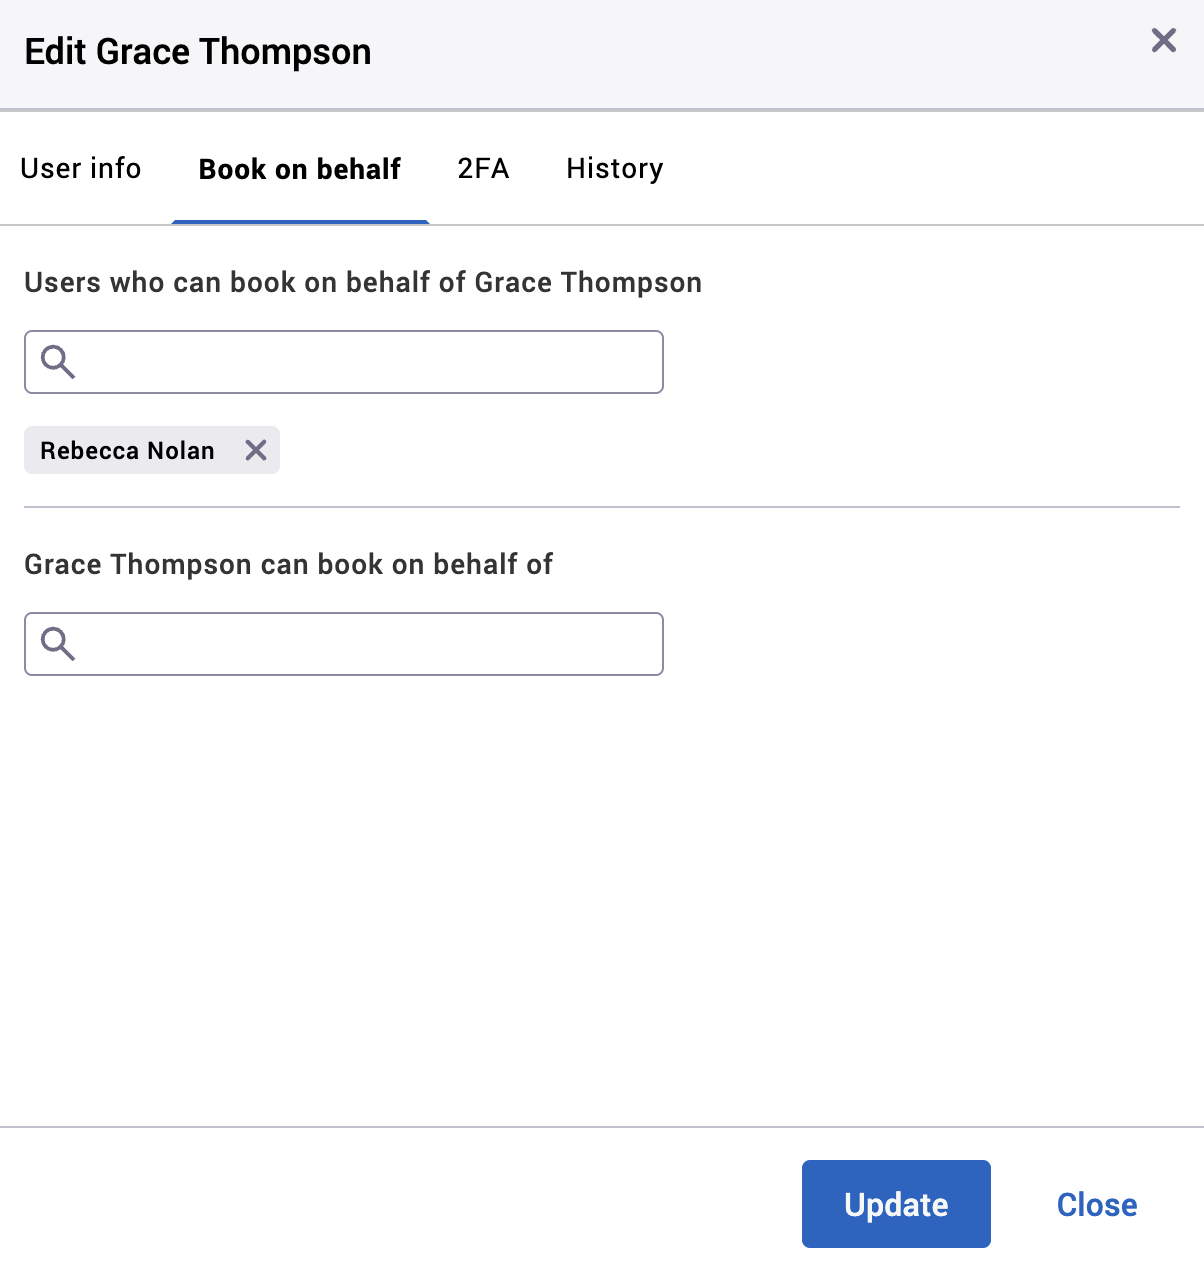
-
Enter the other users’ names that you want to book on behalf of the user you’re editing.
-
Enter the other users’ names that you want the user you’re editing to book on behalf for.
-
Select the History tab for more information on what’s happened to that user (for example, date created or deactivated).
-
Select Save.
-
To discard any changes, select Cancel.
Notes:
-
If you change any of a user’s details, remember to notify them as they won’t receive any automated notifications.
-
If your organisation uses SSO to log in, it’s not possible to update email addresses through Matrix Booking. Our SSO integration synchronises with your directory (for example, Microsoft Entra ID). Contact your IT team to request this change. Once any change happens in your directory, Matrix Booking will automatically sync and any updates to users’s email addresses will be reflected in the Users screen.
If you’re undergoing a bulk change (for example, all staff changing their email domain), it would be quicker to contact your customer success manager and request a “bulk email migration” that our Support Team will carry out for you out of hours. This may involve a small professional services fee.
Search for a user
To search for a user.
-
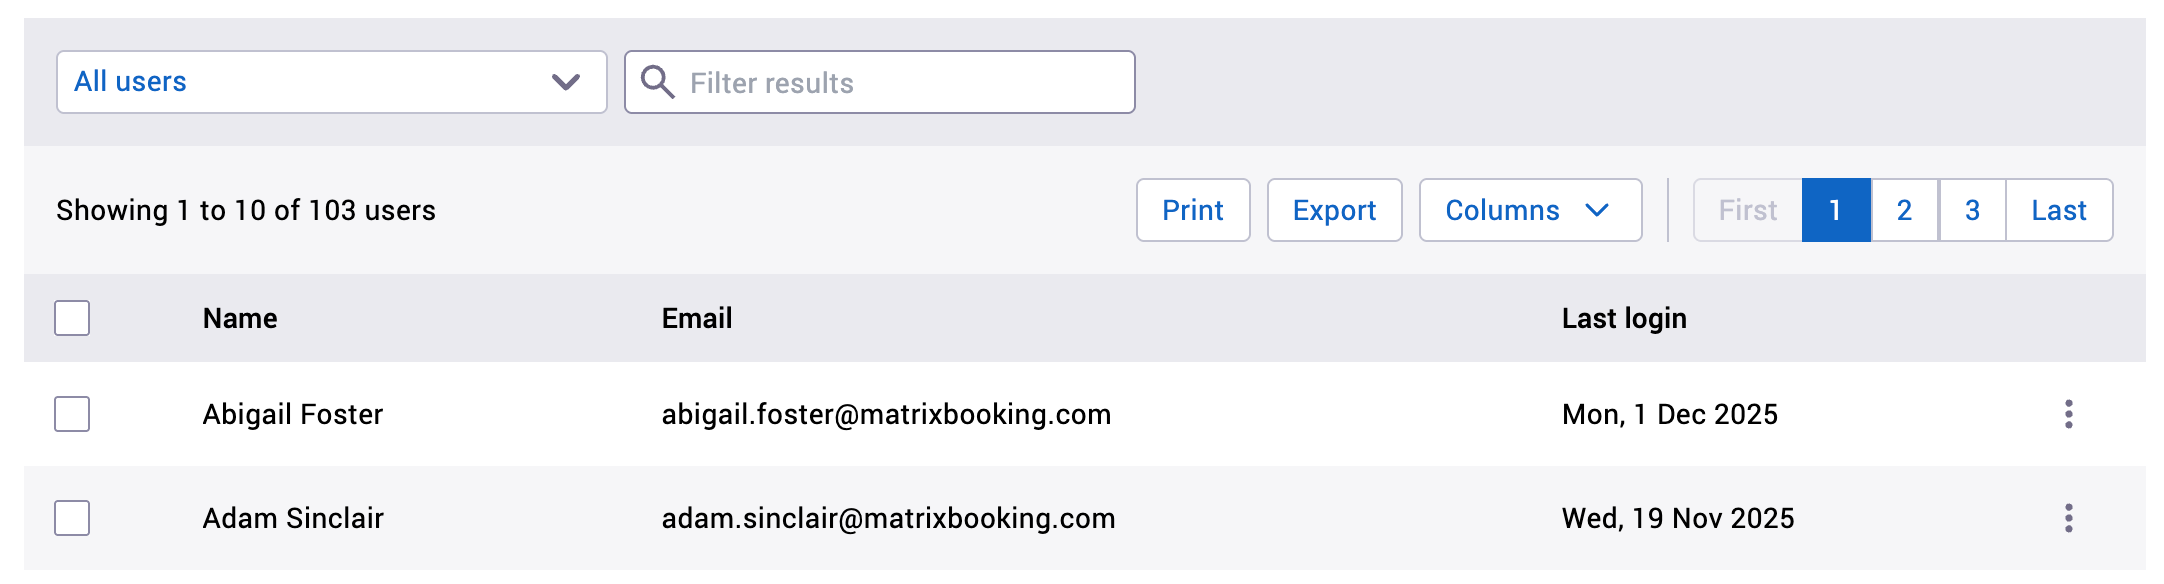
Access the Users screen. A full list of users will be displayed in the main section of the screen, organised alphabetically.
-
There are 3 ways that you can filter your search:
-
Inactivity dropdown (All users is the default).
-
Columns dropdown (where Permissions tells you what the user has access to).
-
Filter text box (user’s first or last name or their email address). For example, “Fio” for Fiona Marshall.
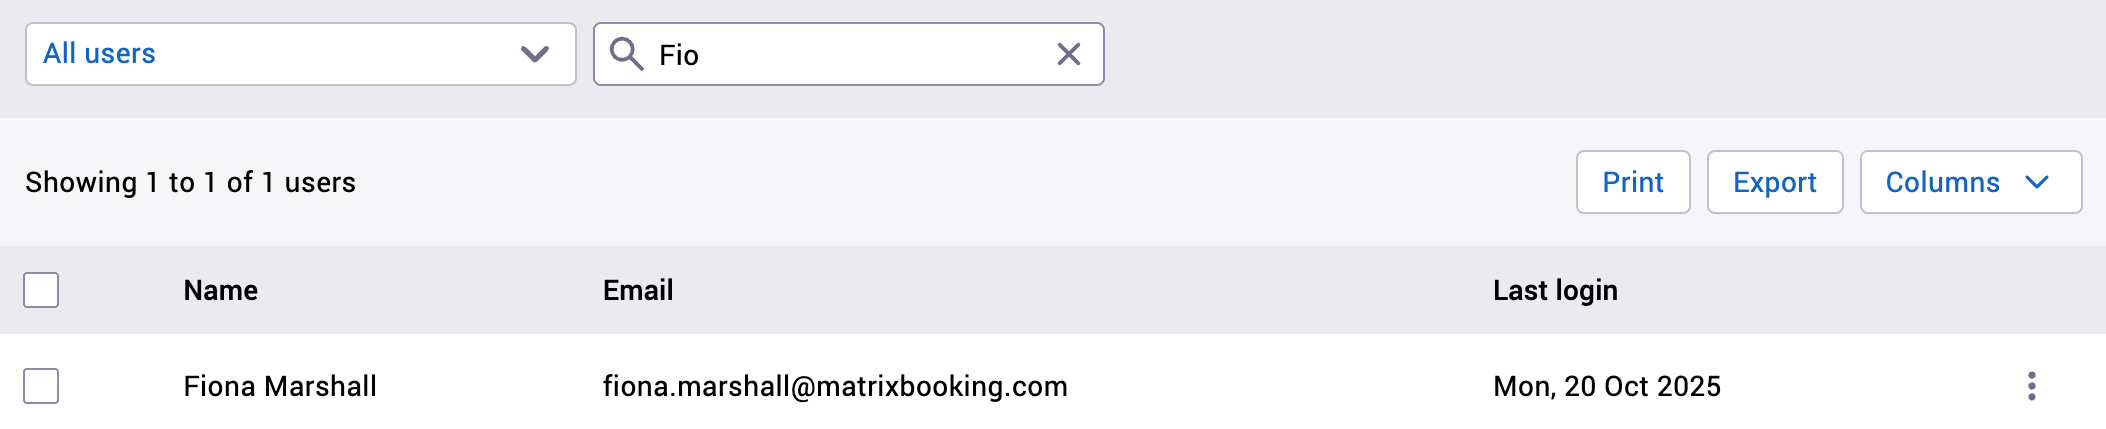
-
-
Use these filters to search for a user.
-
All other users that don’t have “la” (case insensitive) in their email address, first or last name have been filtered out and hidden from view.
Note: in other parts of Matrix Booking, name searches aren’t performed until you enter at least 3 characters. However, in the Users screen, the results are already there so the filtering is immediate.
Look at a user’s activity
You can use the Inactivity or the Column dropdown as seen in the Search for a user section.
The number of users is displayed in the top-right corner of the Users screen. This can be useful because if you are getting close to your maximum number of user licences, you may want to look for users that haven’t used the system in a certain amount of time. Filtering by the users’s activity can help you in removing unused accounts.
Use the Inactivity dropdown
-
Select the Inactivity dropdown (All Users is the default).
-
Select the level of inactivity you wish to filter on.
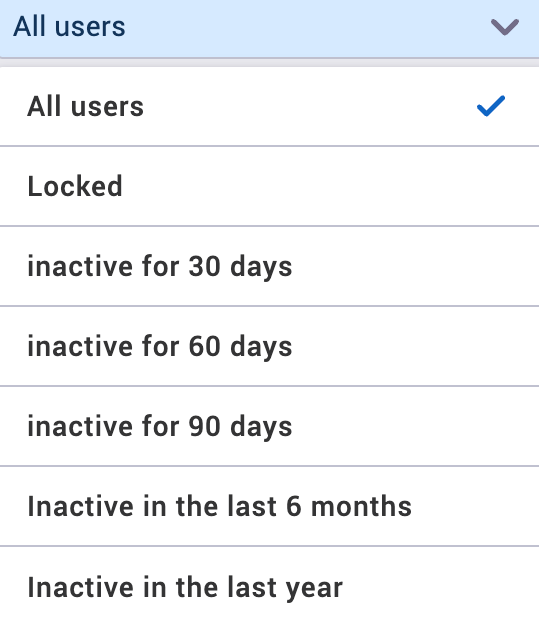
-
Search the users that appear in the list in the main section of the screen.
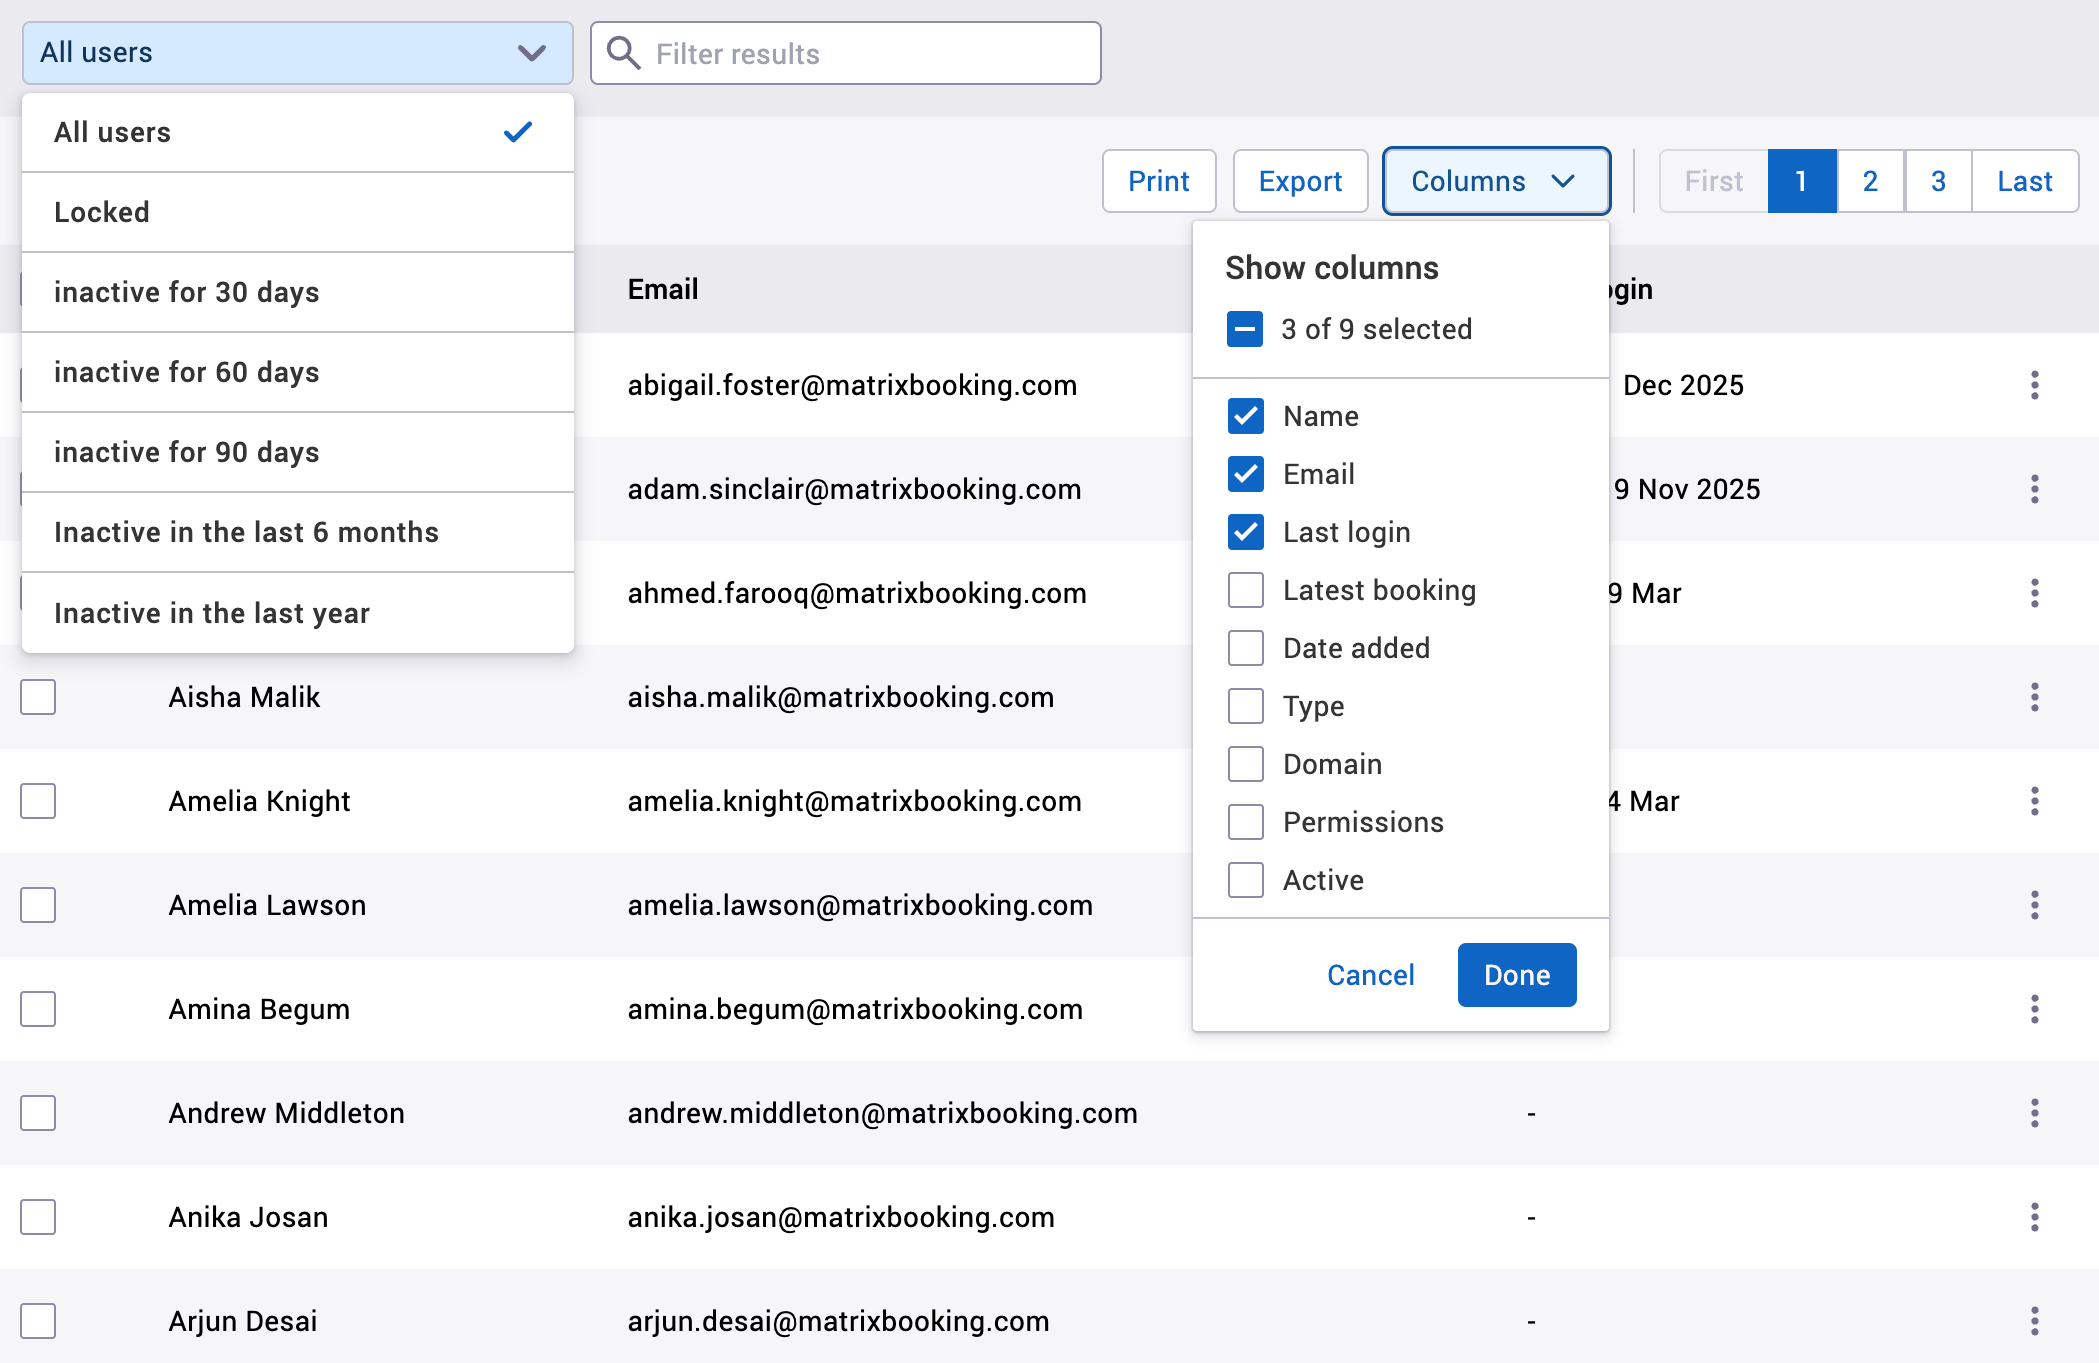
Use the Columns dropdown
-
Select Choose Columns dropdown.
-
Tick the boxes you want to filter by.
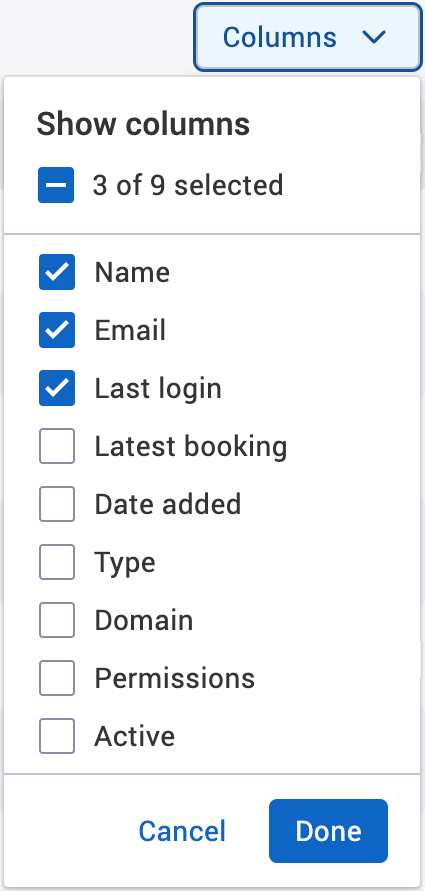
-
The checkboxes that will be of most help are:
-
Last Login.
-
Latest Booking.
-
Active.
-
-
Once ticked, select away from the dropdown.
-
Select 1 of the column titles (for example, Email).
-
An arrow will appear.
-
If the arrow is pointed up, the lists will be organised in ascending order.
-
If the arrow is pointed down, the list will organised in descending order.
-
-
Select the column title again to reorganise the list. In this example, the column Active was used; active users have been sorted to the top and inactive users to the bottom.
Other columns will filter in a similar way.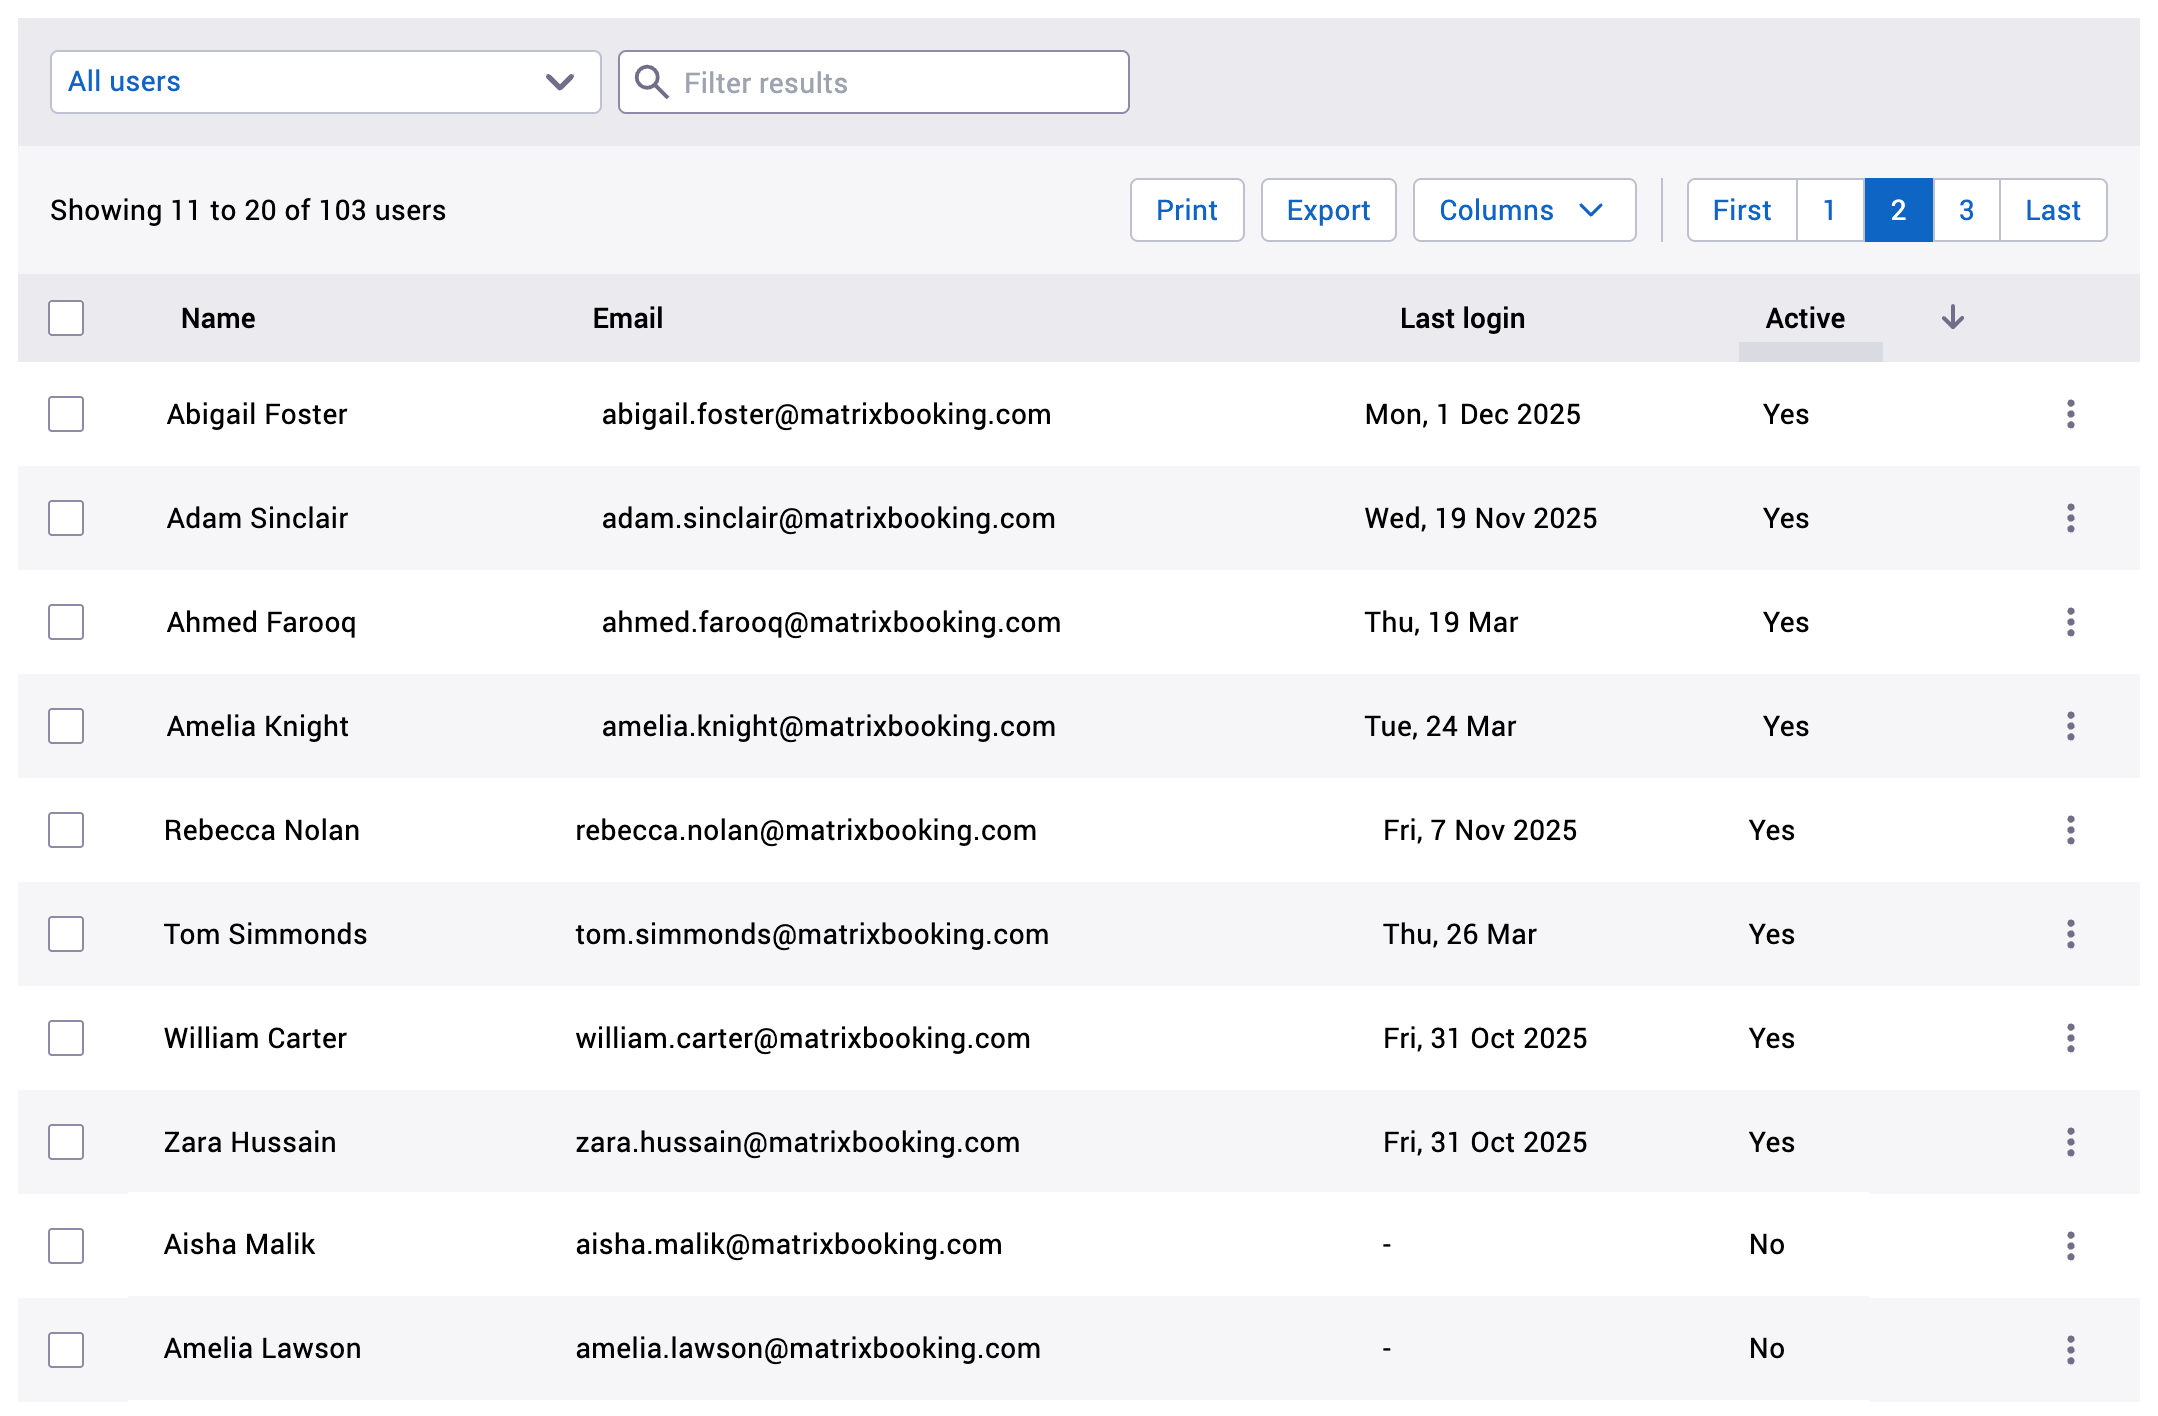
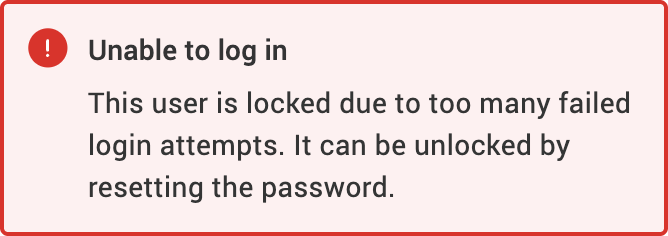
Unlock a user
If a user makes 5 consecutive incorrect password attempts when logging in, the user will be locked out of Matrix Booking across all browsers and platforms of the application. The user will see this error message:
To unlock a user’s account as an administrator:
-
Search for the user using the Locked users filter in the Inactivity dropdown.
-
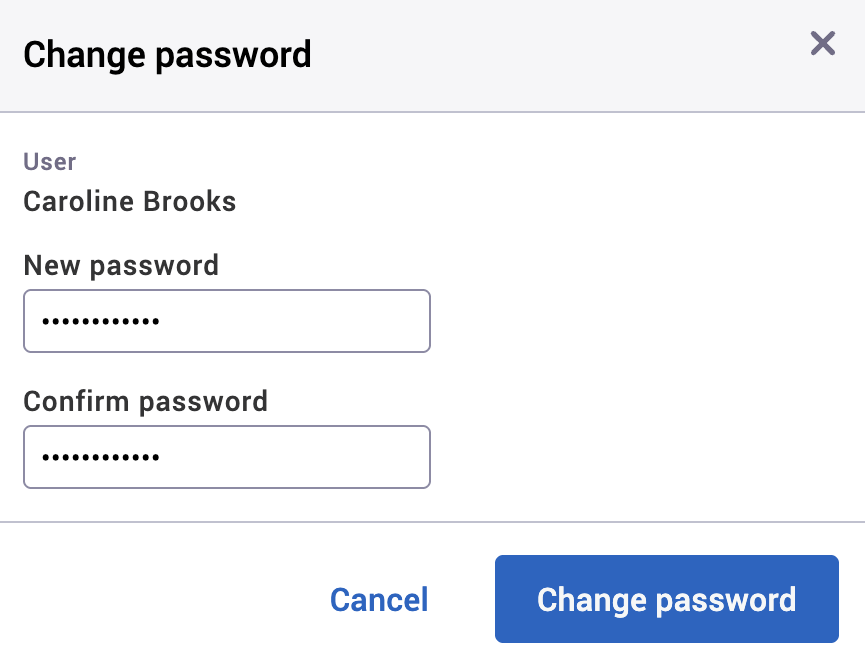
Select the vertical three-dots icon next to the user to open the more options menu.
-
Select Change password. The Change password dialog will appear.
-
Enter the password in the New password and Confirm password textboxes.
-
Select Change password. This will close the Change password dialog and return you to the Users screen.
-
Let the user know what their new password.
Warning: if a signage or kiosk account is locked, all the devices with that log in using that account will show a warning message saying “unable to connect.” When the account is unlocked, the message will be removed and the account be used again.
Administrators can also refer to the History tab on the Edit User dialog for more information. This will show when a user:
-
was locked due to unsuccessful login attempts
-
was unlocked by a password reset
-
was unlocked by an administrator
-
logged back in
This functionality exists for Matrix Booking passwords only. SSO-only users can’t use this feature as this feature and information will be managed by your own SSO provider.
Notes:
-
The default number for incorrect password attempts is 5. Raise a change setup support ticket to increase or decrease the number.
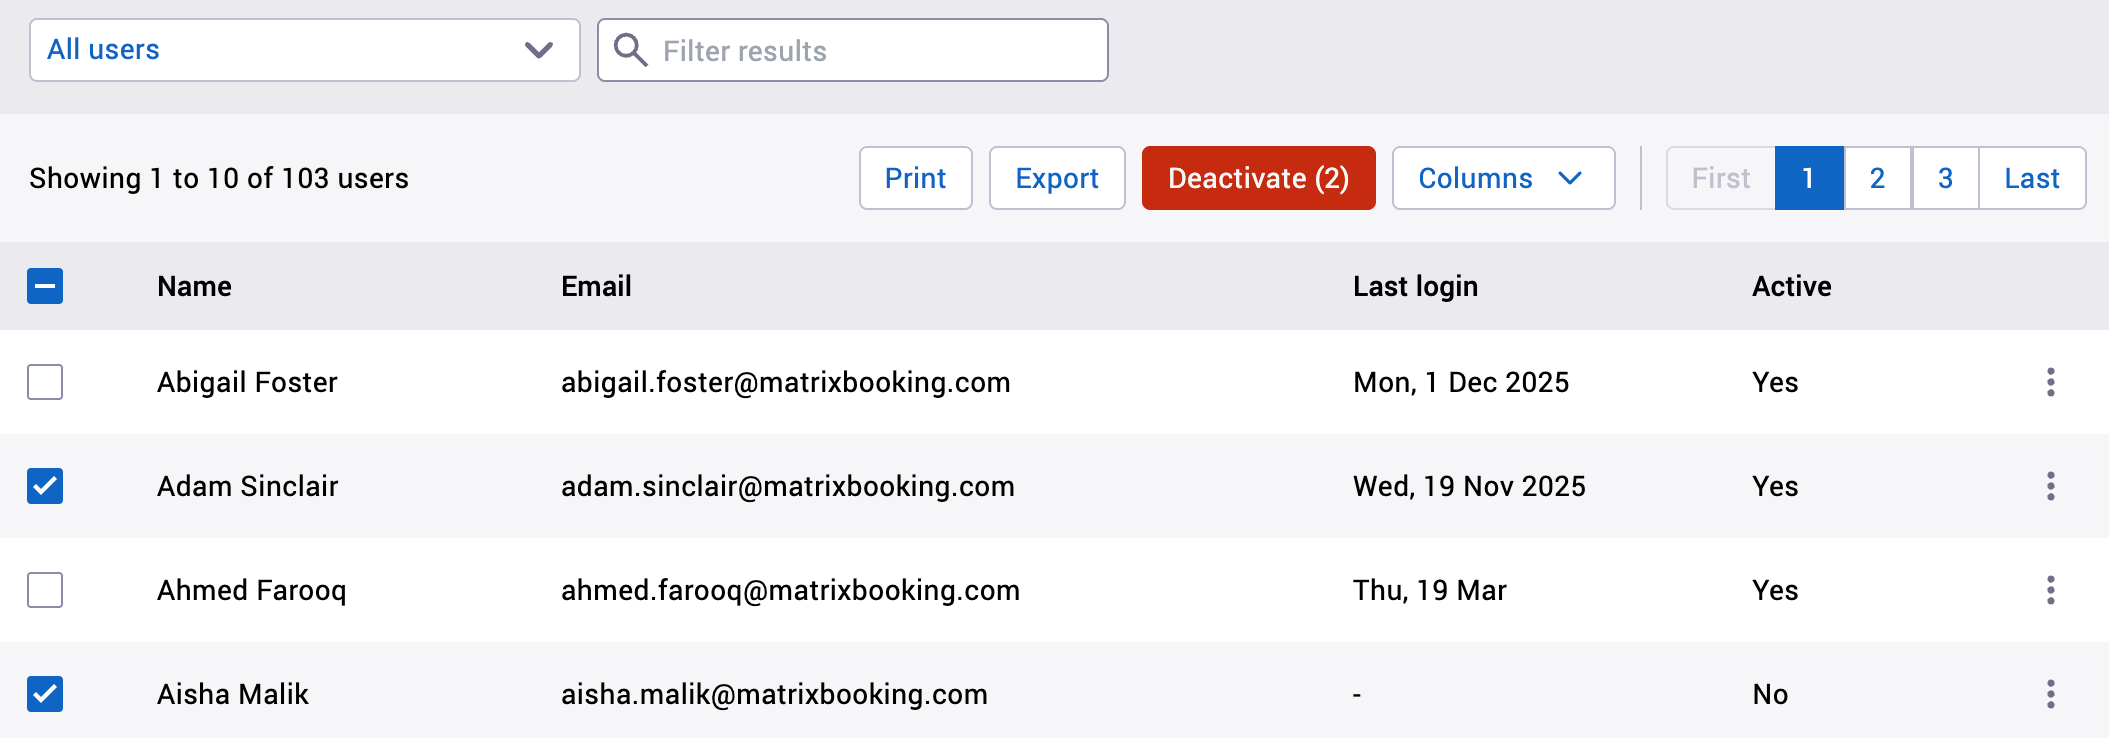
Deactivate a user
To deactivate 1 or more user:
-
Search for the user or use one of our pre-selected filters (show users inactive in last 30, 60, or 90 days, or the last 6 or 12 months).
-
Select the Choose Columns dropdown. The dropdown will appear.
-
Select the columns you want to display (for example, Last Login, Last Booking, or Active).
-
Select the column header of your choice to sort the list of users by that column. Select it once to see your users in ascending order. Select it again to see your users in descending order. Select it once more to return to the default order of users (normally, alphabetically).
-
Select the checkbox to the left of each user you wish to deactivate or select the checkbox next to the left-hand column title (for example, Name) to select all users.
-
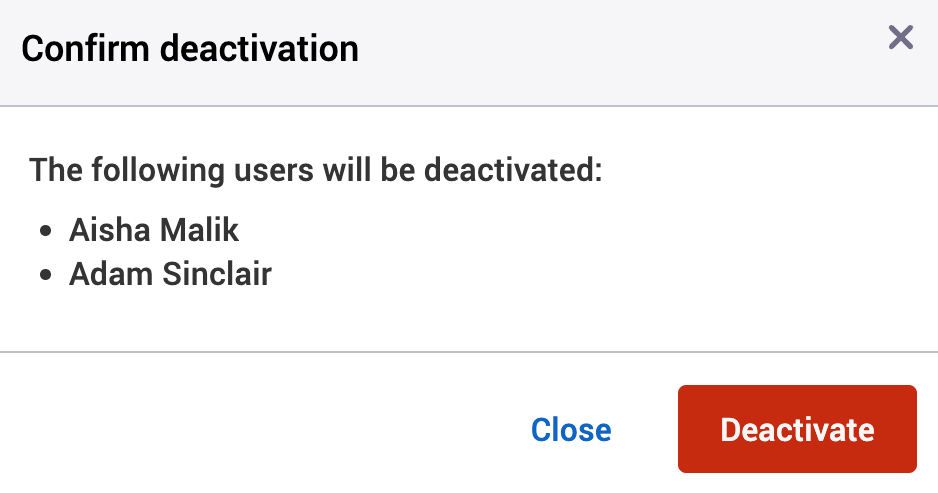
Select Deactivate ([number]) in the top-right of the screen, where the [number] tells you how many users have been selected. The Confirm deactivation dialog will appear.
-
Select Deactivate.
Note: once you’ve deactivated a user, they won’t be able to log in. The system will advise them when they try to log in that their account has been disabled.
Notes for deactivating users
-
You can change a deactivated user’s email address in the same way as the Edit a user steps using the Deactivated Users Admin screen.
-
If your organisation is using SSO, the system will advise you that the user is linked to the SSO and shouldn’t be deactivated this way. They should be deactivated at source (within your own SSO/IdP provider).
-
If the user is deactivated in your active directory and Matrix Booking synchronises with it overnight, the user will be marked as deactivated in Matrix Booking.
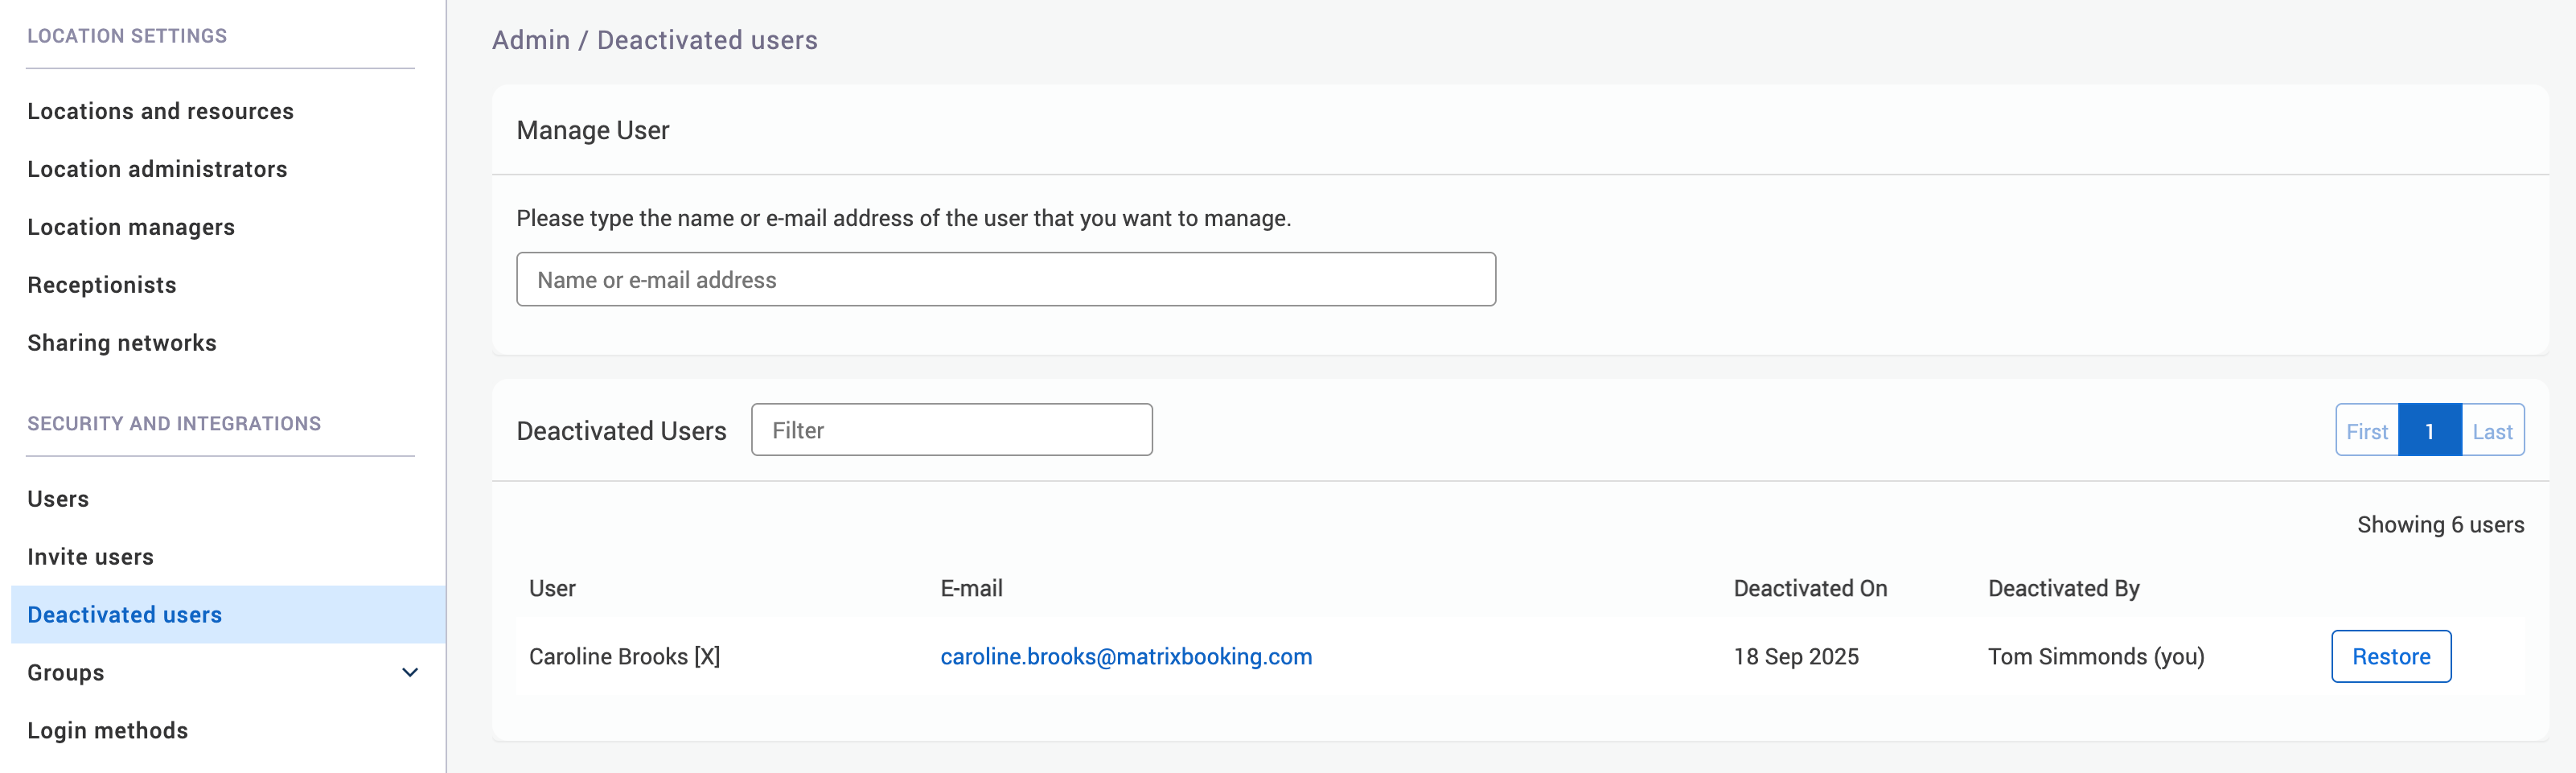
-
If you have deactivated any users, they can be found by selecting the Deactivated Users in the side menu of the Admin screen. You can search through the list of users or put their details into the search bar at the top of the screen.
-
When you look at the All bookings tab, if a booking is held by someone that has been deactivated, the booking will be displayed with an [X] after the booking owner’s name:
-
Any bookings a deactivated user had will be orphaned and will appear in the Unassigned tab on the Bookings screen.
-
You can see who deactivated a user under the Deactivated By column in the Deactivated Users screen.
-
Deactivated users can be anonymised after a set amount of days. Raise a change setup support ticket to get this feature switched on and let our team know how many days you want before deactivated users are anonymised.
-
Deactivated users can be removed from groups that they were put into. If they are reactivated, they will need to be added to those groups again. Raise a change setup support ticket to get this feature switched on.
Reactivate a user
If a user account has been deactivated, it can be reactivated:
-
Select Admin in the navigation bar.
-
Select Deactivated Users under the Security & Integrations section in the side menu.
-
You can search for the deactivated account by:
-
Going through the list.
-
Typing their name or email address in the search bar.
-
-
Select Restore next to the user.
-
The user will now appear back in the user list.
Print or export users
To export a directory:
-
Use the Inactivity and Columns dropdowns to filter the users you want to export.
-
Select Export. Your file explorer will appear.
-
Select the location you want to save your list of users as a
.csvfile. -
Select Save (or equivalent on different PCs). Your file explorer will close and your list of users has been saved.
To print a directory:
-
Use the Inactivity and Columns dropdowns to filter the users you want to export.
-
Select Print. A print preview dialog will appear.
-
Select either:
-
Your chosen printer.
-
Save as PDF to save your list of users as a PDF.
-
-
Select Save (or equivalent on different PCs).
-
If you selected a printer, the dialog will close and your list of users will be printed from the printer you selected.
-
If you selected Save as PDF, your file explorer will appear.
-
Select the location you want to save your list of users as a
.pdffile. -
Select Save (or equivalent on different PCs). Your file explorer will close and your list of users has been saved.
❮ Back
Access profiles and user accounts
Next ❯
Location administrators