In Matrix Booking, you can:
-
Upload your floor plans for your staff to use.
-
Map your resources (for example, rooms or desks) on your floor plans.
-
Book resources using your mapped floor plans.
This page explains how to manage and map your organisation’s floor plans:
Accepted image file types
The following file types are allowed for floor plans:
-
.png -
.svg
Users can zoom in on the images of these file types.
The maximum file size for a floor plan that can be uploaded is 4096 pixels x 3072 pixels.
When you upload a floor plan image that’s large (over 4096 pixels in any direction), it will be automatically resized so that the maximum dimension (width or height) is 4096 pixels. This resized image will be the new “original” image that’s downloaded by browsers and mobile apps. A smaller file size will download more quickly.
On a fast internet connection, the size of the floor plan might not make a difference in download speed. The image will likely be cached (stored) by the device once it has been downloaded the first time. People who regularly view the same floor plan image may not have to download it each time.
Notes:
-
We don’t recommend uploading an architect’s drawing or an Autocad file that has ventilation and storage cupboard markings. This level of detail isn’t required.
-
Floor plans should be uploaded for floors and not other types of locations or resources.
-
The resolution of your image should be high to avoid pixelation when it’s zoomed in on.
-
Use the Matrix Booking resized floor plan image to edit.
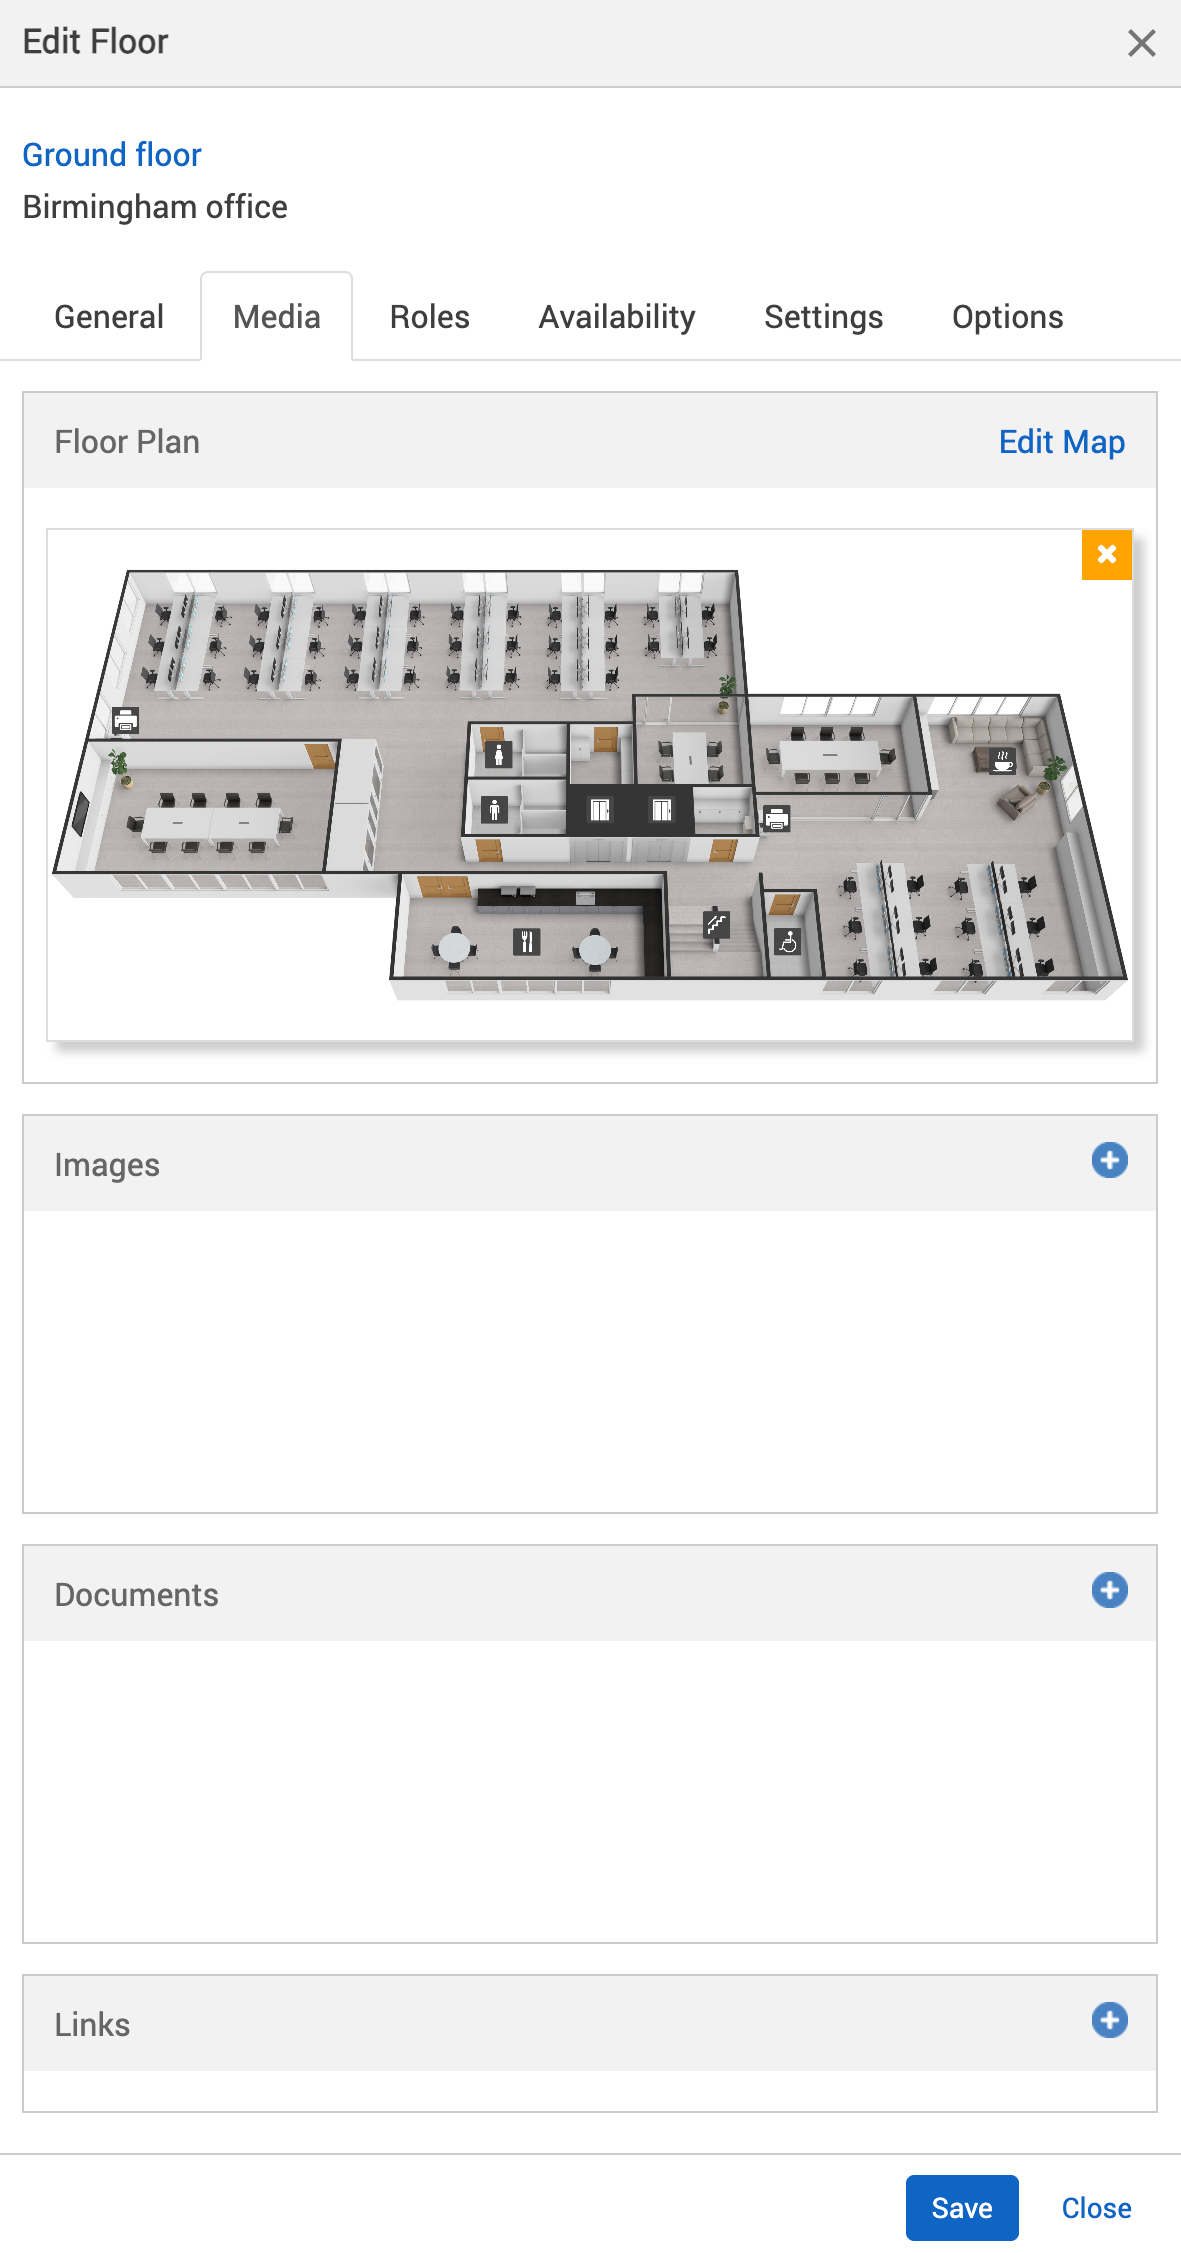
Upload a floor plan
To add floor plans to a floor:
-
Select the + Add button next to the Floor plan section.
-
Your computer’s file explorer will appear.
-
Go to the floor plan file’s location.
-
Select the floor plan file.
-
Select Open or Upload. This will close the file explorer and your floor plan will appear in the Floor plan section of the Media tab.
-
Select either of the following and the dialog will close to return you to the Locations and resources hierarchy:
-
Save to keep your changes.
-
Close to discard your changes.
-
-
Select Save changes.
Tips:
-
Use a simplified floor plan for your staff. We provide a redraw service that make simplified floor plans.
-
Make sure your floor plan complies with the accepted file types.
-
If you upload a new floor plan to override an old one, make sure that it’s the same size. If it isn’t, your mapped resources won’t align with the new floor plan.
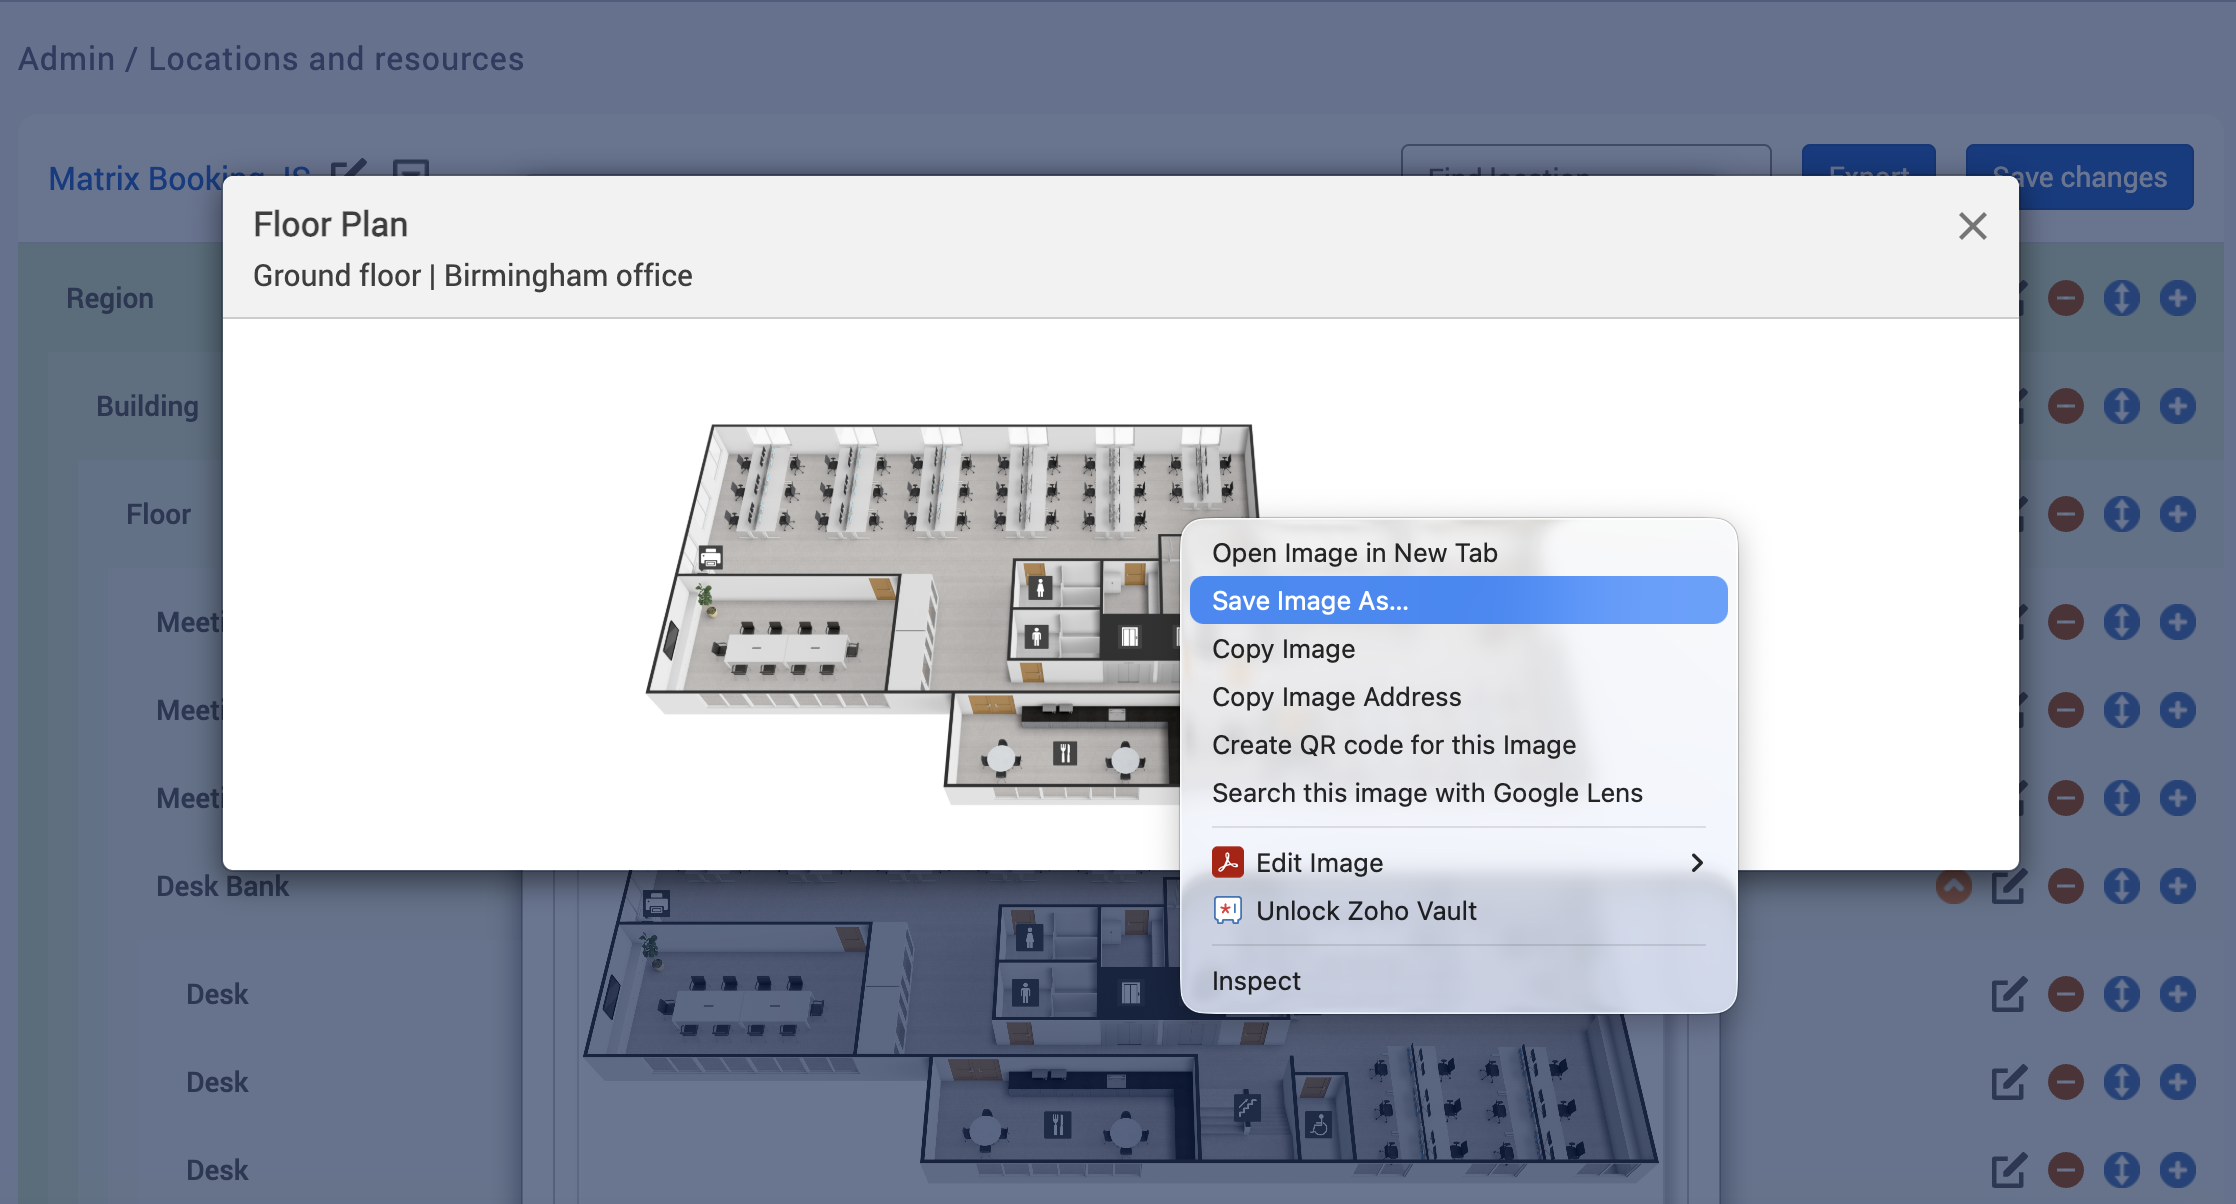
Download the original floor plan image
To download the floor plan after uploading it:
-
Select the image of your floor plan. This will open the floor plan in a new dialog.
-
On the image, right-click to open the context menu.
-
Select Save image as… This will open your file explorer.
-
Select the folder or location you want to save the file in.
-
Select Save (or equivalent). This will close the file explorer and your floor plan will download.
Access the Floor Plan Editor
To access the Floor Plan Editor:
-
Select Admin in the navigation bar.
-
Select Locations and resources under the Location Settings section in the side menu.
-
Select Edit hierarchy. The full Locations and resources hierarchy will appear.
-
Select the Edit floor plan button next to your chosen floor.

-
The Floor Plan Editor will open in a new tab with a banner stating:
”Floor plan changes are saved automatically. Close this browser tab when you are finished.” -
To close the banner, select Dismiss Forever.
-
The Floor Plan Editor will show you an enhanced view of your floor plan and 2 tabs in the side menu:
-
Resources (selected by default).
-
Work areas.
Both will display a list of your locations (for example, desks banks).
-
-
To view only unmapped resources, select the Show only unplaced resource checkbox.

Map resources on a floor plan
Once you have uploaded your floor plan, you can:
-
Leave it as a visual aid only.
-
Map your floor plan to be an interactive booking system.
Note: floor plan changes are saved automatically.
To map a resource on your floor plan:
-
Access the Floor Plan Editor of your chosen floor.
-
Select the location you want to map. A dropdown of the resources in that location will appear (for example, desks in a desk bank).

-
To view only unmapped resources, select the Show only unplaced resource checkbox.
-
There are 2 ways of mapping resources:
-
To map all the resources under a location in turn automatically, select the + Add resource marker button next to the location. A new mapping marker for the next resource in the dropdown will appear each time 1 is placed until all markers for all resources in that location have been placed.
-
To map an individual resource under a location, select the + Add resource marker button next to the resource.
-
-
A mapping marker will replace your cursor (looks like a circle with a cross in the middle). A text box next to this will say which resource the marker is associated with (for example, GF-1-1 for the Ground floor’s Desk bank 1 – desk 1).
-
Find the resource’s position on the floor plan.
-
Place your marker over the position of the resource on the floor plan.
-
To zoom in on your floor plan, select the + Zoom in button in the top-right corner. To zoom out, select the - Zoom out button.

-
Select on the position you want to place the marker.
-
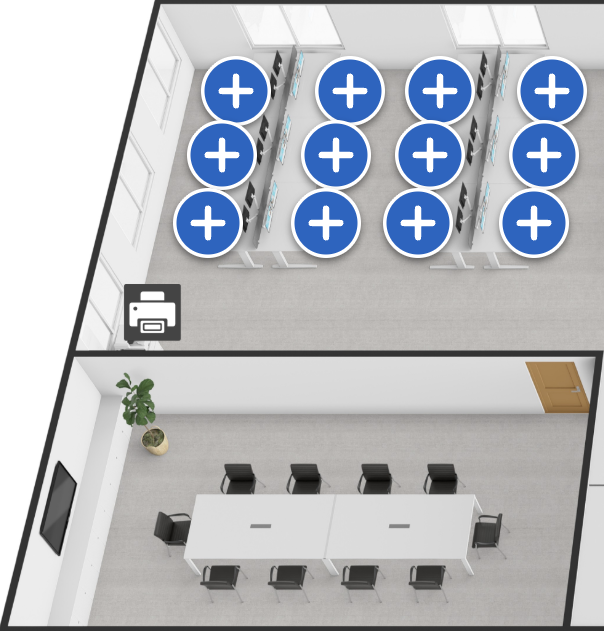
The marker will appear as a solid blue circle with a white outline.
-
If you selected the + Add resource markers button next to the location, a new mapping marker will appear with the next resource’s name (for example, GF-1-2) so that you can continue the process. If you didn’t select this button, your cursor will return to normal.
-
Repeat steps 4 to 10 for all your other resources.
-
To help align your markers, red dotted lines will appear either side of the markers when they are aligned.
-
If you want to return to your normal cursor, select the ESC button.
-
Next to each mapped resource in the side menu, select any of the following:
-
The Edit button to allow you to move the marker.
-
The Remove button to remove the marker.
-
The Remove all resource markers button to remove all markers.

-
Warning: if you upload a new floor plan to override an old one, make sure that it’s the same size. If it isn’t, your mapped resources and work areas won’t align with the new floor plan.
Map work areas on a floor plan
Once you have uploaded your floor plan, you can:
-
leave it as a visual aid only
-
map your floor plan to be an interactive booking system
Besides mapping individual resources, you can group the resources together as a work area, similar to resource clustering.
Notes:
-
Floor plan changes are saved automatically.
-
Mapped work areas are only available for floor plans on Matrix Booking. They aren’t available for the mobile and Floor Plan apps.
-
All users making bookings will see all work areas on the floor plan. It may not be appropriate to place all work areas, particularly if you have many levels within your hierarchy. Only place work areas on the floor plan that you wish to show. To get the most out of this functionality, you may need to rename or restructure your Locations and resources hierarchy.
-
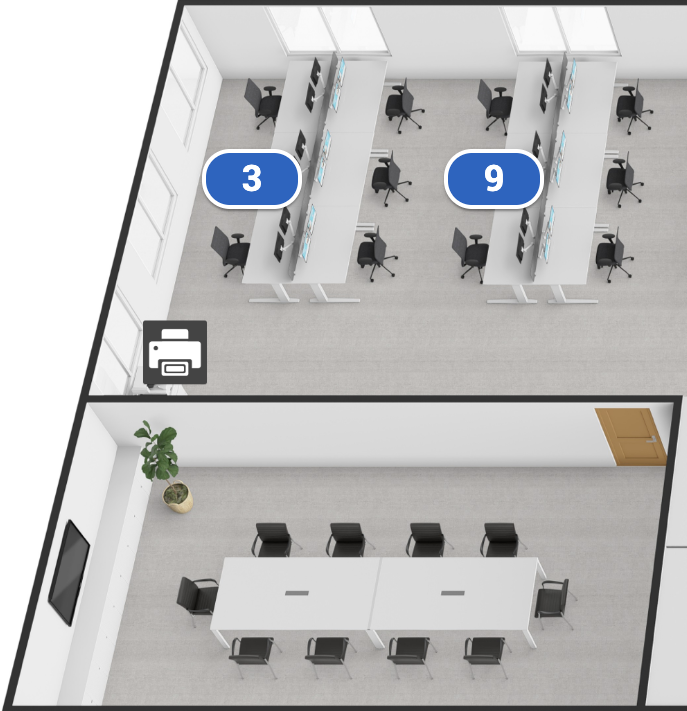
When users are viewing the floor plan as they make a booking, they will see the work areas displayed at an appropriate zoom level. The area name is displayed with a the number of available resources in brackets. Zooming in on the floor plan will hide the work area markers and display the individual bookable resources.
To map work areas on your floor plan:
-
Access the Floor Plan Editor of your chosen floor.
-
Select the Work areas tab.
-
There are 2 views for the side menu:
-
View as hierarchy (selected by default) – this gives you the list as it appears in your location and resources hierarchy (for example, meeting rooms and desk banks may not be grouped together).
-
View by type – this gives you the list separated by location and resource type (for example, desk banks are grouped together).
-
-
Select the view you want.
-
Select the + Add work area marker button next to the work area you want to map.
-
A mapping marker will replace your cursor (it looks like a light blue elongated circle with a blue outline). Text in the marker will say which work area the marker is associated with (for example, Desk bank 1).
-
Find the work area’s position on the floor plan.
-
Place your marker over the position of the work area on the floor plan.
-
To zoom in on your floor plan, select the + Zoom in button in the top-right corner. To zoom out, select the - Zoom out button.
-
Select the position you want to place the marker.
-
The marker will appear as a blue circle with a white outline and white text.
-
Repeat steps 5 to 11 for all your other work areas.
-
To help align your markers, red dotted lines will appear in the middle of the markers when they are aligned.
-
To return to your normal cursor, select the ESC button.
-
Next to each mapped resource in the side menu, there will appear:
-
The Edit button to allow you to move the marker.
-
The Remove button to remove the marker.
-
At the bottom, the Remove all work area markers button to remove all markers.

-
Warning: if you upload a new floor plan to override an old one, make sure that it’s the same size. If it isn’t, your mapped resources and work areas won’t align with the new floor plan.
Edit a marker on a floor plan
To edit a marker on your floor plan:
-
Access the Floor Plan Editor of your chosen floor.
-
Depending on the type of marker you want to move, select either the:
-
Resources tab (selected by default).
-
Work areas tab.
-
-
Select the Edit button next to the marker you want to move.
-
The marker you’ve selected will become a light blue circle with blue outline to show that that’s the marker you’ve selected to be moved.
-
Move the marker with your arrow keys.
-
To help align your markers, red dotted lines will appear either side of the markers when they are aligned.
-
Once you’ve moved your marker to the right position, select the marker. This will turn it back to a blue circle with a white outline to show that the mark has been placed.
-
If you no longer want to edit your marker, select the Back button to return to the main Floor Plan Editor.

Notes:
-
When editing a marker, the side menu will be replaced with information about the resource or work area and its coordinates on the floor plan.
-
You can remove a marker you’re editing by selecting the Remove marker button in the side menu.
Remove markers on a floor plan
There are 2 ways to remove markers:
Warning: once 1 or all of your resources or work areas have been removed, this action can’t be undone as any floor plan changes are saved automatically and overwrite the previously saved version.
Remove 1 marker
To remove 1 marker from your floor plan:
-
Access the Floor Plan Editor of your chosen floor.
-
In the side menu, select either the:
-
Resources tab (selected by default).
-
Work areas tab.
-
-
Select Remove next to the resource or work area. The Remove marker dialog will appear.
-
Select either of the following and the dialog will close to return you to the Floor Plan Editor:
-
Remove to permanently remove the marker.
-
Cancel to disregard the marker’s removal.

-
Warning: once 1 of your resources or work areas has been removed, this action can’t be undone as any floor plan changes overwrite the previously saved version of it.
Remove all markers
To remove all your markers from your floor plan:
-
Access the Floor Plan Editor of your chosen floor.
-
In the side menu, select either the:
-
Resources tab (selected by default).
-
Work areas tab.
-
-
Select Remove all [resource or work area] markers. The Remove all [resource or work area] markers dialog will appear.
-
If you’d like to continue with removing all markers, select the I have read the above and wish to continue checkbox. This will activate the Remove button and will no longer appear greyed-out.
-
Select either of the following and the dialog will close to return you to the Floor Plan Editor:
-
Remove to permanently remove the markers.
-
Cancel to disregard the markers’ removal.

-
Warning: once all your resources or work areas have been removed, this action can’t be undone as any floor plan changes overwrite the previously saved version of it.
Test your mapping
It’s important to test your markers to make sure that your staff can access the resources they want without any errors. To test your markers:
-
Make a new booking for a resource (for example, a desk).
-
Select View as floor plan. Any resources that were grouped together in a work area will be displayed.

-
Select the work area button you want to zoom in on or the + Zoom in button in the top-right corner to zoom in on where you want your booking.
-
To zoom in on your floor plan, select the + Zoom in button in the top-right corner. To zoom out, select the - Zoom out button.
-
You’ll see a zoomed in version of the floor plan in that area with your mapped resources.
-
If the mapping isn’t right and needs to be changed, you can edit the resource or work area markers.

Warning: if you upload a new floor plan to override an old one, make sure that it’s the same size. If it isn’t, your mapped resources and work areas won’t align with the new floor plan.
Resource clustering on a floor plan
In the Floor Plan Editor, you can map resources on your floor plans using markers. Similar to work areas, resource clustering groups nearby resources into a single marker when zoomed out, reducing on-screen clutter and keeping the floor plan easy to read.
When you zoom in or select a cluster, it expands to show individual desks or rooms, making it easier to choose the correct resource.
Clustering suits floor plans with many closely placed resources, and is switched on by default. For smaller or more spread out layouts, it may not be needed.
|
Resource clustering on |
Resource clustering off |
|---|---|
|
|
If resources are assigned to work areas, clustering doesn’t apply as they are already grouped. Work areas that are close to each other aren’t clustered either.
Note: to switch this global feature off or if the feature has been switched off and needs to be turned back on, raise a support ticket.
Our floor plan redraw service
Rather than you engaging with costly third parties to create floor plans that are more appropriate to use in our system, we offer a floor plan redraw service provided by our in-house design team. We have developed a clean and simple format that removes unnecessary detail and focuses on the features that are important for orientation. Our service can take your floor plan and redraw it in our recommended format in either 2D or 3D (see below for examples).
.png?cb=7f51cf17da2168c41f9929c87e0d152a)

Key features:
-
Unnecessary detail removed
-
Walls, rooms, and resources redrawn
-
Key facilities, such as stairs and toilets, have been identified to assist way-finding
-
Desk numbers and zone colours can also be added
You can provide us with a floor plan in a variety of formats (for example, .pdf) and our pricing is based on the number of resources (for example, desks and rooms).
Learn more about our Floor plan redraw service