Note: Matrix Booking has a feature switch that prevents standard users from seeing each other’s external visitors. This feature will therefore keep external visitor information confidential between standard users. Only administrators will have access to external visitor information in the External directory screen. This feature is switched off by default. To switch this feature on, raise a change setup support ticket.
This page explains our visitor management features and tools in detail:
Basic module
When you make a booking, you can add an external visitor to the booking. The visitor will appear in the Visitors list and the Visitor summary dashboards.
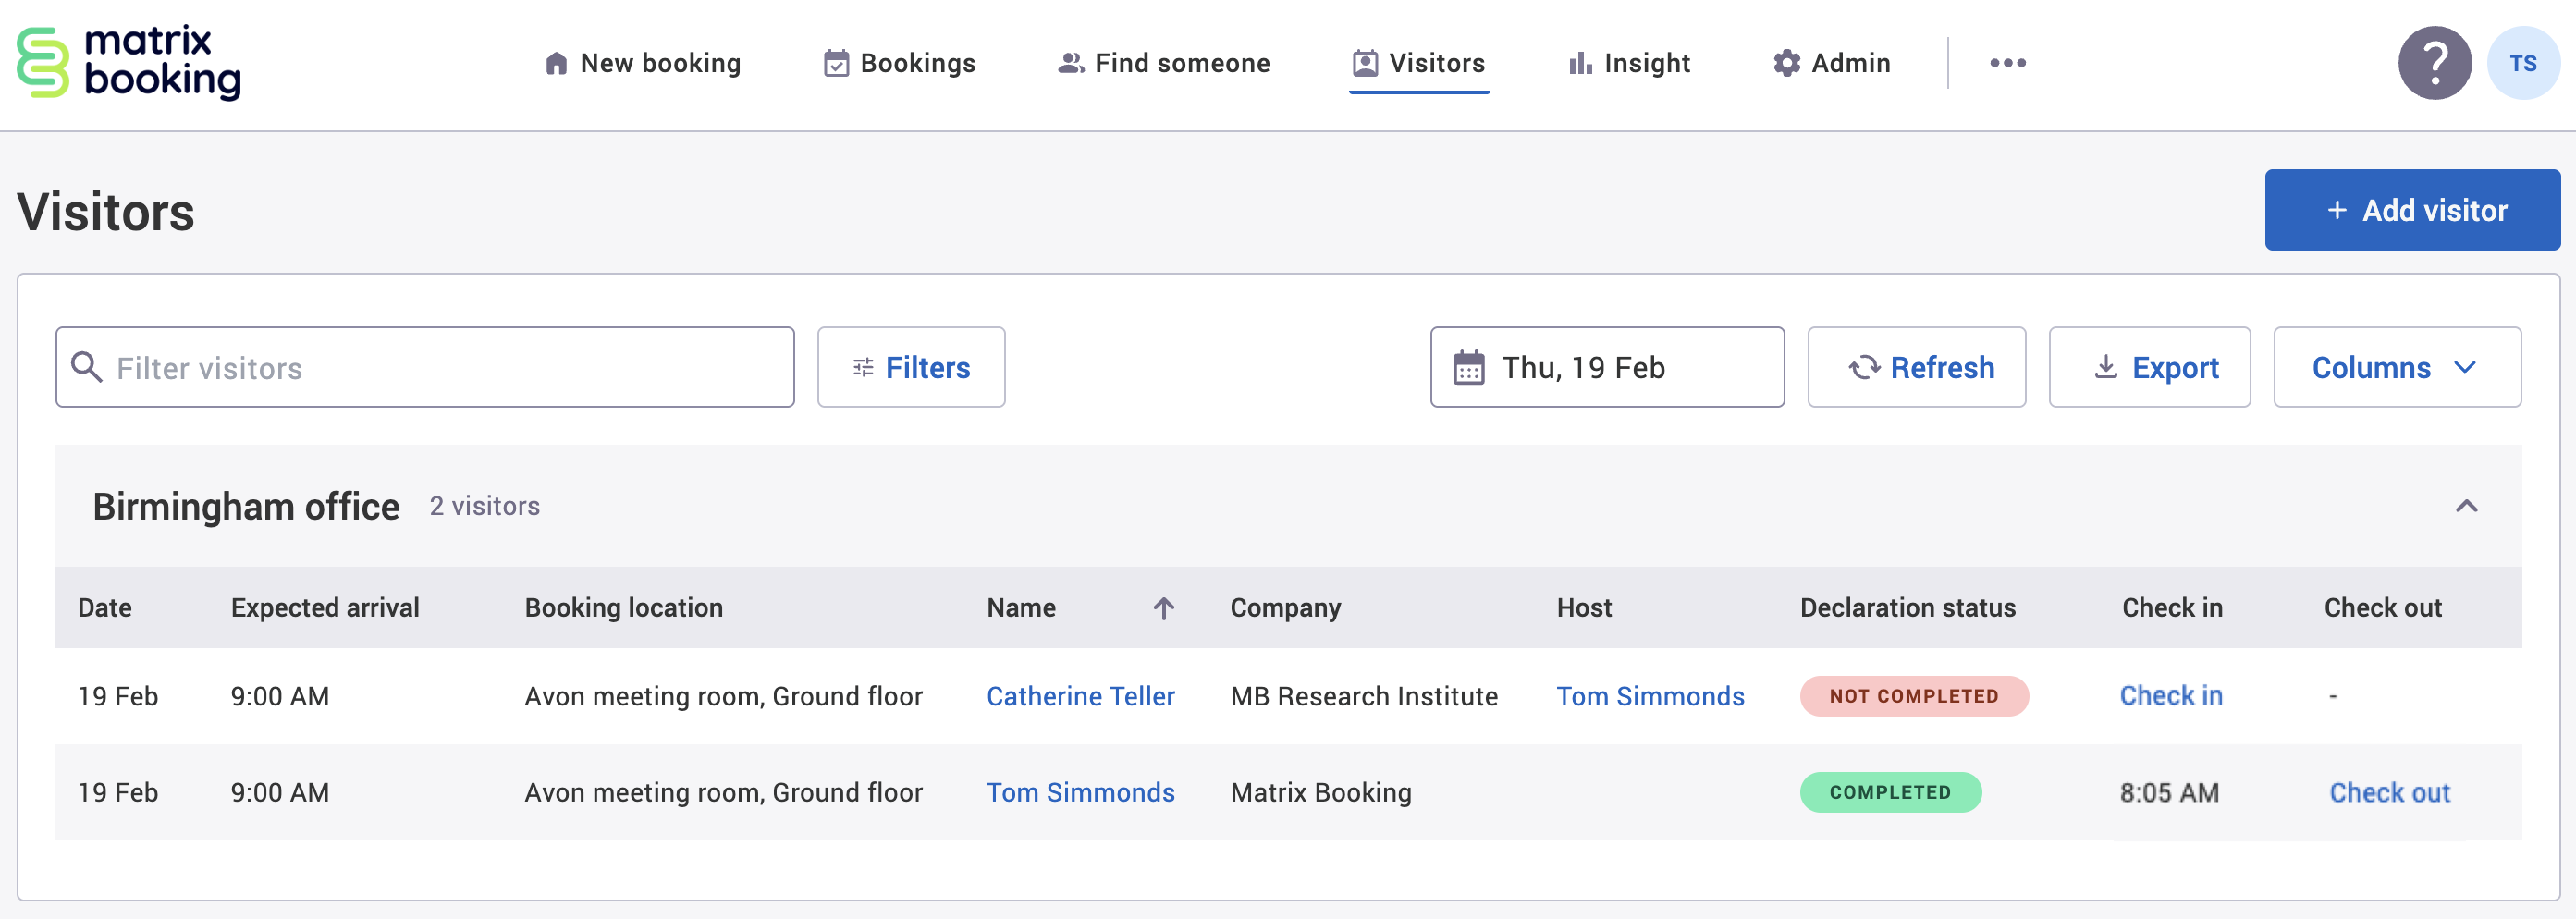
The Visitors screen can be used by reception staff to manually check in visitors and assign them a badge or ID card number.
Note: for more information on using or setting up visitor management, contact your customer success manager.
Enhanced module
The enhanced visitor management module normally includes the basic module. What you get on top is:
-
Standard users (most of your staff) will have access to the Visitors screen in Matrix Booking.
-
Standards user can check in visitors without relying on reception or security staff.
-
Standard users can check in visitors independently of any meetings.
-
Standard users will only be able to see the visitors that they have submitted.
-
Receptionists, location managers, and location administrators can access the standard users’ visitor information for the reception or location they are assigned to.
-
Administrators can access all the standard users’ visitor information regardless of location.
To set up this subscription, contact your customer success manager. Depending on your organisation’s setup, it’s normally charged on a “per reception” basis.
Notes: if visitor data anonymisation has been switched on, visitors information will anonymised and unaccessible.
Visitor data anonymisation
By default, Matrix Booking will store your external contacts (for example, visitors) until the end of your contract.
This feature is different to the Anonymise bookings after setting under Advanced booking rules:
-
Visitor “anonymisation” permanently deletes the visitor (not visit) data from the External directory.
-
The Anonymise bookings after setting anonymises booking and visit data while maintaining both the Internal and External directories.
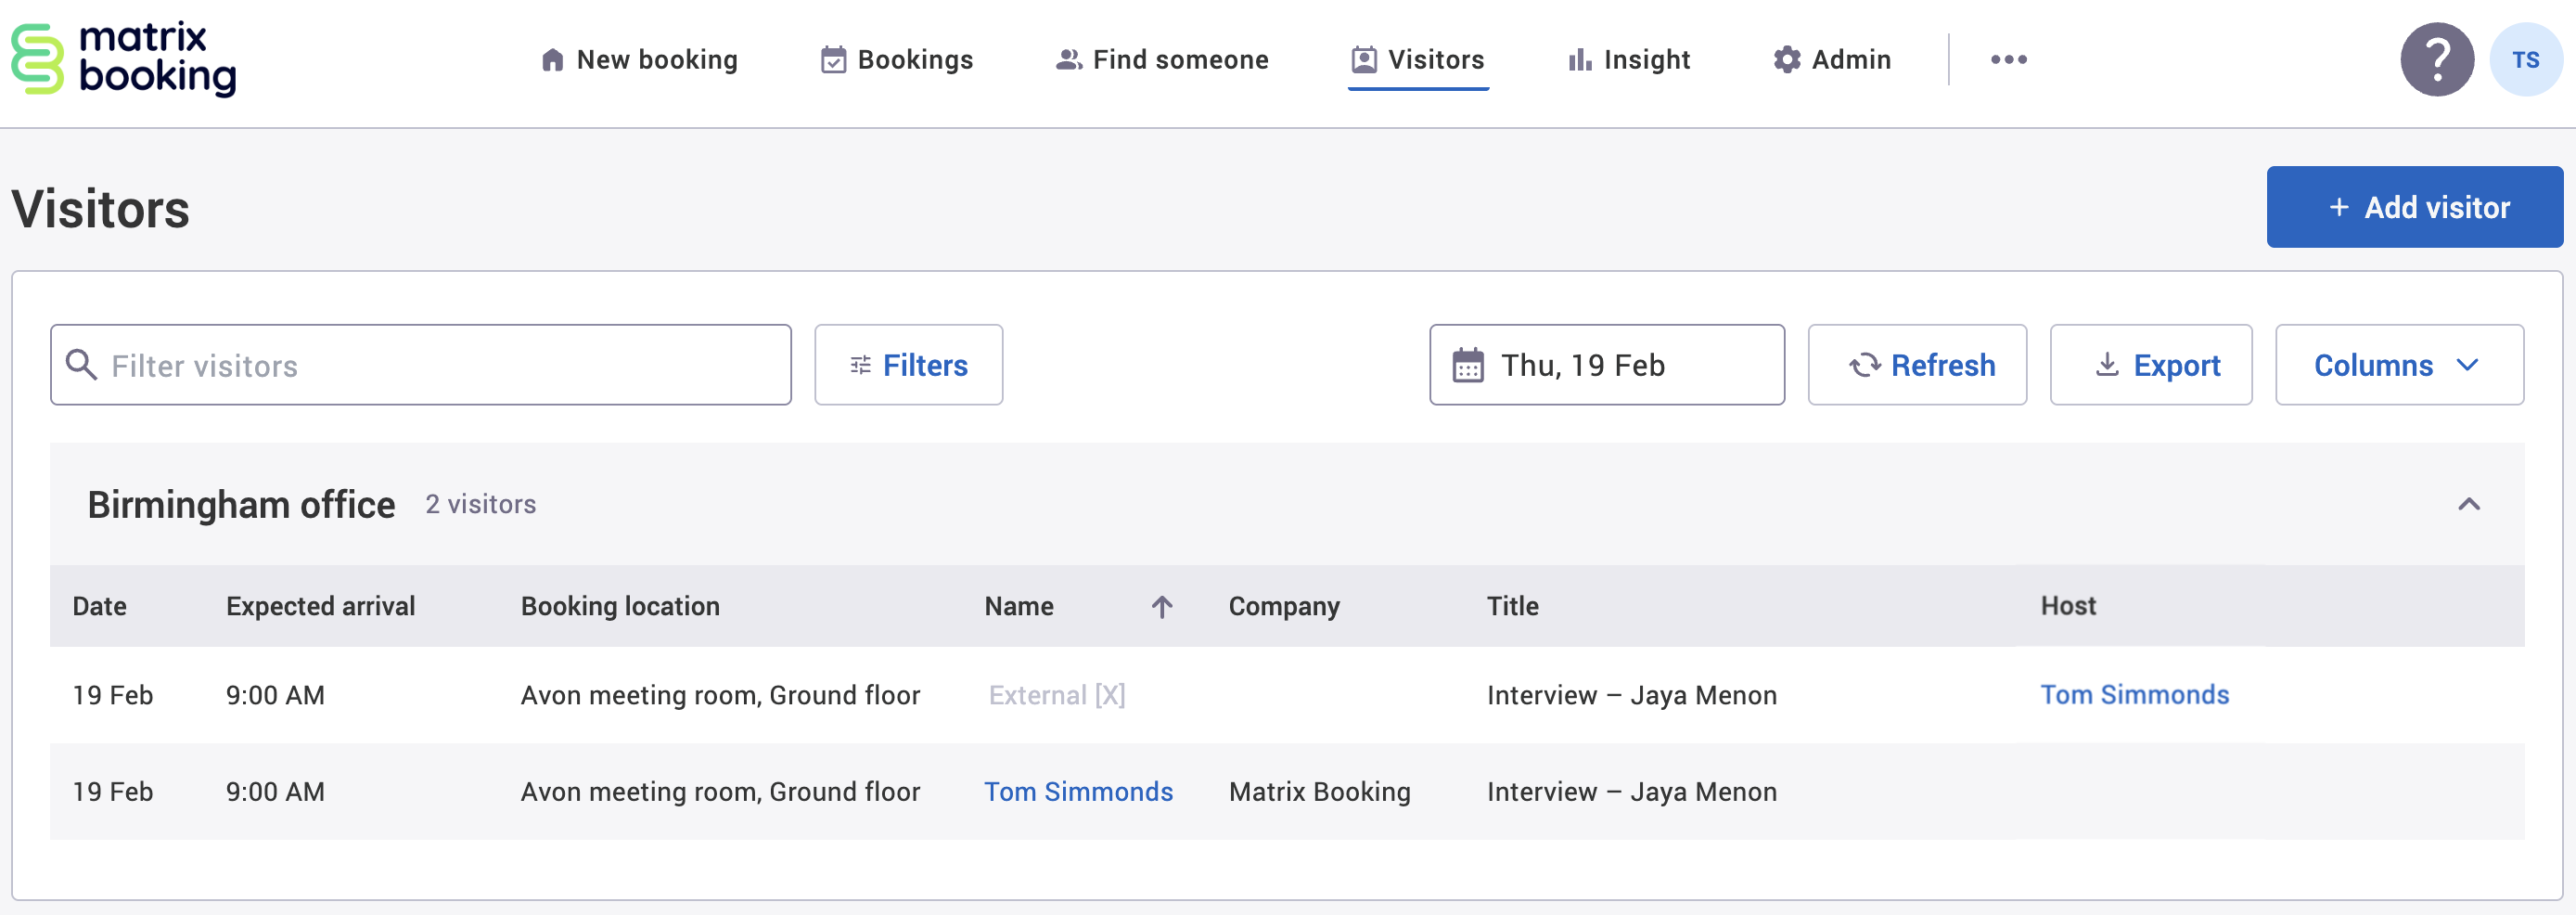
Any removed external contacts on the Visitors screen will:
-
Have their information removed and their name updated to External [X].
-
Have their check-in and checkout functionality disabled.
-
Not be able to update the record.
In the example below, the visitor (Jaya Menon) was anonymised:
Notes:
-
Once anonymised, this data can’t be recovered. If you need to discuss whether this option is right for you, contact your customer success manager.
-
Raise a change setup support ticket to get this feature switched on.
-
External contacts who have a future visit won’t be anonymised.
-
When reception sharing is switched on, anonymisation follows the setup of the organisation being visited. For example, Organisation 1 and 2 share a building and reception. Organisation 1 has anonymisation switched on and to occur after 5 days, but Organisation 2 doesn’t. The visitor visits Organisation 1 and after 5 days is anonymised for both organisations.
-
If anonymisation isn’t switched on for the organisation receiving a visitor, the other organisation will see the visitors information on their Visitors screen.
Create a reception
You need to create a reception in your resource hierarchy to be able to use the visitor management modules.
To set up a reception:
-
Select Admin in the navigation bar.
-
Select Locations and resources under the Location Settings section in the side menu.
-
Select Edit hierarchy. The Locations and resources hierarchy will appear.
-
Select Edit next to the location or resource you want to change. The Edit [Location or Resource] dialog will appear with the General tab selected by default.
-
Select the Settings tab.
-
Select the correct resource using the booking category selector.
-
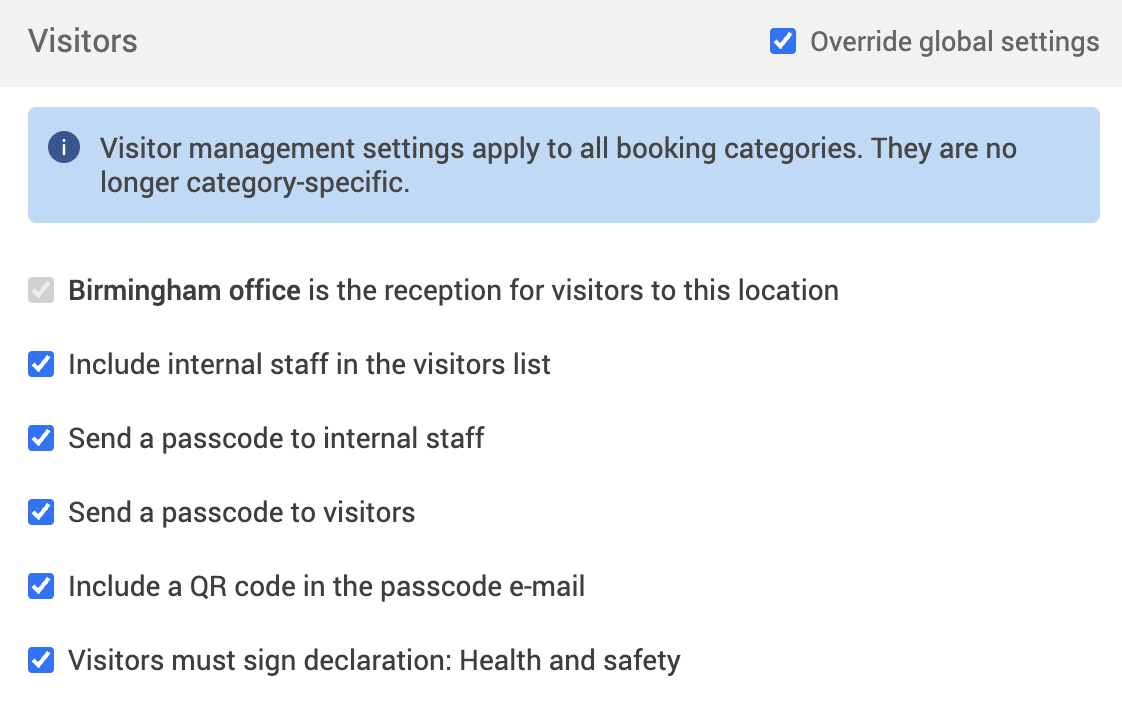
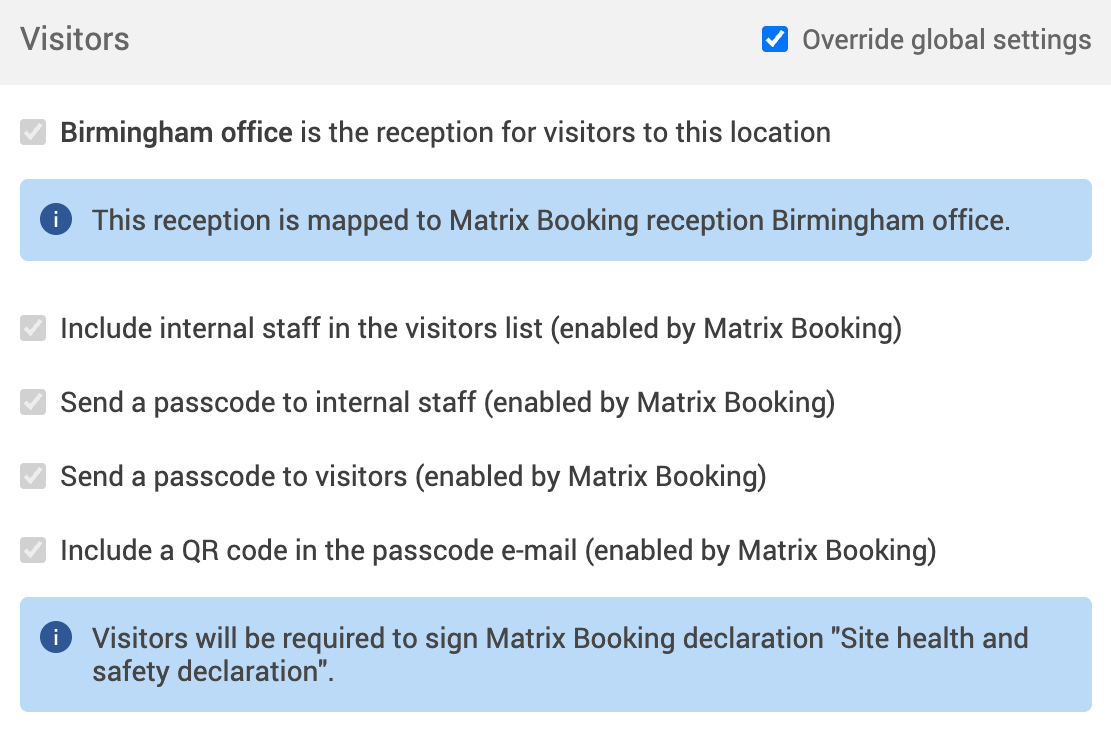
Select the Override global settings or Override [location or resource] checkbox under the Visitors section.
-
Check if any of the checkboxes are greyed out. If they are, this means that these settings are inherited from a higher level in your resource hierarchy. You may have them switched on at that level for a reason.
-
The [Building] is the reception for visitors to this location checkbox will be automatically selected for you.
-
Optional – select any of the following that you want to set up:
-
The Include internal staff in the visitors list checkbox.
-
The Send a passcode to internal staff checkbox.
-
The Send a passcode to visitors checkbox.
-
The Include a QR code in the passcode email checkbox.
-
-
Select either of the following and the dialog will close to return you to the Locations and resources hierarchy:
-
Save to keep your changes.
-
Close to discard your changes.
-
-
Select Save changes.
Learn more about Visitor settings
Learn more about shared receptions
Access the Visitors screen
To access the Visitors screen:
-
Get the basic or enhanced visitor management module switched on.
-
Once your customer success manager or our Support Team have let you know that it’s switched on, select Visitors in the navigation bar. The Visitors screen will appear.
-
Filter by visitor name or email address in the Filter visitors search bar.
-
Select the More filters button to open the Location and Visitor type filters.
-
Select the date picker to change the date you want to search on.
-
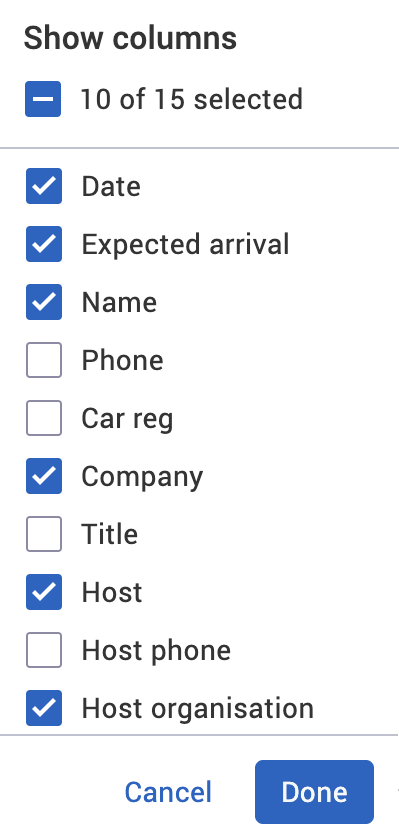
Select the columns you want to search on using the Columns dropdown.
-
Select Refresh to see your search results based on your search parameters and filters.
-
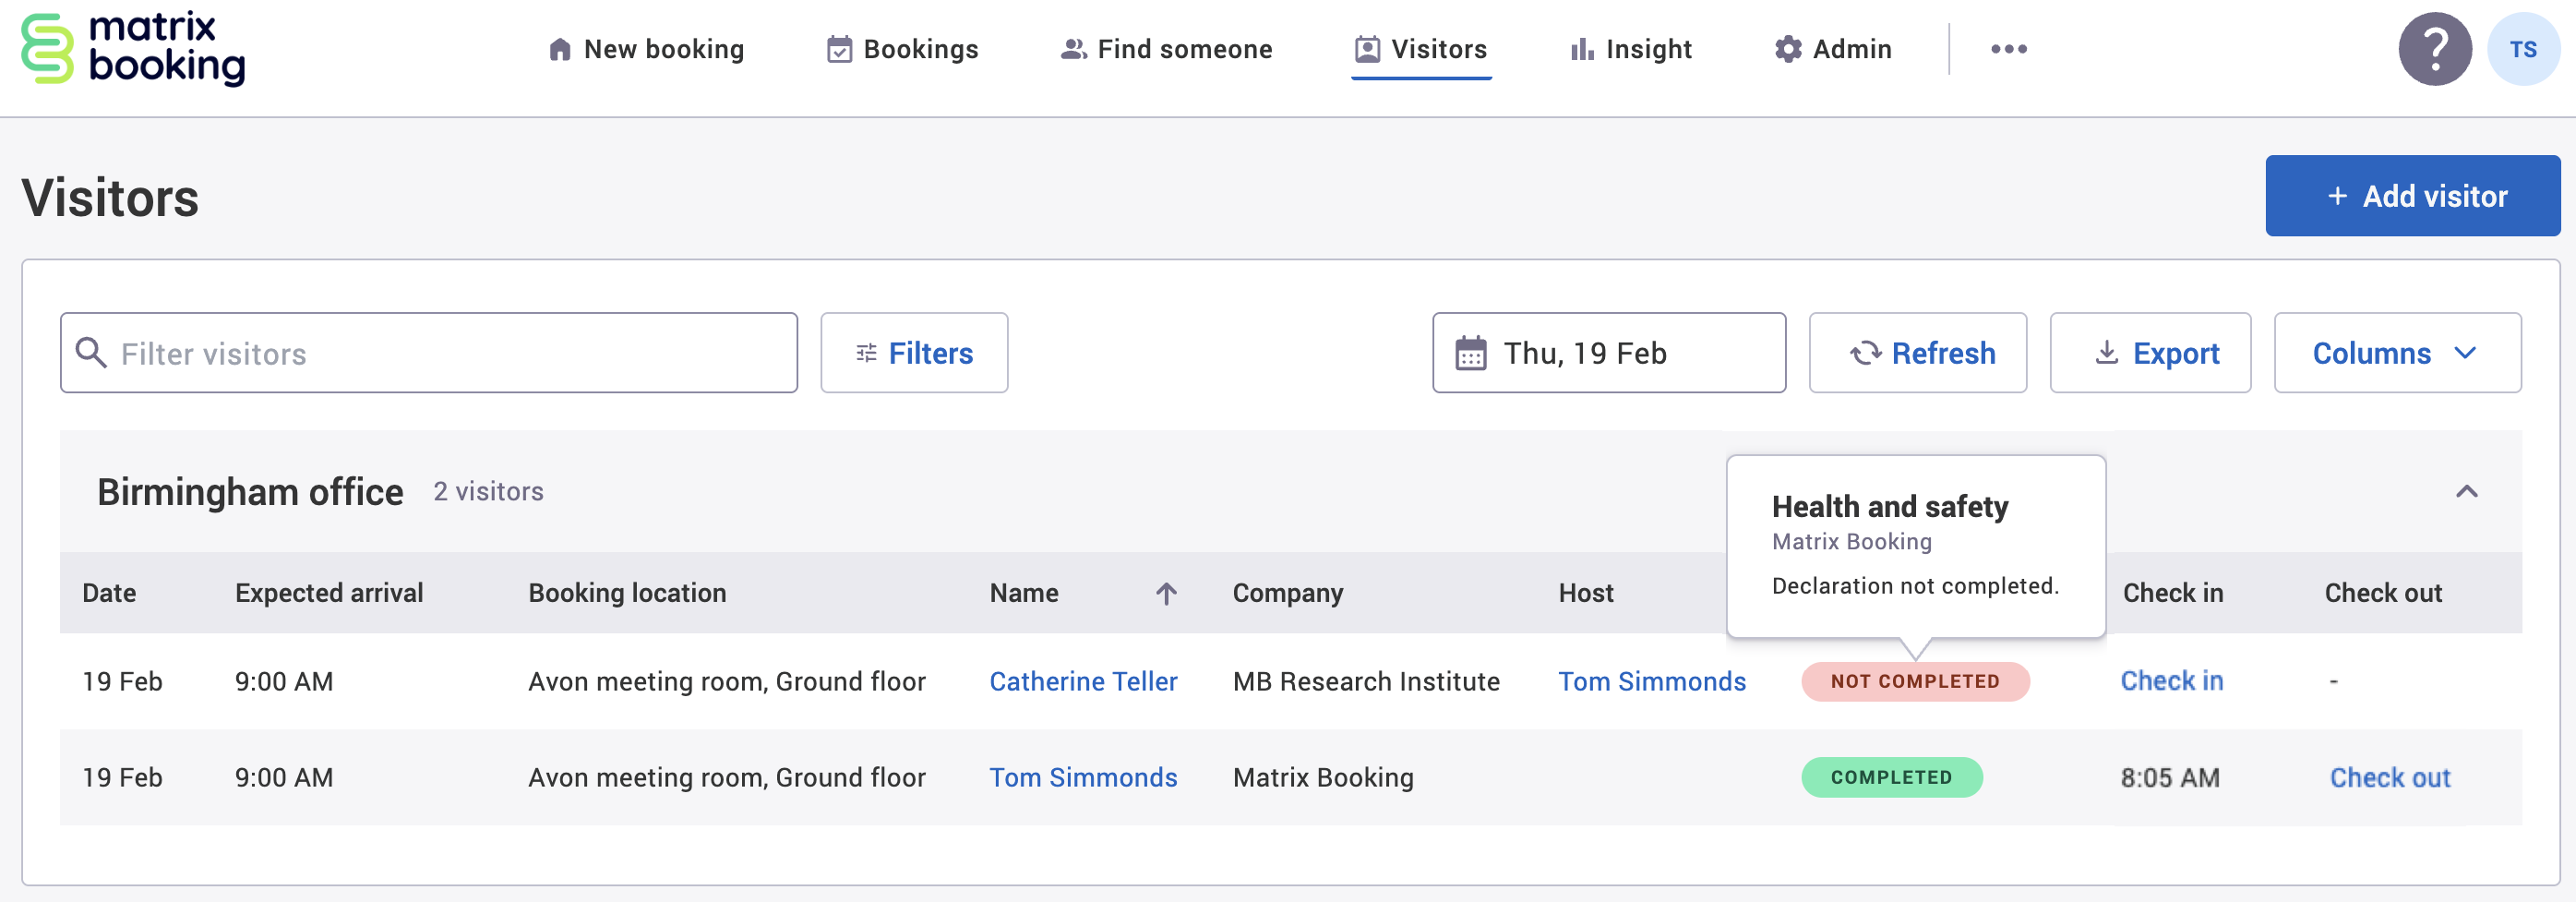
Hover over the declaration status to see the name of the declaration that has been completed or not.
-
Select the booking title under the Title column to view the booking in new tab.
Search parameters and filters
You can search on the:
-
Visitor name or email address
-
Location
-
Visitor type
-
Date
-
Status:
-
Checked in
-
Checked out
-
Expected
-
-
Columns
Columns filters
The full list of Columns filters is as follows:
-
Date
-
Expected arrival
-
Name
-
Phone
-
Car reg
-
Company
-
Title
-
Host
-
Host phone
-
Host organisation
-
Declaration status
-
Badge Number
-
Check in
-
Check out
Add a visitor
There are 2 ways to add a visitor:
-
Make or edit a booking and add external visitors in the Attendees section.
-
Add visitor on the Visitors screen.
To discuss our enhanced visitor management module, contact your customer success manager. To add a visitor in the Visitors screen:
-
Select + Add visitor. The Add visit dialog will appear (red asterisks denote required information).
-
Select the location that the visitor is visiting.
-
If reception sharing has been switched on, select the host organisation that the visitor is visiting.
-
Depending on whether the visitor has been added before might mean you need to take different steps to add them to the Visitors screen:
-
If the visitor hasn’t been added to your directory before or has been removed due anonymisation, skip to step 6.
-
If the visitor has been added to your directory and is still retained, skip to step 9.
-
-
For a new visitor, select Create new visitor. The Add visitor dialog will appear.
-
Enter their details in the text boxes provided.
-
Select Add visitor. This will return you to the Add visit dialog with your new visitor added.
-
Begin to enter the visitor’s name or email address in the search bar. If you created a new visitor, they will appear automatically below the search bar.
-
Select their name from the dropdown. They will be added below.
-
Enter the visit details under the Visit information section.
-
Enter a message for the host if needed.
-
Select whether the visitor has complete the required declarations.
-
Select either of the following and the dialog will close to return you to the Visitors screen:
-
Add visit to add the visitor’s upcoming visit (and not check them in).
-
Add and check in to add and check in the visitor.

-
-
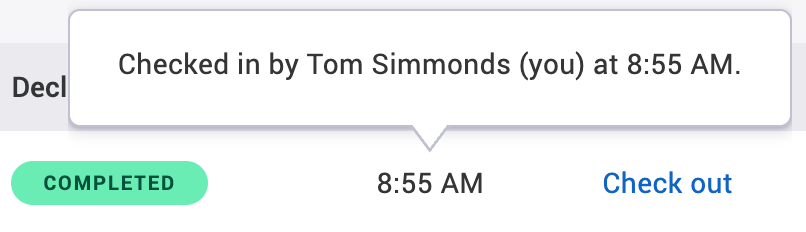
If you hover over the visitor’s check-in or checkout time, a dialog will tell you who check the visitor in or out.
When a visitor checks in, Matrix Booking automatically sends an email to the meeting host to let them know. Visitors can check in and out multiple times a day. This will give multiple entries for the same visitor on the same day, but with different check-in and checkout times.
Check in a visitor
There are 2 ways to check in a visitor:
-
Add a visitor on the Visitors screen and select Add and Check in.
-
Check in in the Check in column (only active on the current day).
To check a visitor in using the Check in button in the Action column:
-
Select Check in next to the visitor. The Check in [visitor] dialog will appear.
-
Enter any other relevant details.
-
Select either of the following and the dialog will close to return you to the Visitors screen:
-
Select Check in. The Check-in time for the visitor will appear.
-
Select Cancel to discard the check-in.

-
-
If you hover over the visitor’s check-in time, a dialog will tell you who check the visitor in or out.
When a visitor checks in, Matrix Booking automatically sends an email to the meeting host to let them know. Visitors can check in and out multiple times a day. This will give multiple entries for the same visitor on the same day, but with different check-in and out times.
Note:
-
The Matrix Booking Welcome app also allows visitors and staff to check in. For more information, see our guidance:
-
If you want your staff to be automatically checked in to your building when they check in to their first booking of the day, raise an administrator support ticket to get this feature switched on for you. It will also update the Visitors list and Visitor summary dashboards.
Check out a visitor
To check a visitor out:
-
Select Check out next to the visitor. The Check out [visitor] dialog will appear.
-
Select either of the following and the dialog will close to return you to the Visitors screen:
-
Select Check out. The Checkout time for the visitor will appear.
-
Select Cancel to discard the check-in.
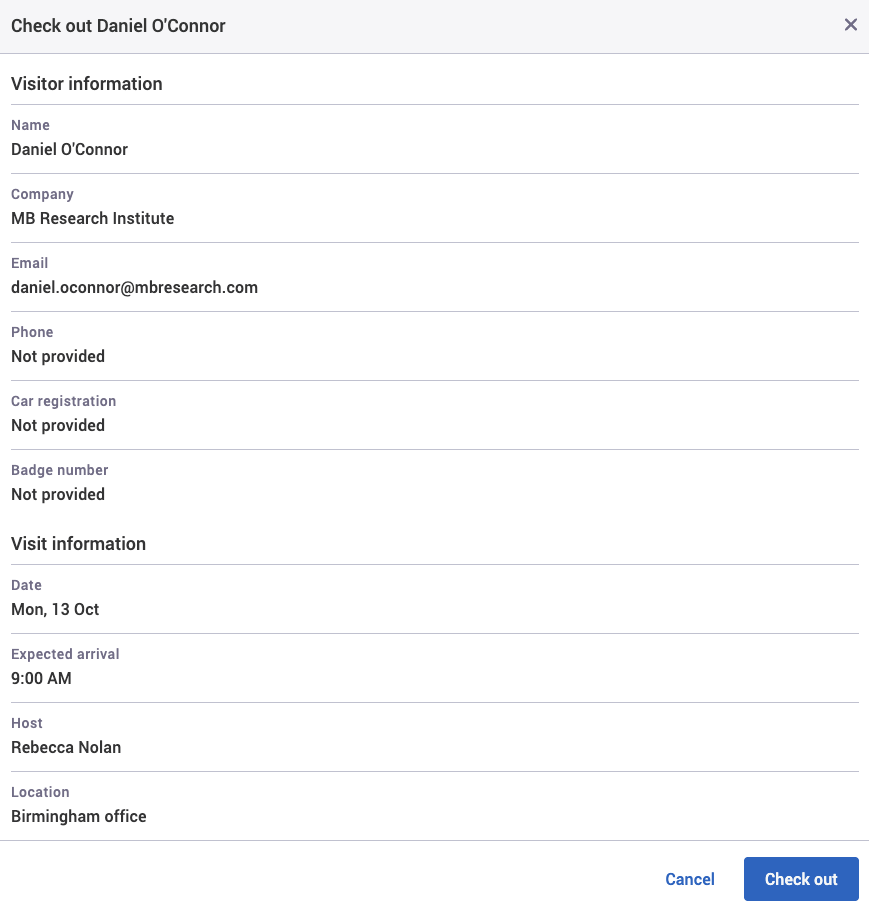
-
-
If you hover over the visitor’s checkout time, a dialog will tell you who check the visitor in or out.
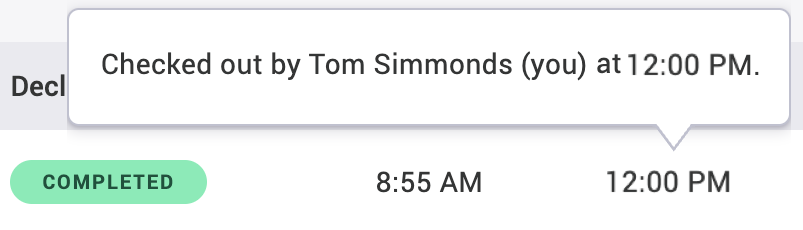
When a visitor checks in, Matrix Booking automatically sends an email to the meeting host to let them know. Visitors can check in and out multiple times a day. This will give multiple entries for the same visitor on the same day, but with different check-in and out times.
Export Visitors
To export Visitors:
-
Select Export. Your file explorer will appear.
-
Select the location you want to save your directory as a
.csvfile. -
Select Save (or equivalent on different PCs). Your file explorer will close and your Visitors have been saved.
Visitors settings in the Settings tab
-
Settings from a location or resource that’s higher in your hierarchy will be inherited by locations and resources below it. These settings will appear greyed out in the locations or resources lower in the hierarchy. If they are, this means that these settings are inherited from a higher level in your resource hierarchy. You may have them switched on at that level for a reason.
-
Changing the settings described above may affect other features you have for your organisation.
-
These settings aren’t booking category-specific. They apply to all booking categories. This means that the Visitors settings don’t need to be switched on for each category using the booking category selector.
-
If reception sharing is switched on, the Visitors section will show what reception is mapped by which organisation.
-
If reception sharing is switched on, the sharer organisation’s Visitors settings will override the sharee organisation’s Visitors settings. Any Visitors settings that the sharer organisation switches on will be switched on and greyed out for the sharee organisation. If those settings aren’t switched on by the sharer organisation, the sharee organisation can choose to switch them for their visitors.
-
If the sharer organisation has declarations switched on, visitors will receive its declaration email as well as one from the sharee organisation they are visiting (if switched on).
Limitations
The Visitors screen limitations are:
-
The Visitors screen is limited to the first 2,000 entries for all visitors and populates the table based on the search parameters you selected.
-
There’s only 1 view type.
-
Adding a visitor that isn’t hasn’t been linked to a booking will leave the booking location blank.
-
The system doesn’t allow to view, edit, approve, reject, end early, or cancel any bookings.
-
You need to create a reception in your resource hierarchy before making bookings with visitors. Bookings with visitors won’t appear in this list until a reception has been set up. All bookings that have yet to take place and have visitors will need to be cancelled and remade to include them in the list.