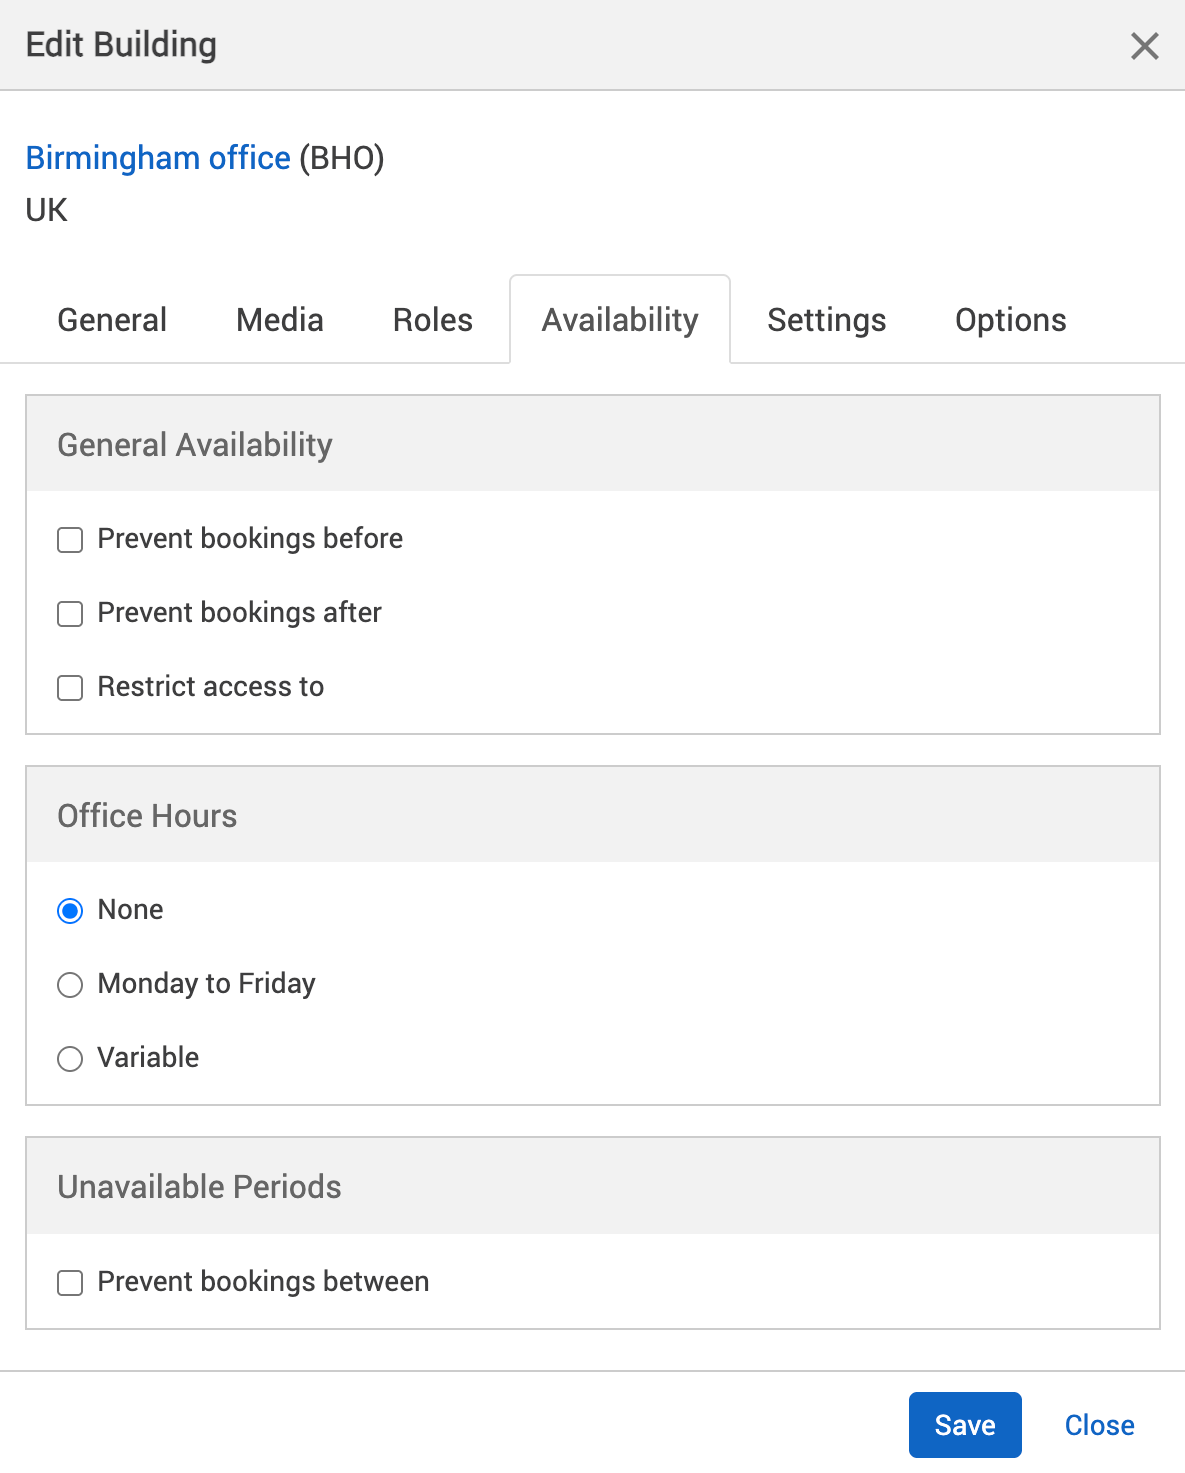
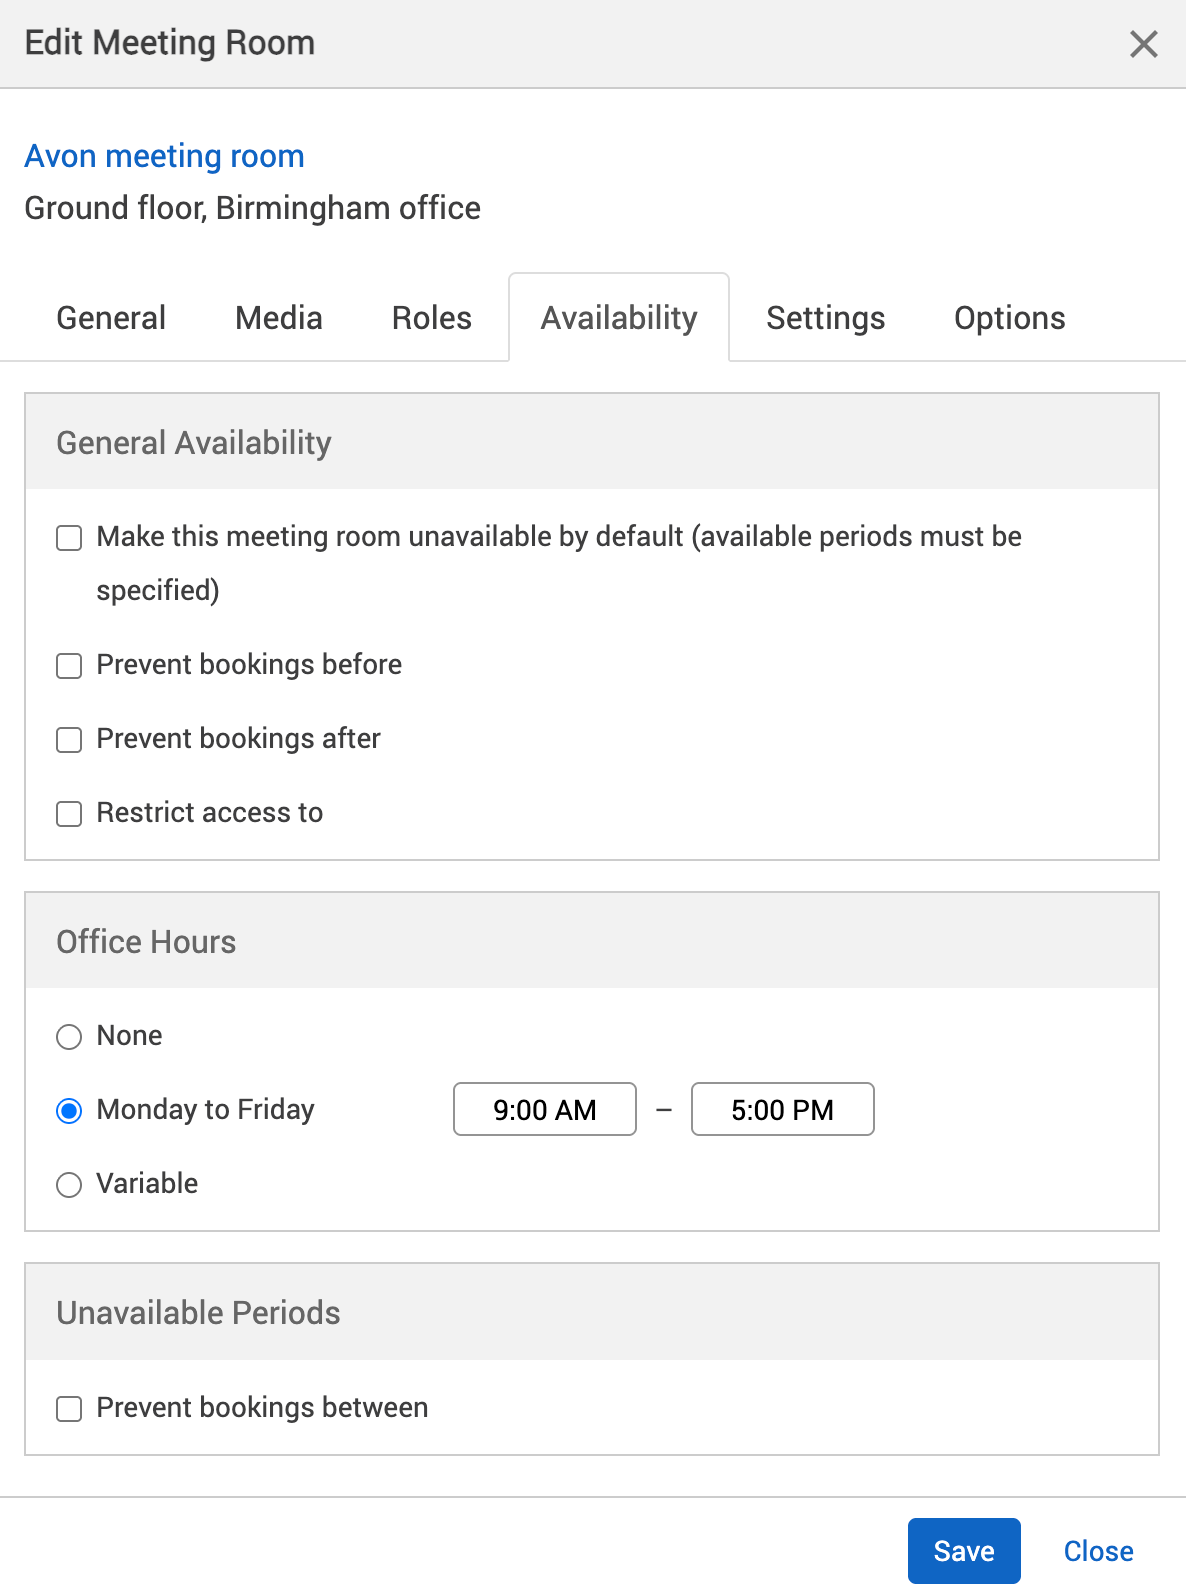
The Availability tab is where you can set the availability of a resource or all the resources of a location. It determines on what date, what time, and who can book a resource:
Access the Availability tab
To access the Availability tab of a location or resource:
-
Select Admin in the navigation bar.
-
Select Locations and resources under the Location Settings section in the side menu.
-
Select Edit hierarchy. The Locations and resources hierarchy will appear.
-
Select Edit next to the location or resource you want to change. The Edit [Location or Resource] dialog will appear with the General tab selected by default.
-
Select the Availability tab.
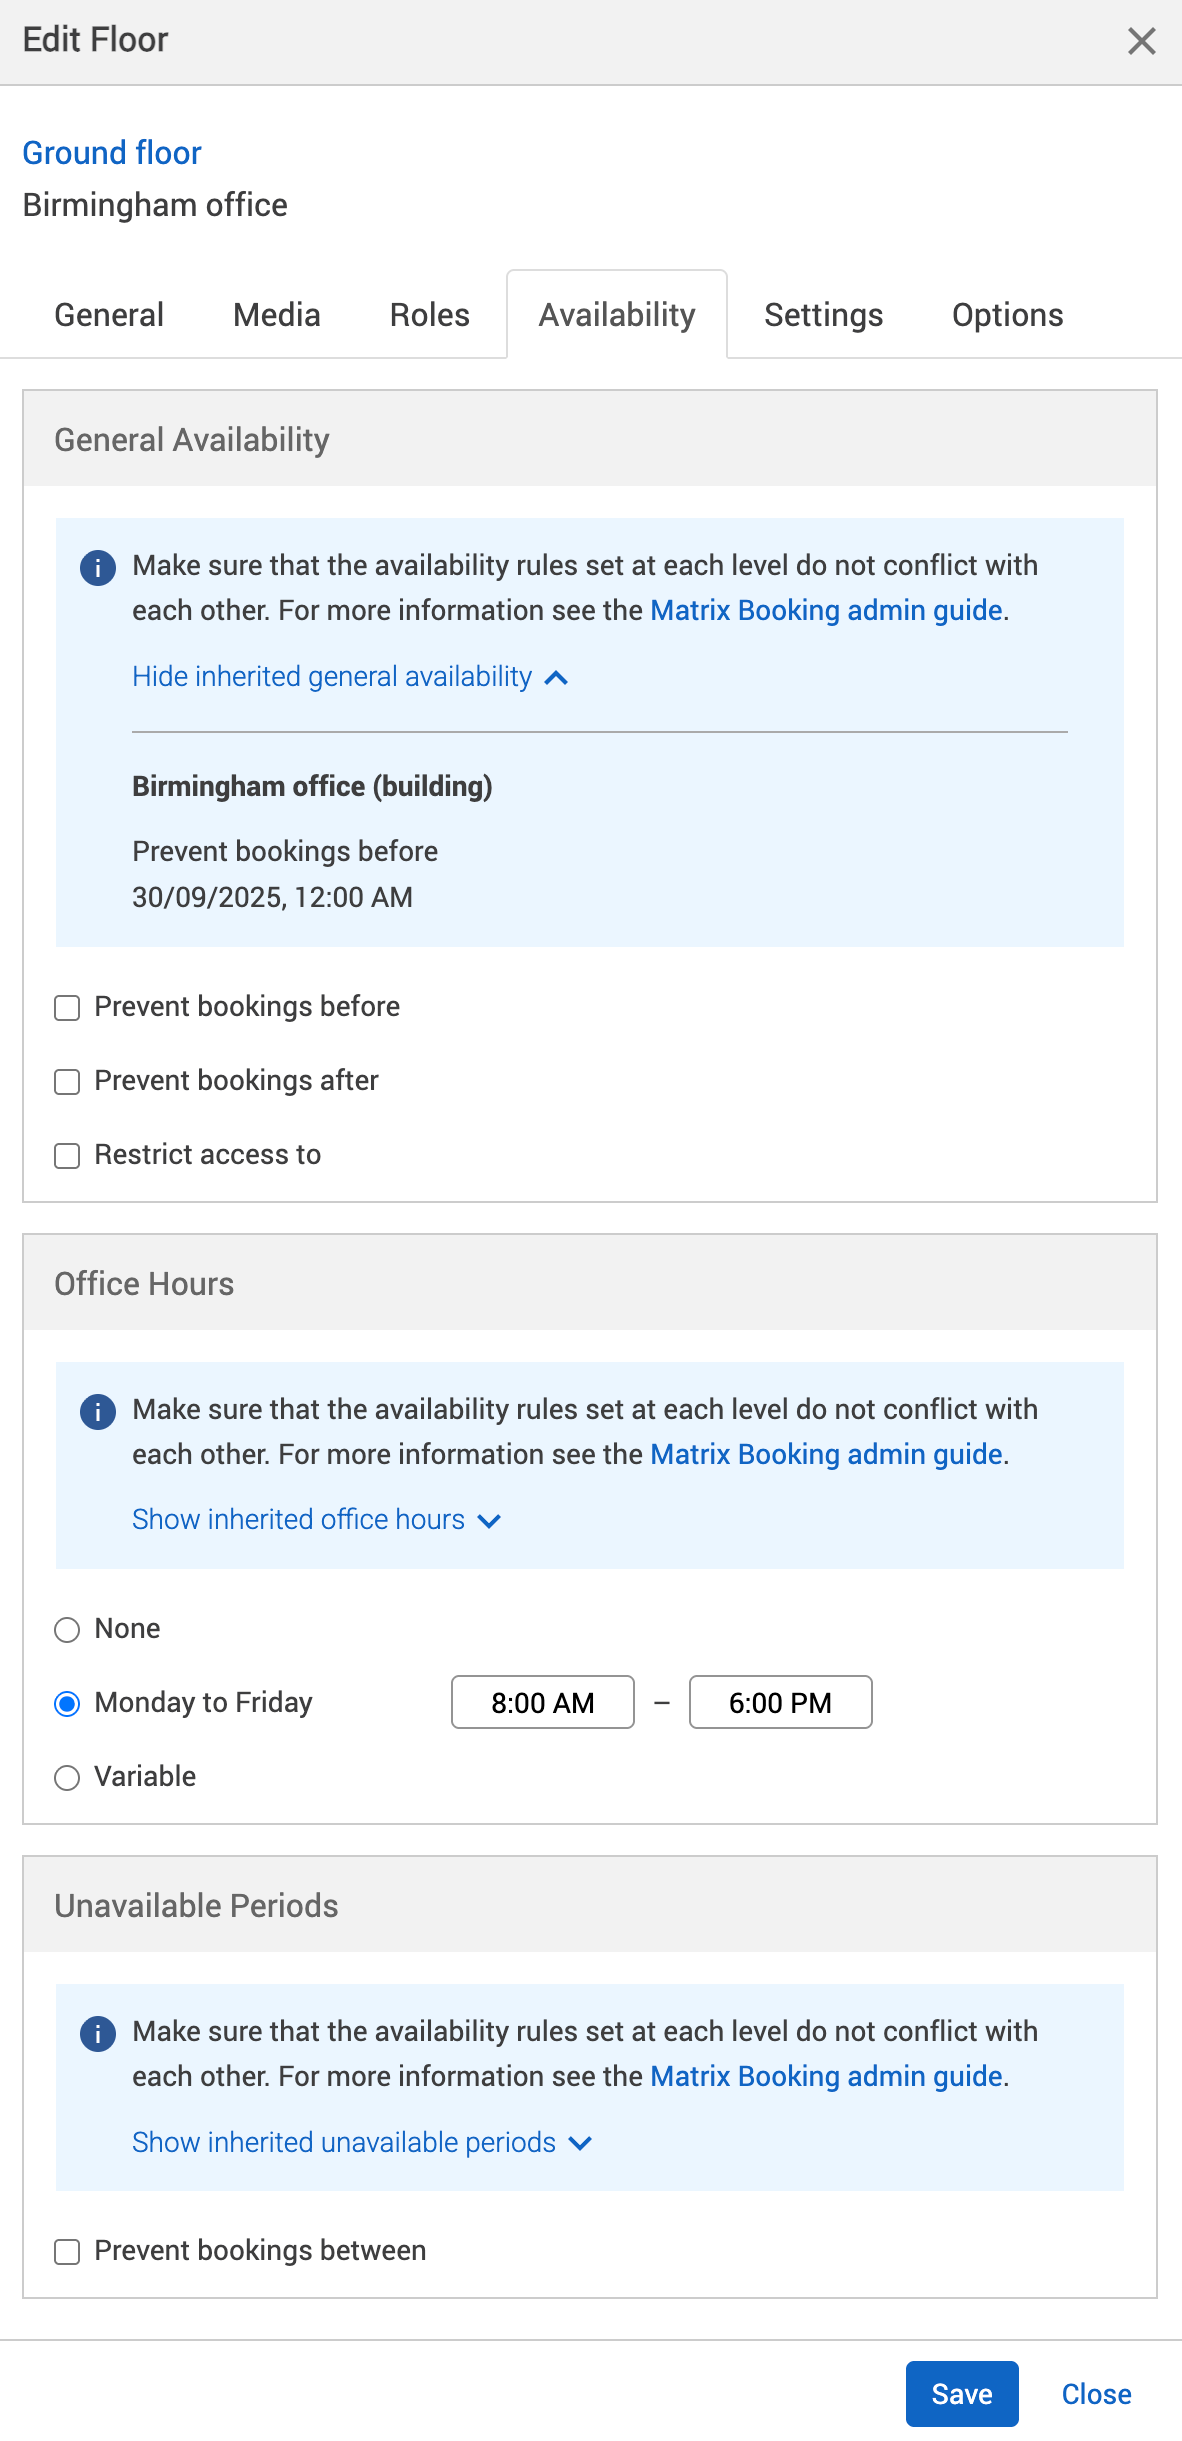
Inherited availability
Settings of a location or resource are inherited from a higher level. A resource can’t be available outside of the location’s, overall building’s, or site’s opening hours. To see more information on the availability, select Show inherited general availability.
You might select a location instead of a resource to limit the availability of all the resources under that location, which is faster than limiting the availability of each resource in turn. The availability of the resources under a location will be inherited by that location.
Note: if you enter a 24-hour format, this will be changed automatically to a 12-hour format (for example, 23:00 will be changed to 11:00 PM).
General availability
This section allows you to limit the availability of a resources or all the resources of a location to certain dates, times, and groups. There are different ways to set up the availability of a resource or all the resources of a location:
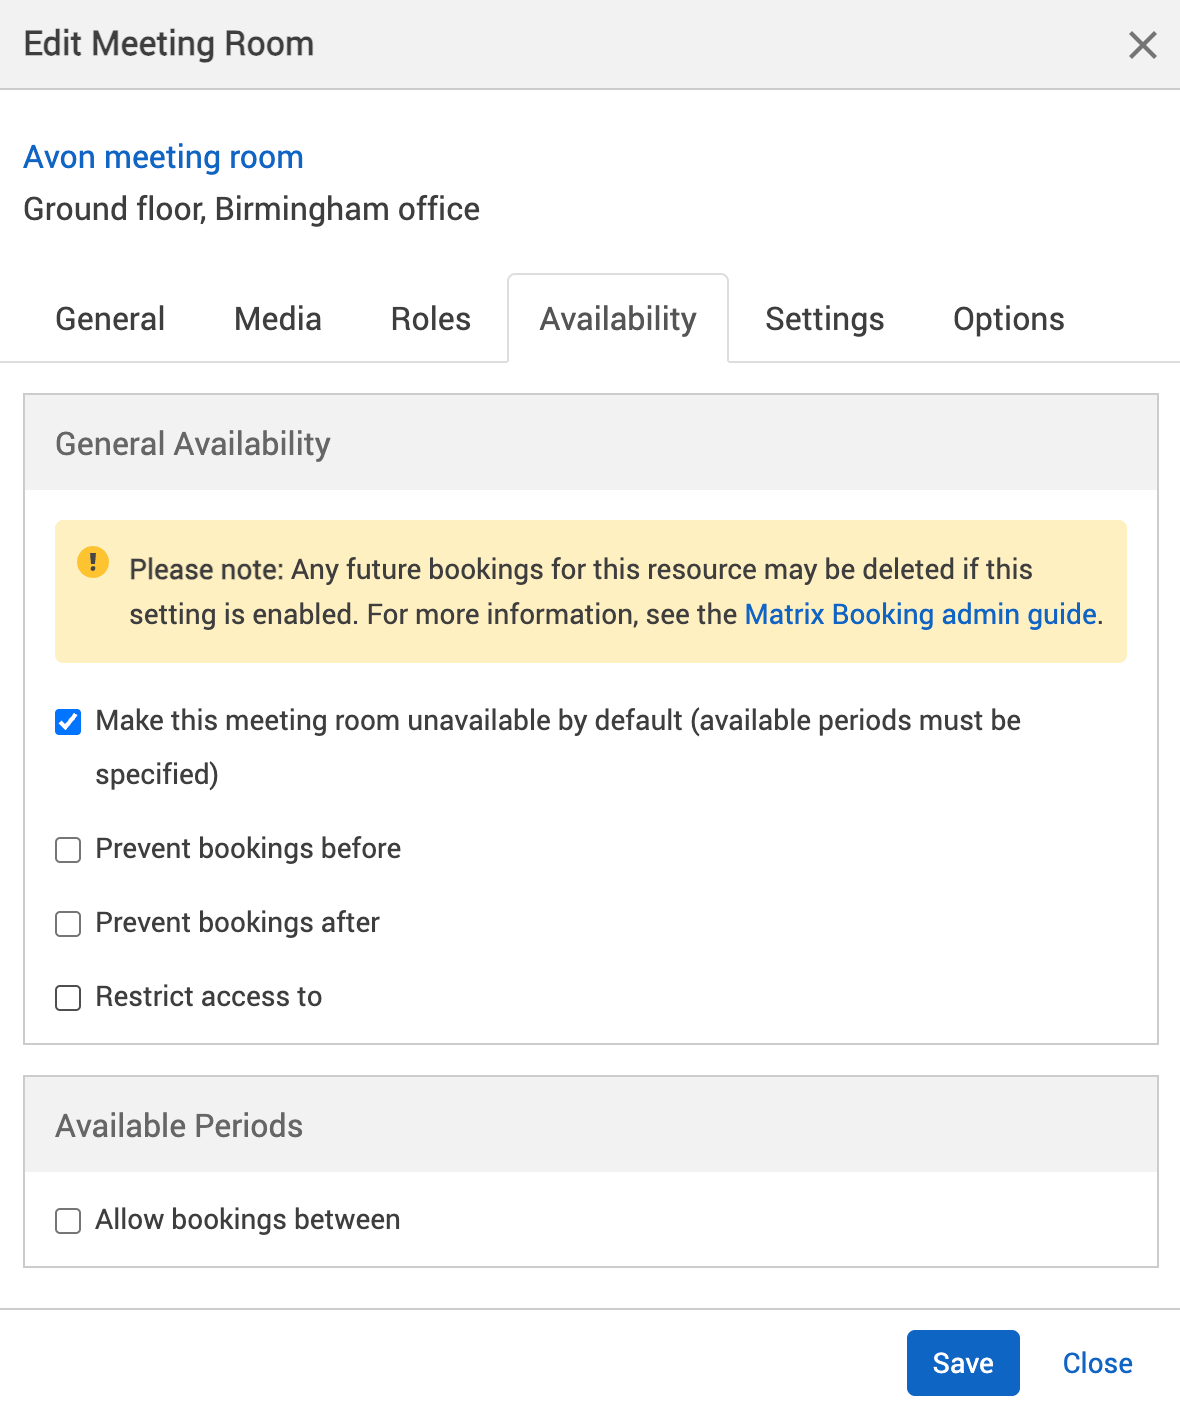
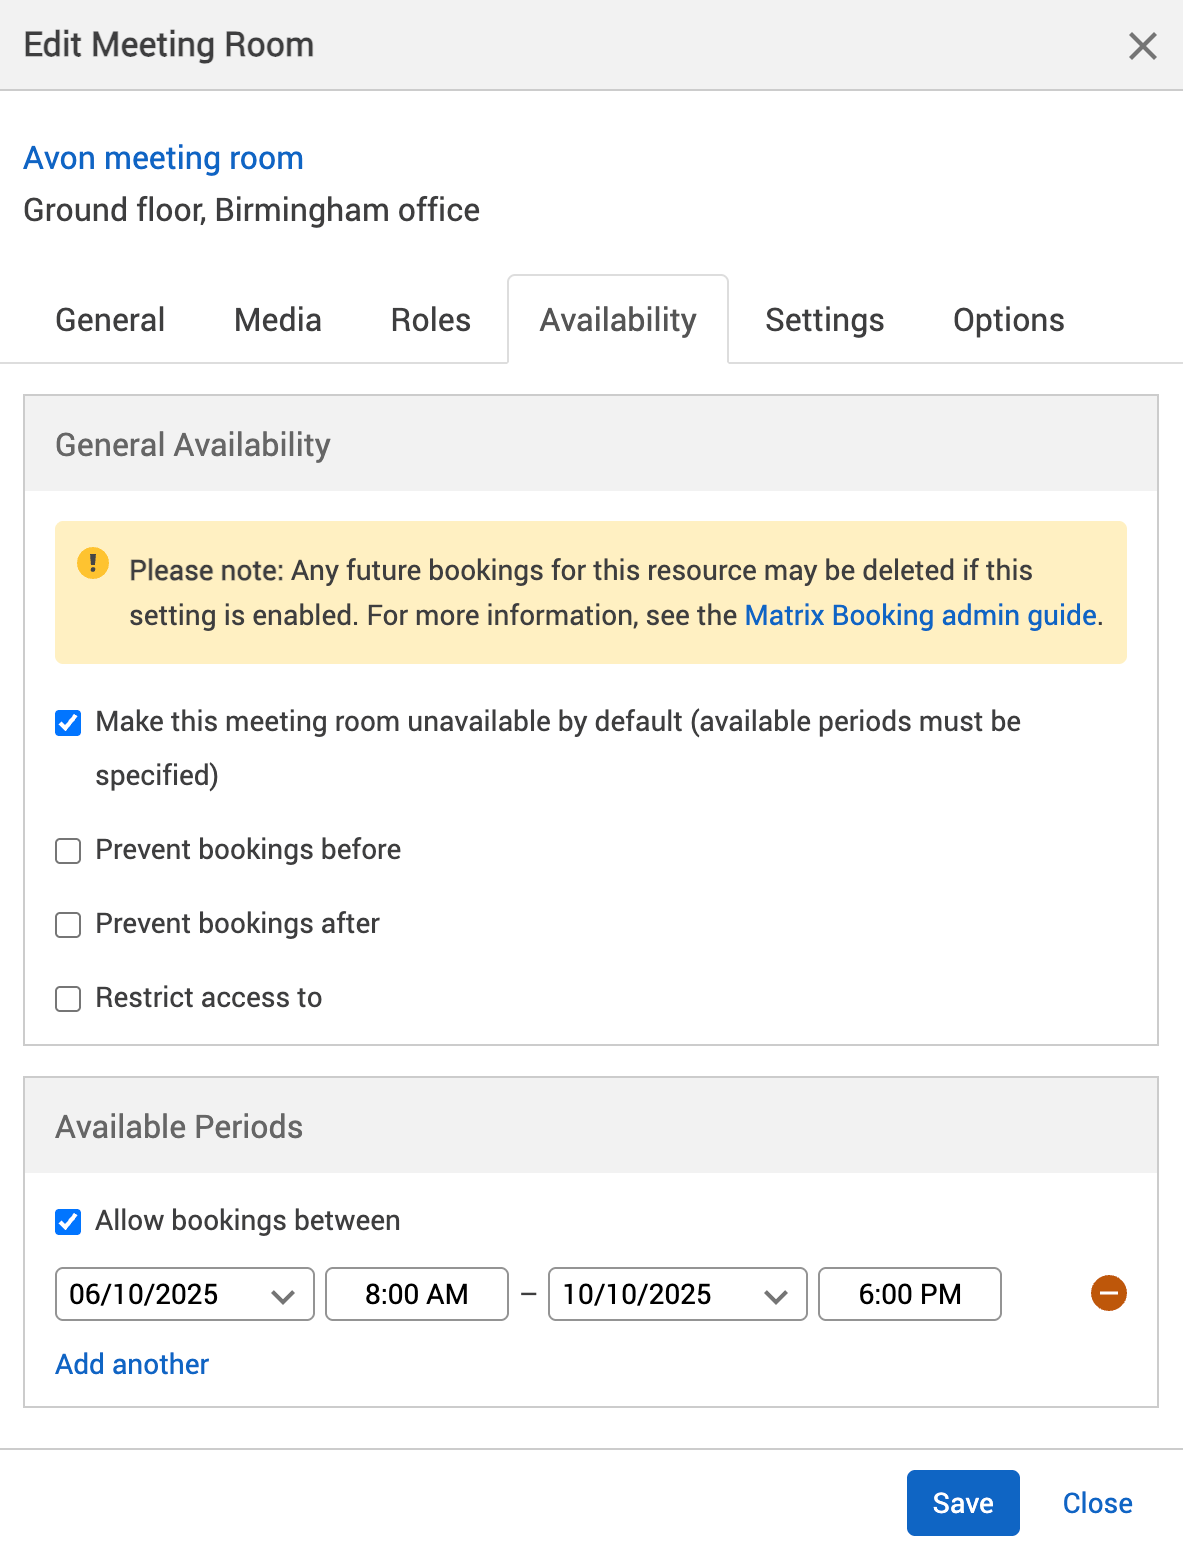
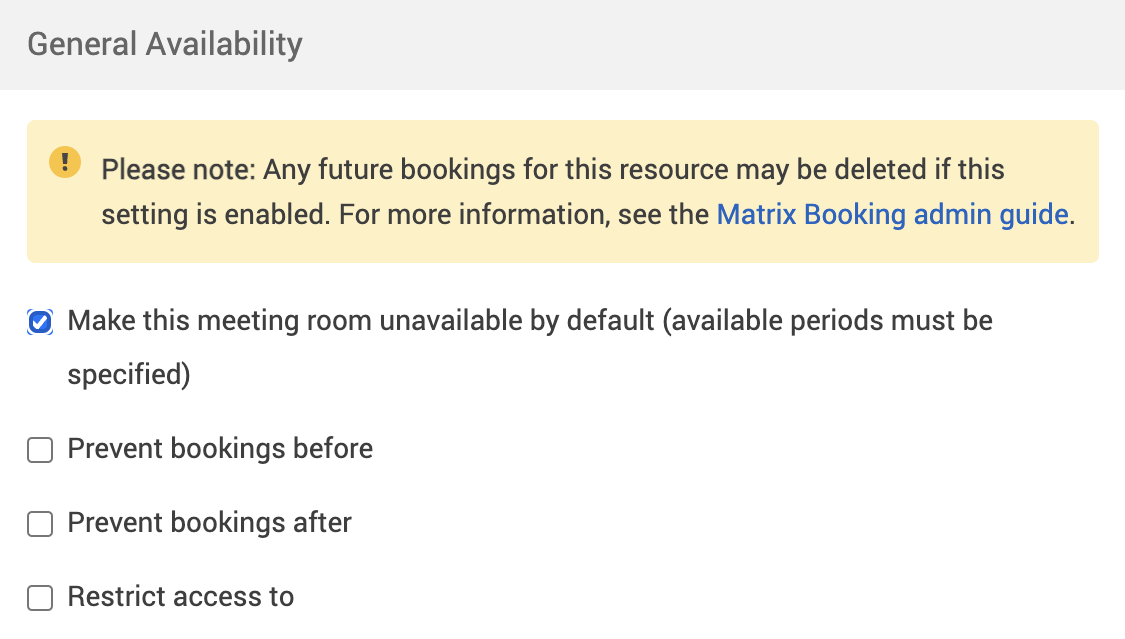
Unavailable by default
This setting allows you to make a location or resource unavailable during certain dates and time. This is sometimes easier than creating a booking if it’s for some special event or reason.
The dates and times you set are for when the location or resource will be available and not unavailable.
Notes:
-
This setting replaces the Office Hours and Unavailable Periods sections with the Available Periods section.
-
Any location or resource that has this setting switched on will have it’s booking data reflected accurately in the availability and utilisation dashboard in Matrix Booking Insight, even if there are other available periods for other locations and resources.
To make a location or resource unavailable by default:
-
Go to the General Availability section.
-
Select the Make this [location or resource] unavailable by default checkbox. The Office Hours and Unavailable Periods section will be replaced by the Available Periods section.
-
Go to the Available Periods section.
-
Select the Allow bookings between checkbox. The Date dropdowns and Add Time buttons will appear.
-
Select the first Date dropdown. A calendar will appear.
-
Select the start date you want the location or resource to be available from.
-
Select the first Add Time. The Time text box will appear.
-
Enter the start time you want the location or resource to be available from.
-
Select the second Date dropdown. A calendar will appear.
-
Select the start date you want the location or resource to be available until.
-
Select the second Add Time. The Time text box will appear.
-
Enter the end time you want the location or resource to be available until.
-
If you want to add another date and time range for the location or resource to be made available, select Add another and repeat steps 9 to 16.
-
To remove a date and time range, select the – Remove button.
-
If you want to make the resource available again, select the Make this [location or resource] unavailable by default checkbox again to untick it.
-
Select either of the following and the dialog will close to return you to the Locations and resources hierarchy:
-
Save to keep your changes.
-
Close to discard your changes.
-
-
Select Save changes.
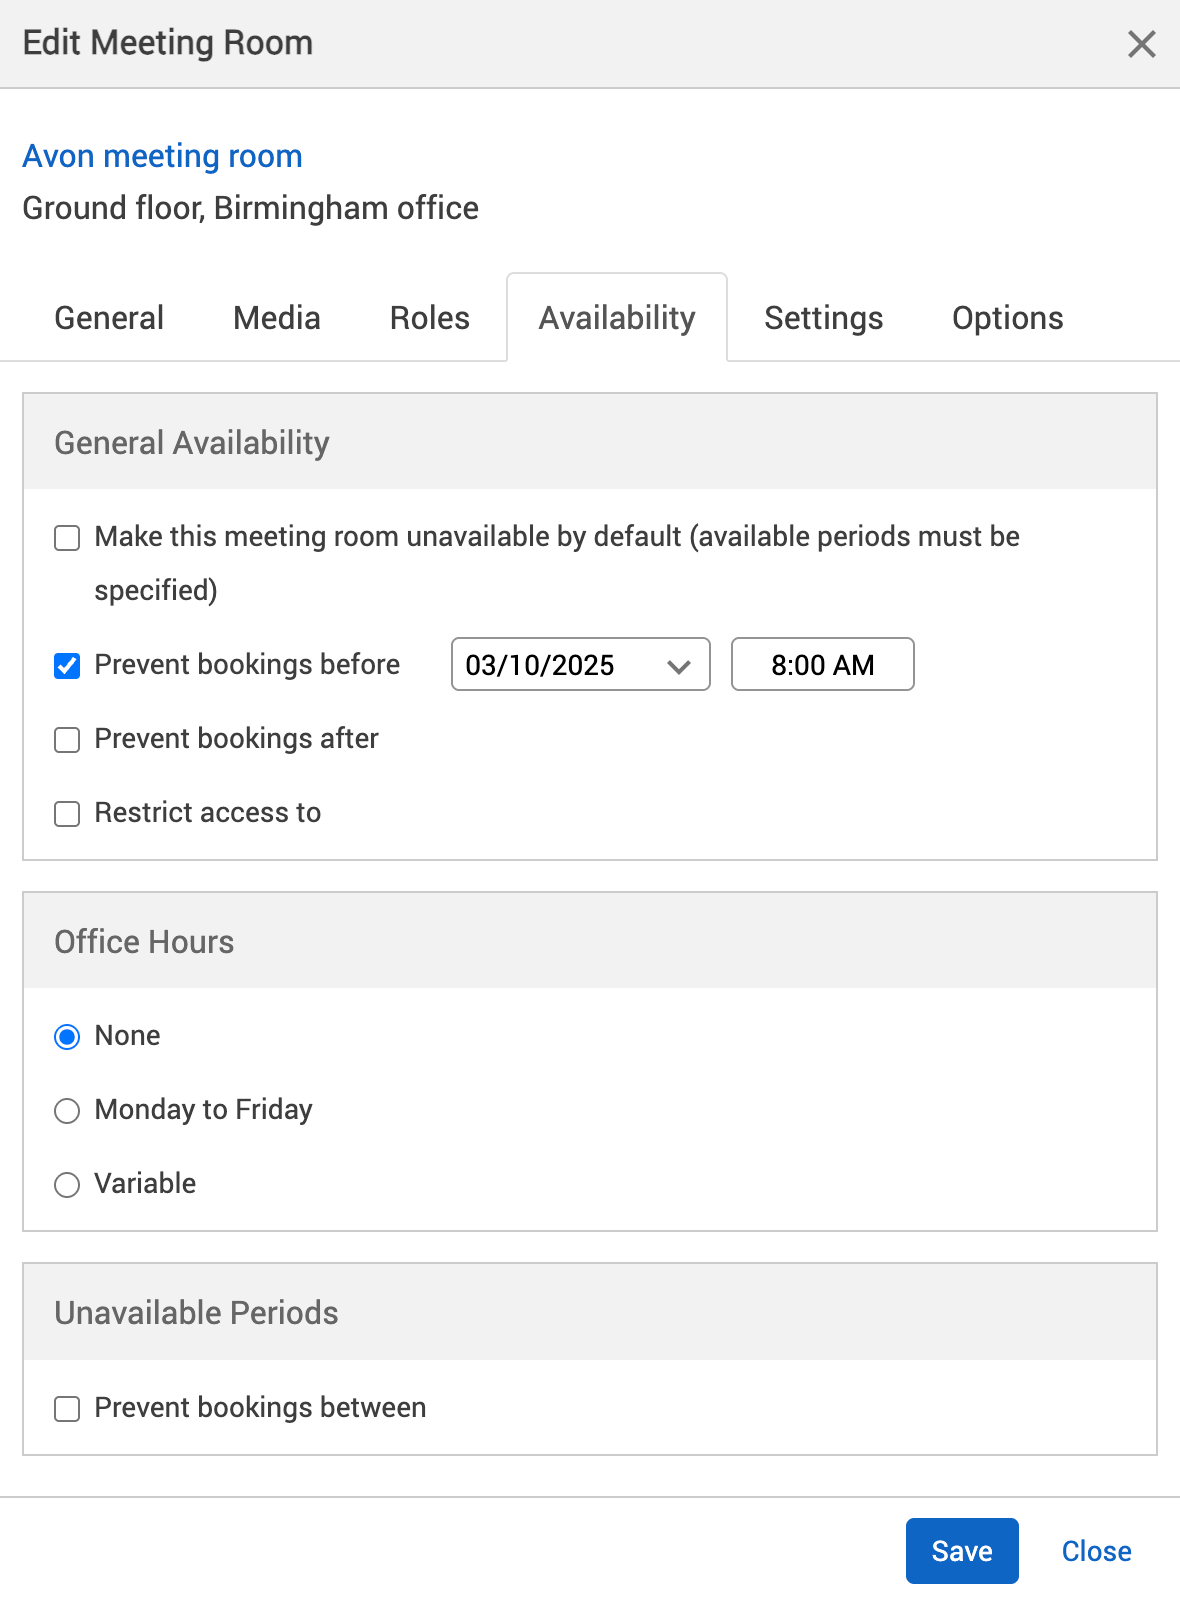
Prevent bookings before
This setting allows you to stop bookings being made against a resource or all resources of a location before a certain date and time.
To prevent bookings being made for a location or resource before a certain date and time:
-
Go to the General Availability section.
-
Select the Prevent bookings before this checkbox. The Date dropdown and Time text box will appear.
-
Select the Date dropdown. A calendar will appear.
-
Select the end date you want the resource or resources of a location to be available from.
-
Enter the end time you want the location or resource to be available until in the Time text box.
-
If you want to make the resource available to everyone again, select the Prevent bookings before this checkbox again to untick it.
-
Select either of the following and the dialog will close to return you to the Locations and resources hierarchy:
-
Save to keep your changes.
-
Close to discard your changes.
-
-
Select Save changes.
Prevent bookings after
This setting allows you to stop bookings being made against a resource or all resources of a location after a certain date and time.
To prevent bookings being made for a location or resource after a certain date and time, follow the Prevent bookings before steps, but instead select the Prevent bookings after checkbox and choose the date and time you want bookings to be prevented from being made.
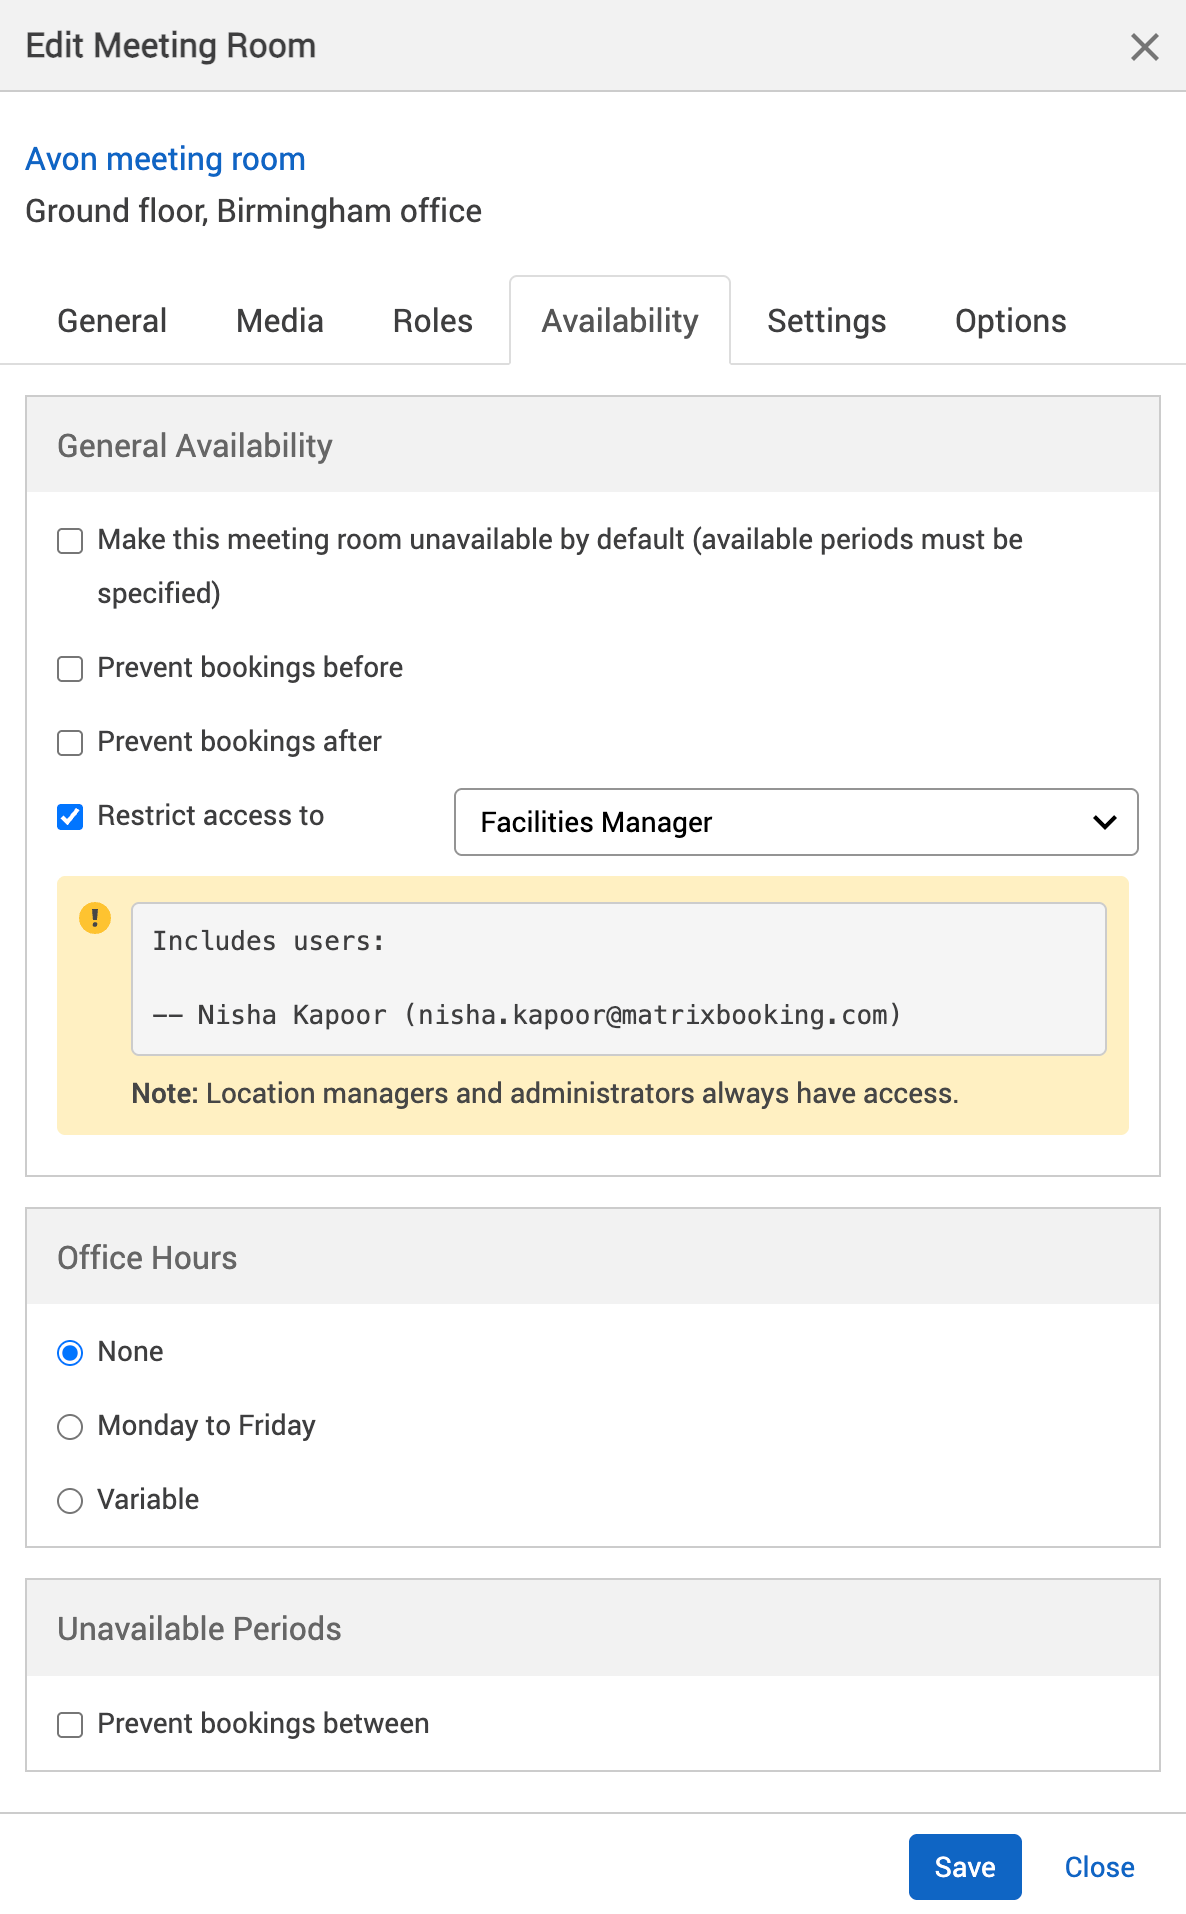
Restrict access to
This setting allows you to make a location or resource visible to only a certain group of people and to hide it from all other users. You need to create the user group you want to have access to the location or resource.
To restrict access of a location or resource to a group:
-
Go to the General Availability section.
-
Select the Restrict access to checkbox. The Groups dropdown will appear.
-
Select the Groups downdown. A list of all your groups will be appear.
-
Select the group you want the location or resource restricted to. The list of users in that group will appear.
-
If you want to make the resource available to everyone again, select the Restrict access to checkbox again to untick it.
-
Select either of the following and the dialog will close to return you to the Locations and resources hierarchy:
-
Save to keep your changes.
-
Close to discard your changes.
-
-
Select Save changes.
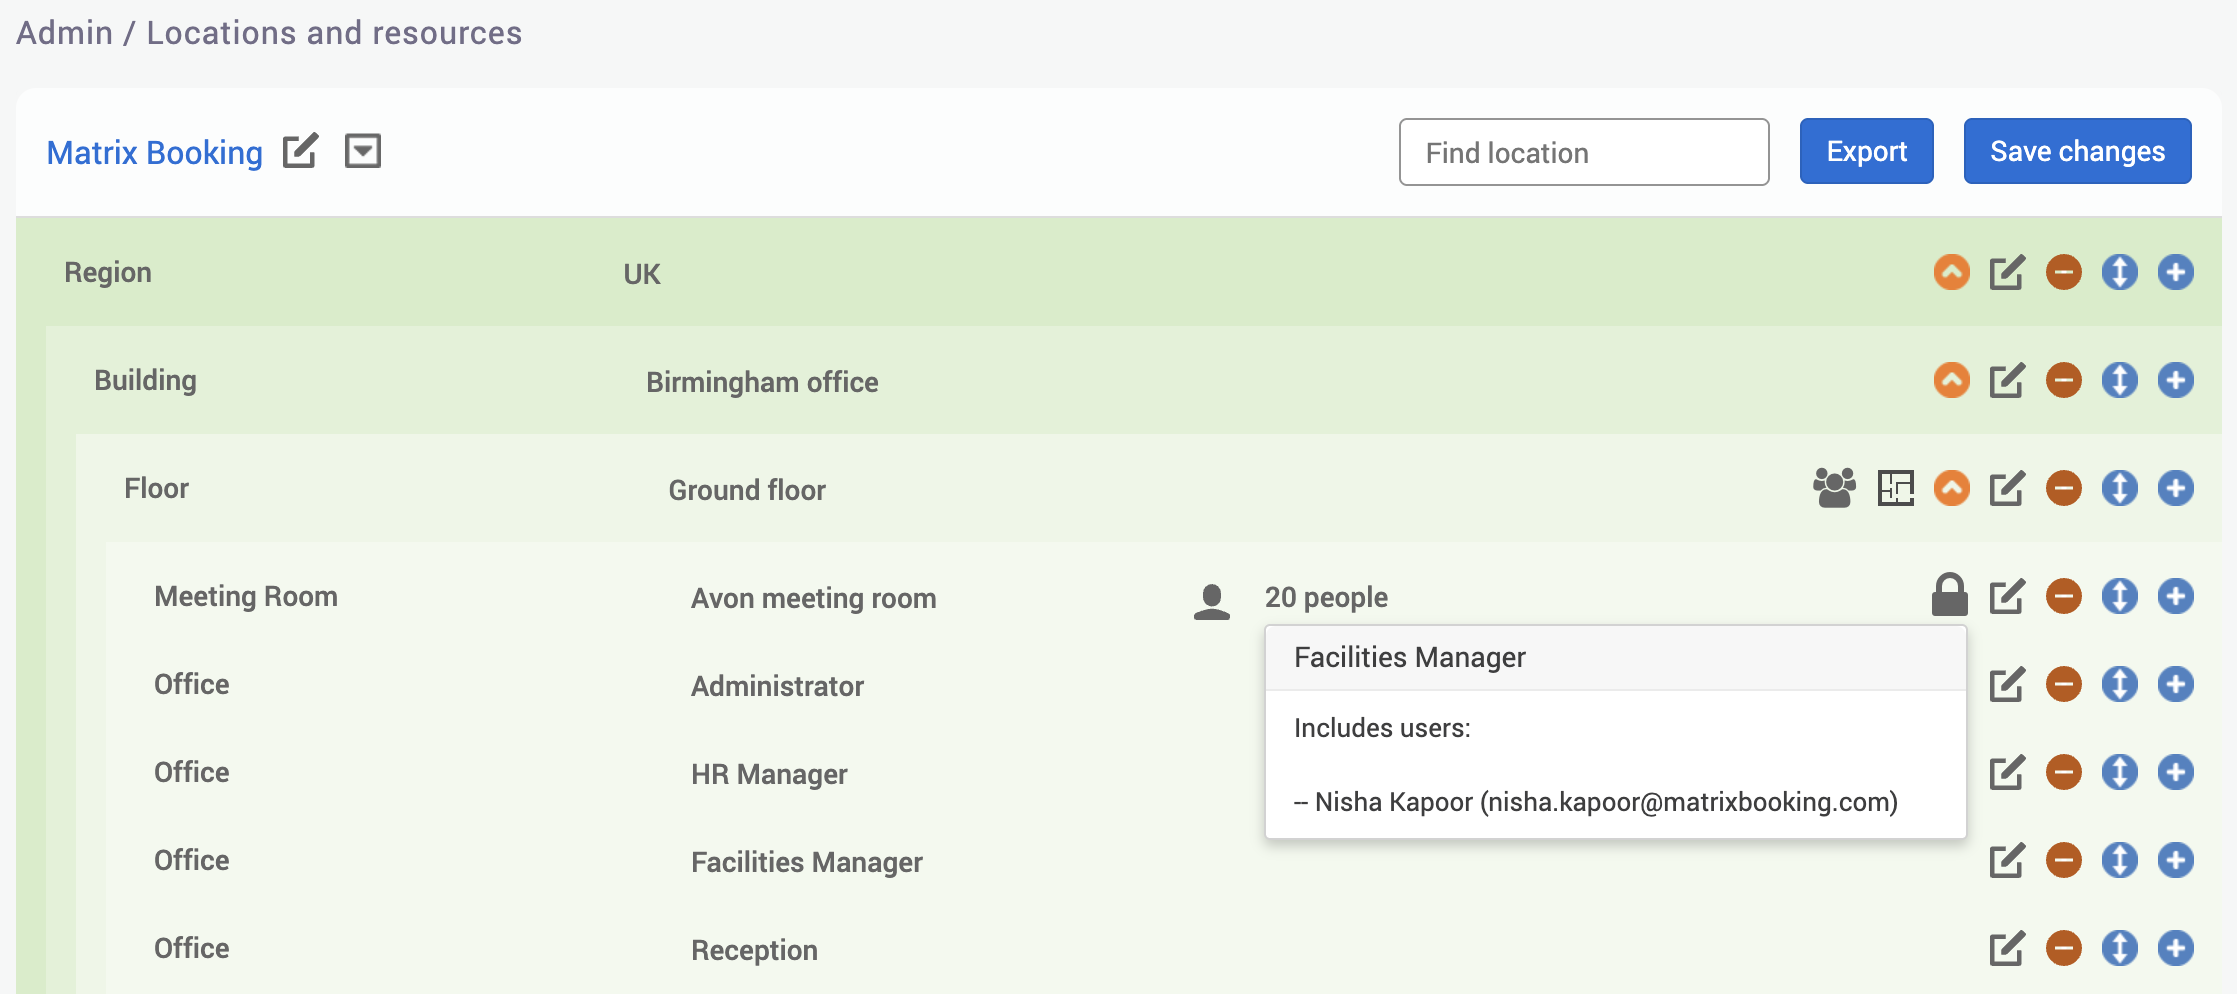
If you’ve restricted the access of a location or resource to a group, a lock button will appear next to that location or resource. Select the lock icon to see more details about who has access to the location or resource. Select it again to hide the details.
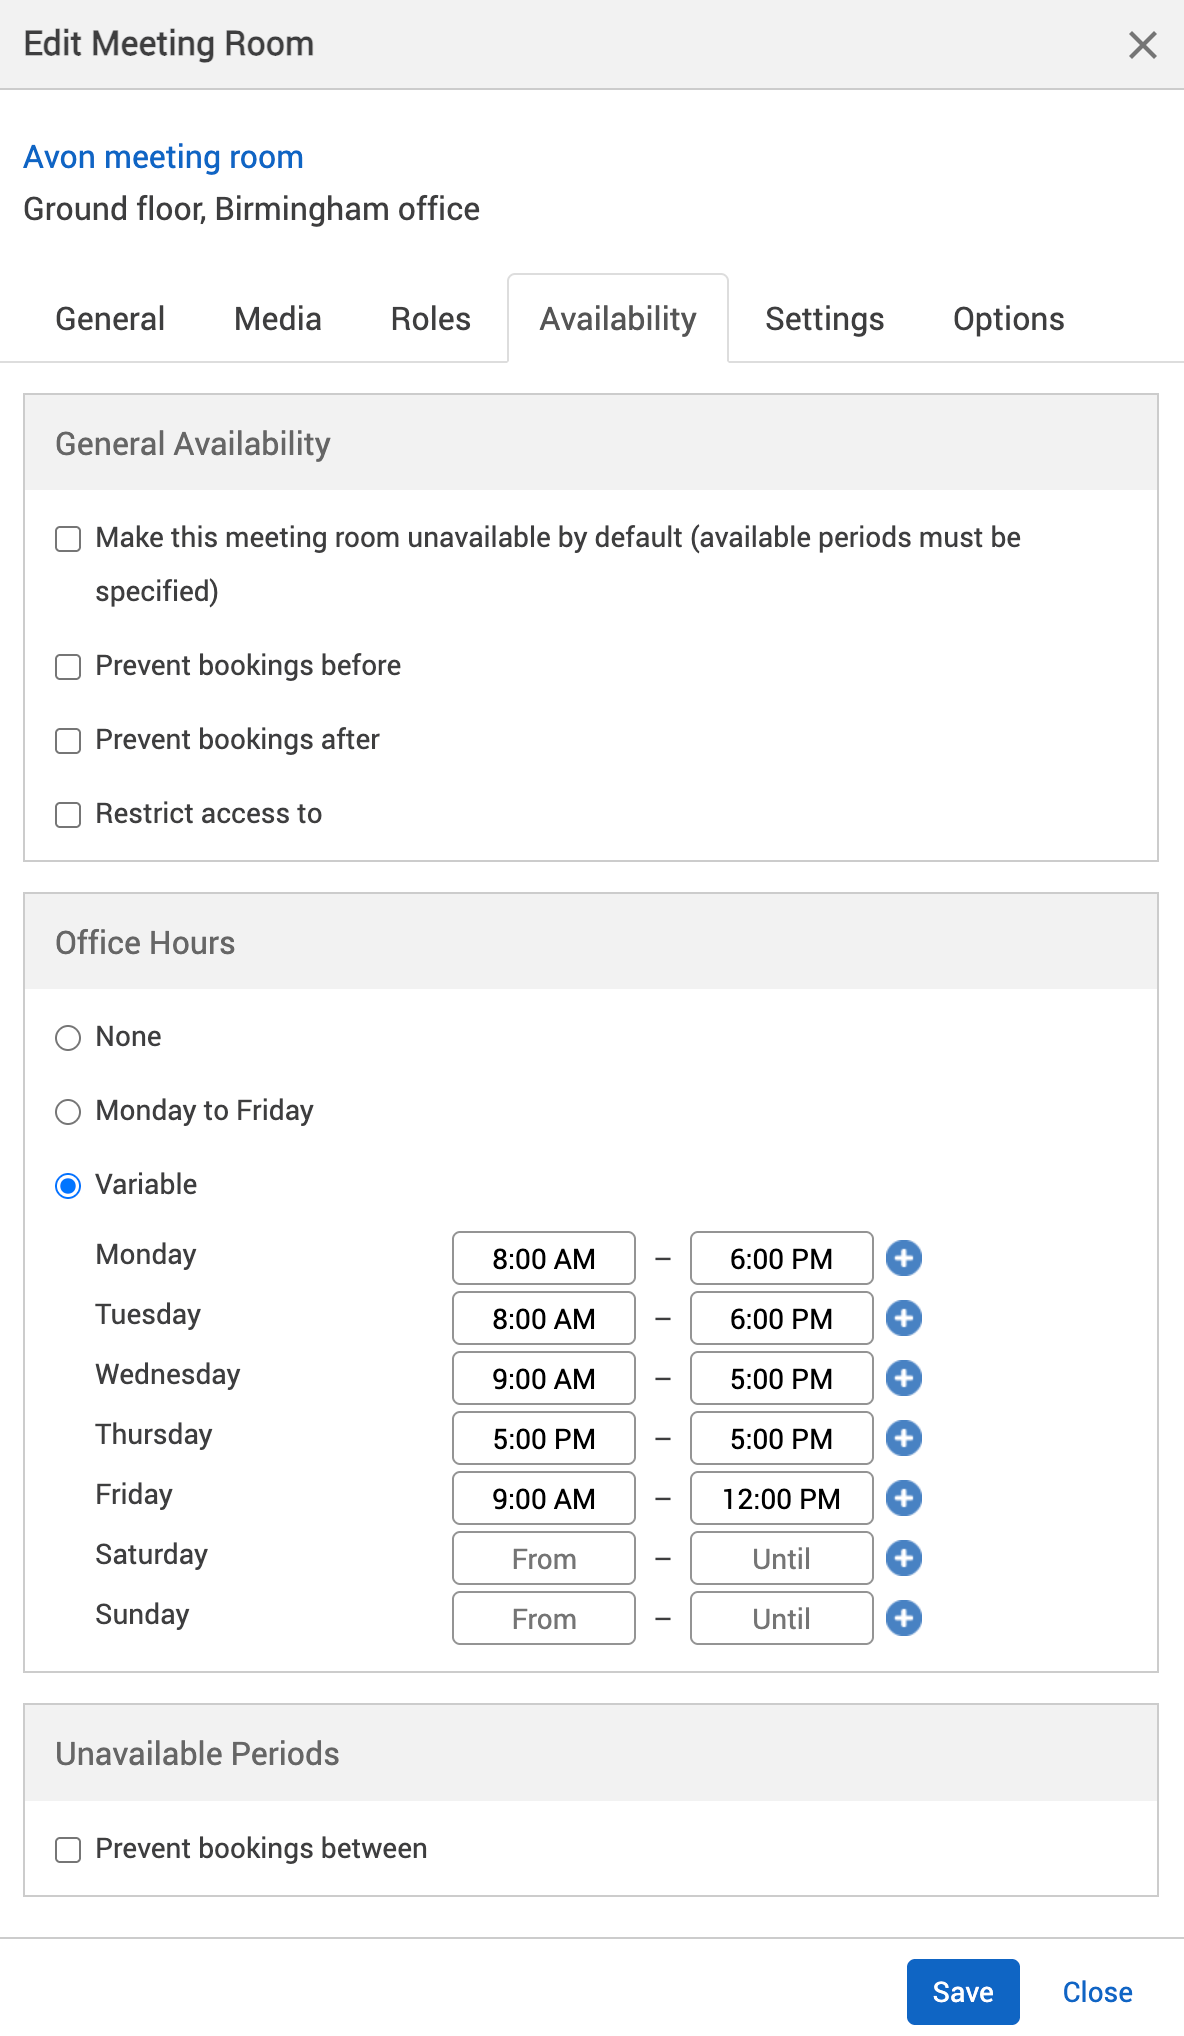
Office hours
This section allows you to limit the availability of a resources or all the resources of a location by setting your organisation’s working hours (office hours).
To set up your office hours:
-
Go to the Office Hours section.
-
None will be selected by default.
-
If your organisation is open Monday to Friday, select Monday to Friday. The From and Until text boxes will appear.
-
Enter the times of when the location or resource will be available from and until in the text boxes.
-
If your organisation has different office hours on different days, select Variable. The From and Until text boxes for all days of the week will appear.
-
Enter the times of when the location or resource will be available from and until for each day in the text boxes.
-
If there are multiple office hour periods for a particular day, select the + Add button and repeat step 10.
-
If you want to remove an office hour period for a particular day, select the – Remove button.
-
If you no longer need office hours set for your resource, select None.
-
Select either of the following and the dialog will close to return you to the Locations and resources hierarchy:
-
Save to keep your changes.
-
Close to discard your changes.
-
-
Select Save changes.
If you allow your users to book resources for X amount of days in advance and have set office hours (for example, Monday to Friday 9:00 AM to 5:00 PM), any times outside of the set office hours (Friday 5:00 PM to Monday 9:00 AM) will be discounted from this rule. For example, if a standard user:
-
can only book 2 days in advance;
-
books a resource on a Friday;
they can book for the following Monday and Tuesday. Saturdays and Sundays are automatically ignored.
|
|
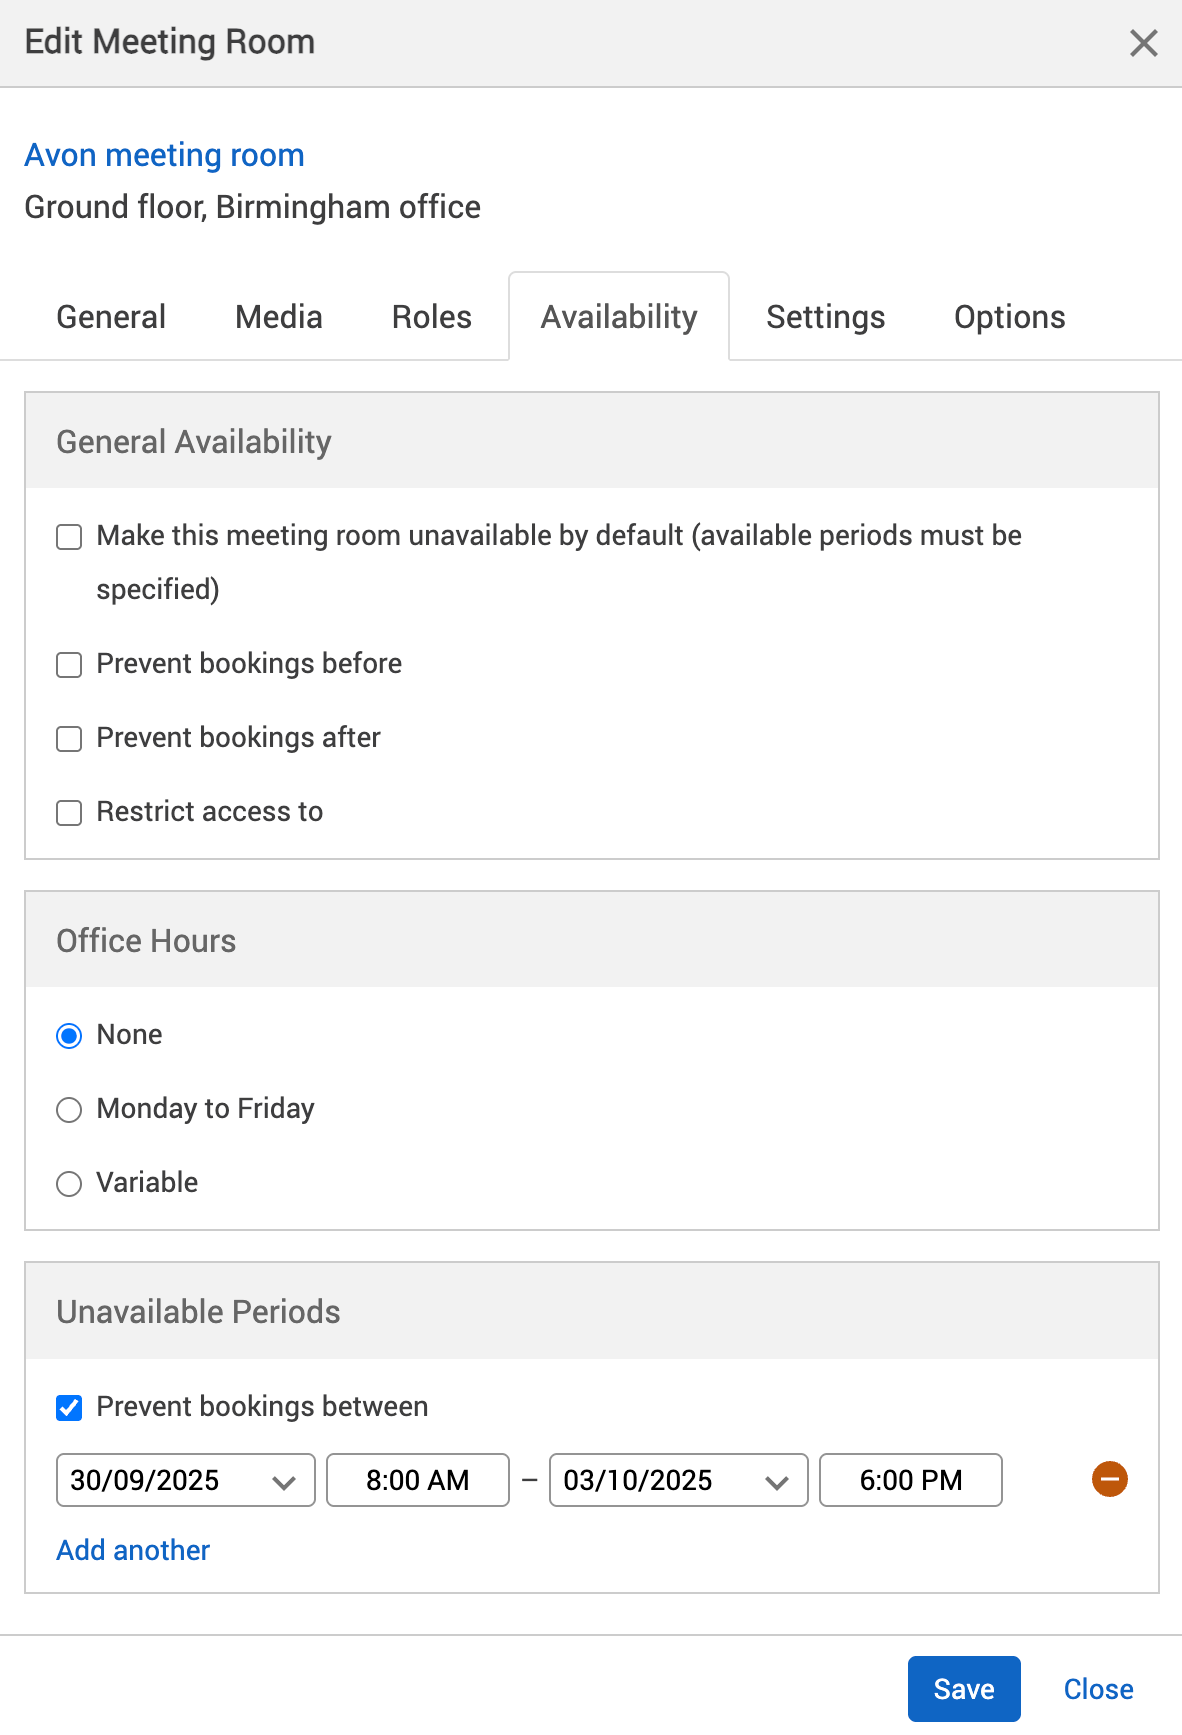
Unavailable periods
Locations and resources can be made unavailable when needed. For example:
-
bank holidays
-
out-of-office hours
-
planned team bookings for a set period
To set up unavailable periods for your locations and resources:
-
Go to the Unavailable Periods section.
-
Select the Prevent bookings between checkbox. The Date dropdowns and Add Time buttons will appear.
-
Select the first Date dropdown. A calendar will appear.
-
Select the start date you want the location or resource to be available from.
-
Select the first Add Time. The Time text box will appear.
-
Enter the start time you want the location or resource to be available from.
-
Select the second Date dropdown. A calendar will appear.
-
Select the start date you want the location or resource to be available until.
-
Select the second Add Time. The Time text box will appear.
-
Enter the end time you want the location or resource to be available until.
-
If you want to add another date and time range for the location or resource to be made available, select Add another and repeat steps 4 to 11.
-
To remove a date and time range, select the – Remove button.
-
If you want to make the resource available again, select the Prevent bookings between checkbox again to untick it.
-
Select either of the following and the dialog will close to return you to the Locations and resources hierarchy:
-
Save to keep your changes.
-
Close to discard your changes.
-
-
Select Save changes.
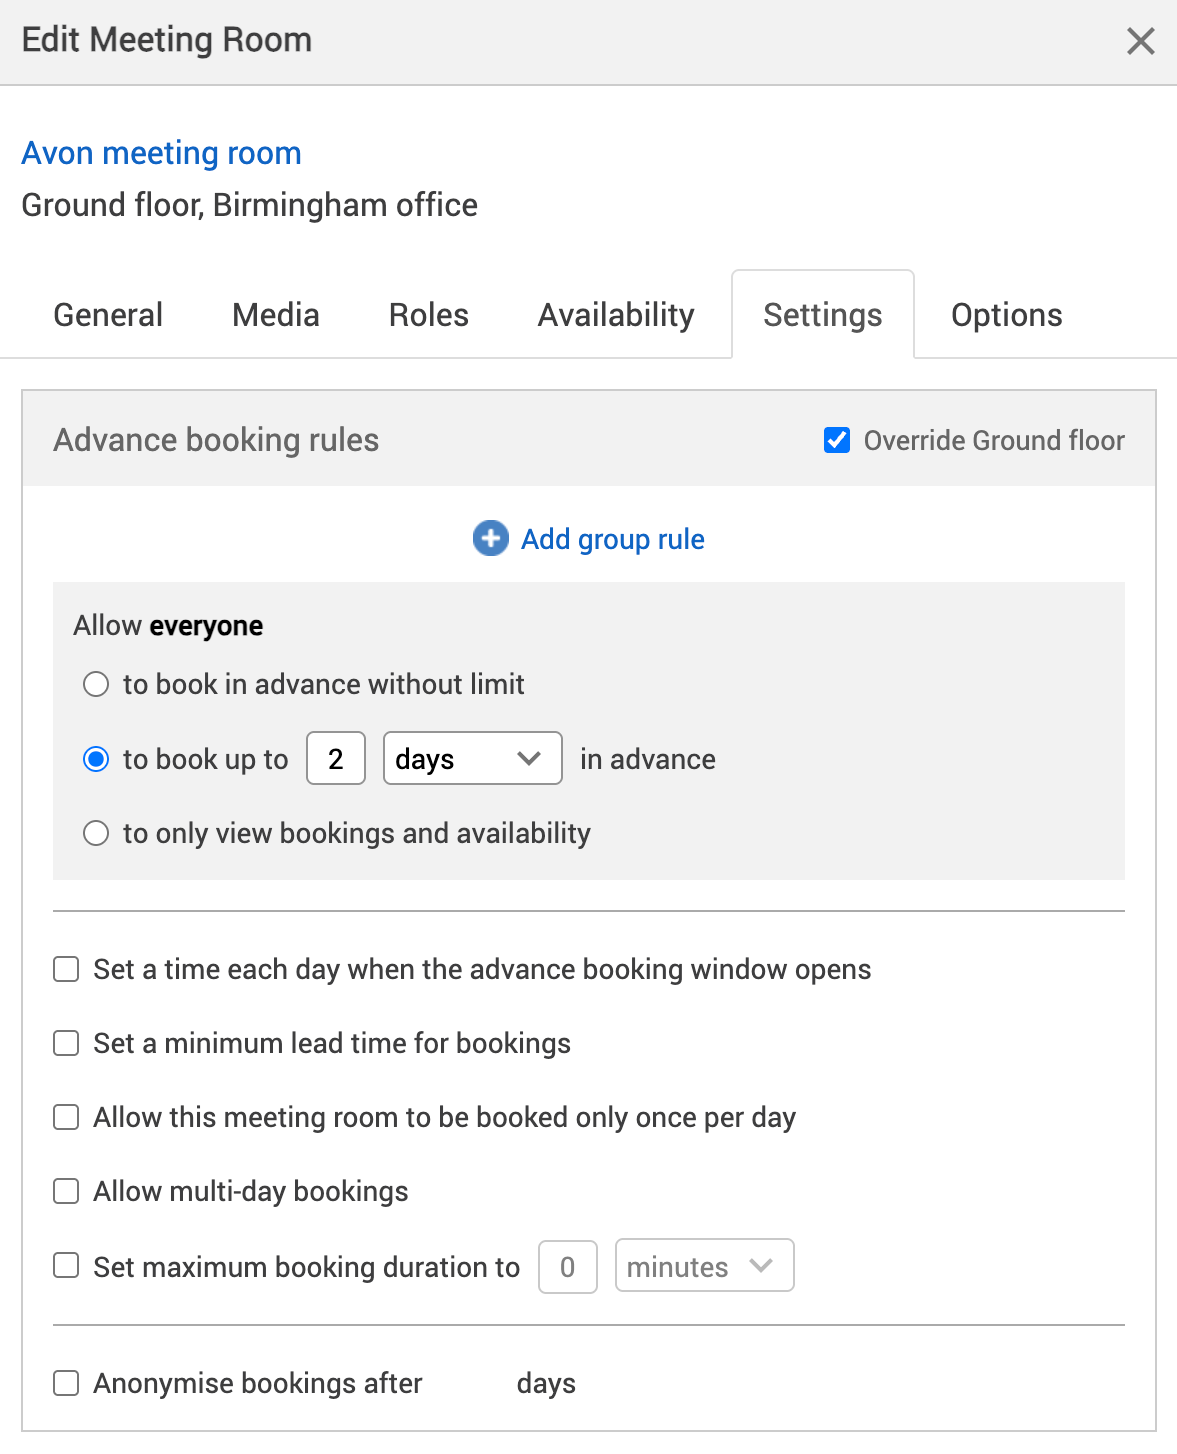
Security approach
Access is based on your Locations and resources hierarchy restrictions. You can restrict access at any level, with 1 group per location or resource.
Users must pass every level of restriction to gain access. For example:
-
A floor is restricted to Group A.
-
A resource on that floor is restricted to Group B.
Only users in both Group A and Group B can book that resource. Users in just one of these groups can’t.
Resource sharing security
If the sharer organisation enables Restrict access to in the Availability tab of a shared resource and sets it to one of their own groups, the sharee organisation won’t be able to book it.
To allow access to shared resources, remove any restrictions from the resource and any locations above it in the hierarchy.
You can apply 1 group restriction per shared location or resource. The same “must pass all levels” rule applies to shared locations and resources.
Notes on the Availability tab
There are some things to note for the availability of locations and resources:
-
Only availability (and not unavailability) is inherited from higher levels.
-
You need set unavailability at each level of the hierarchy.
-
If the resources under a location have any future bookings against them and then you switch the Make this meeting room unavailable by default setting on, your future bookings may be deleted or cancelled automatically.
You need to raise a support ticket to ask for the “flexible auto-cancel check” feature to be switched on. Once our Support Team have confirmed that it’s been switched on, they will ask you to wait for a certain amount of time to pass. This is so that Matrix Booking updates and removes any future bookings for that resource. You can continue to use Matrix Booking during the waiting period.