This page explains how to set up and manage user groups, domain groups, and advanced groups as well as how to restrict access to locations and resources for particular users. How the different groups are synchronised and our approach to security is also explained:
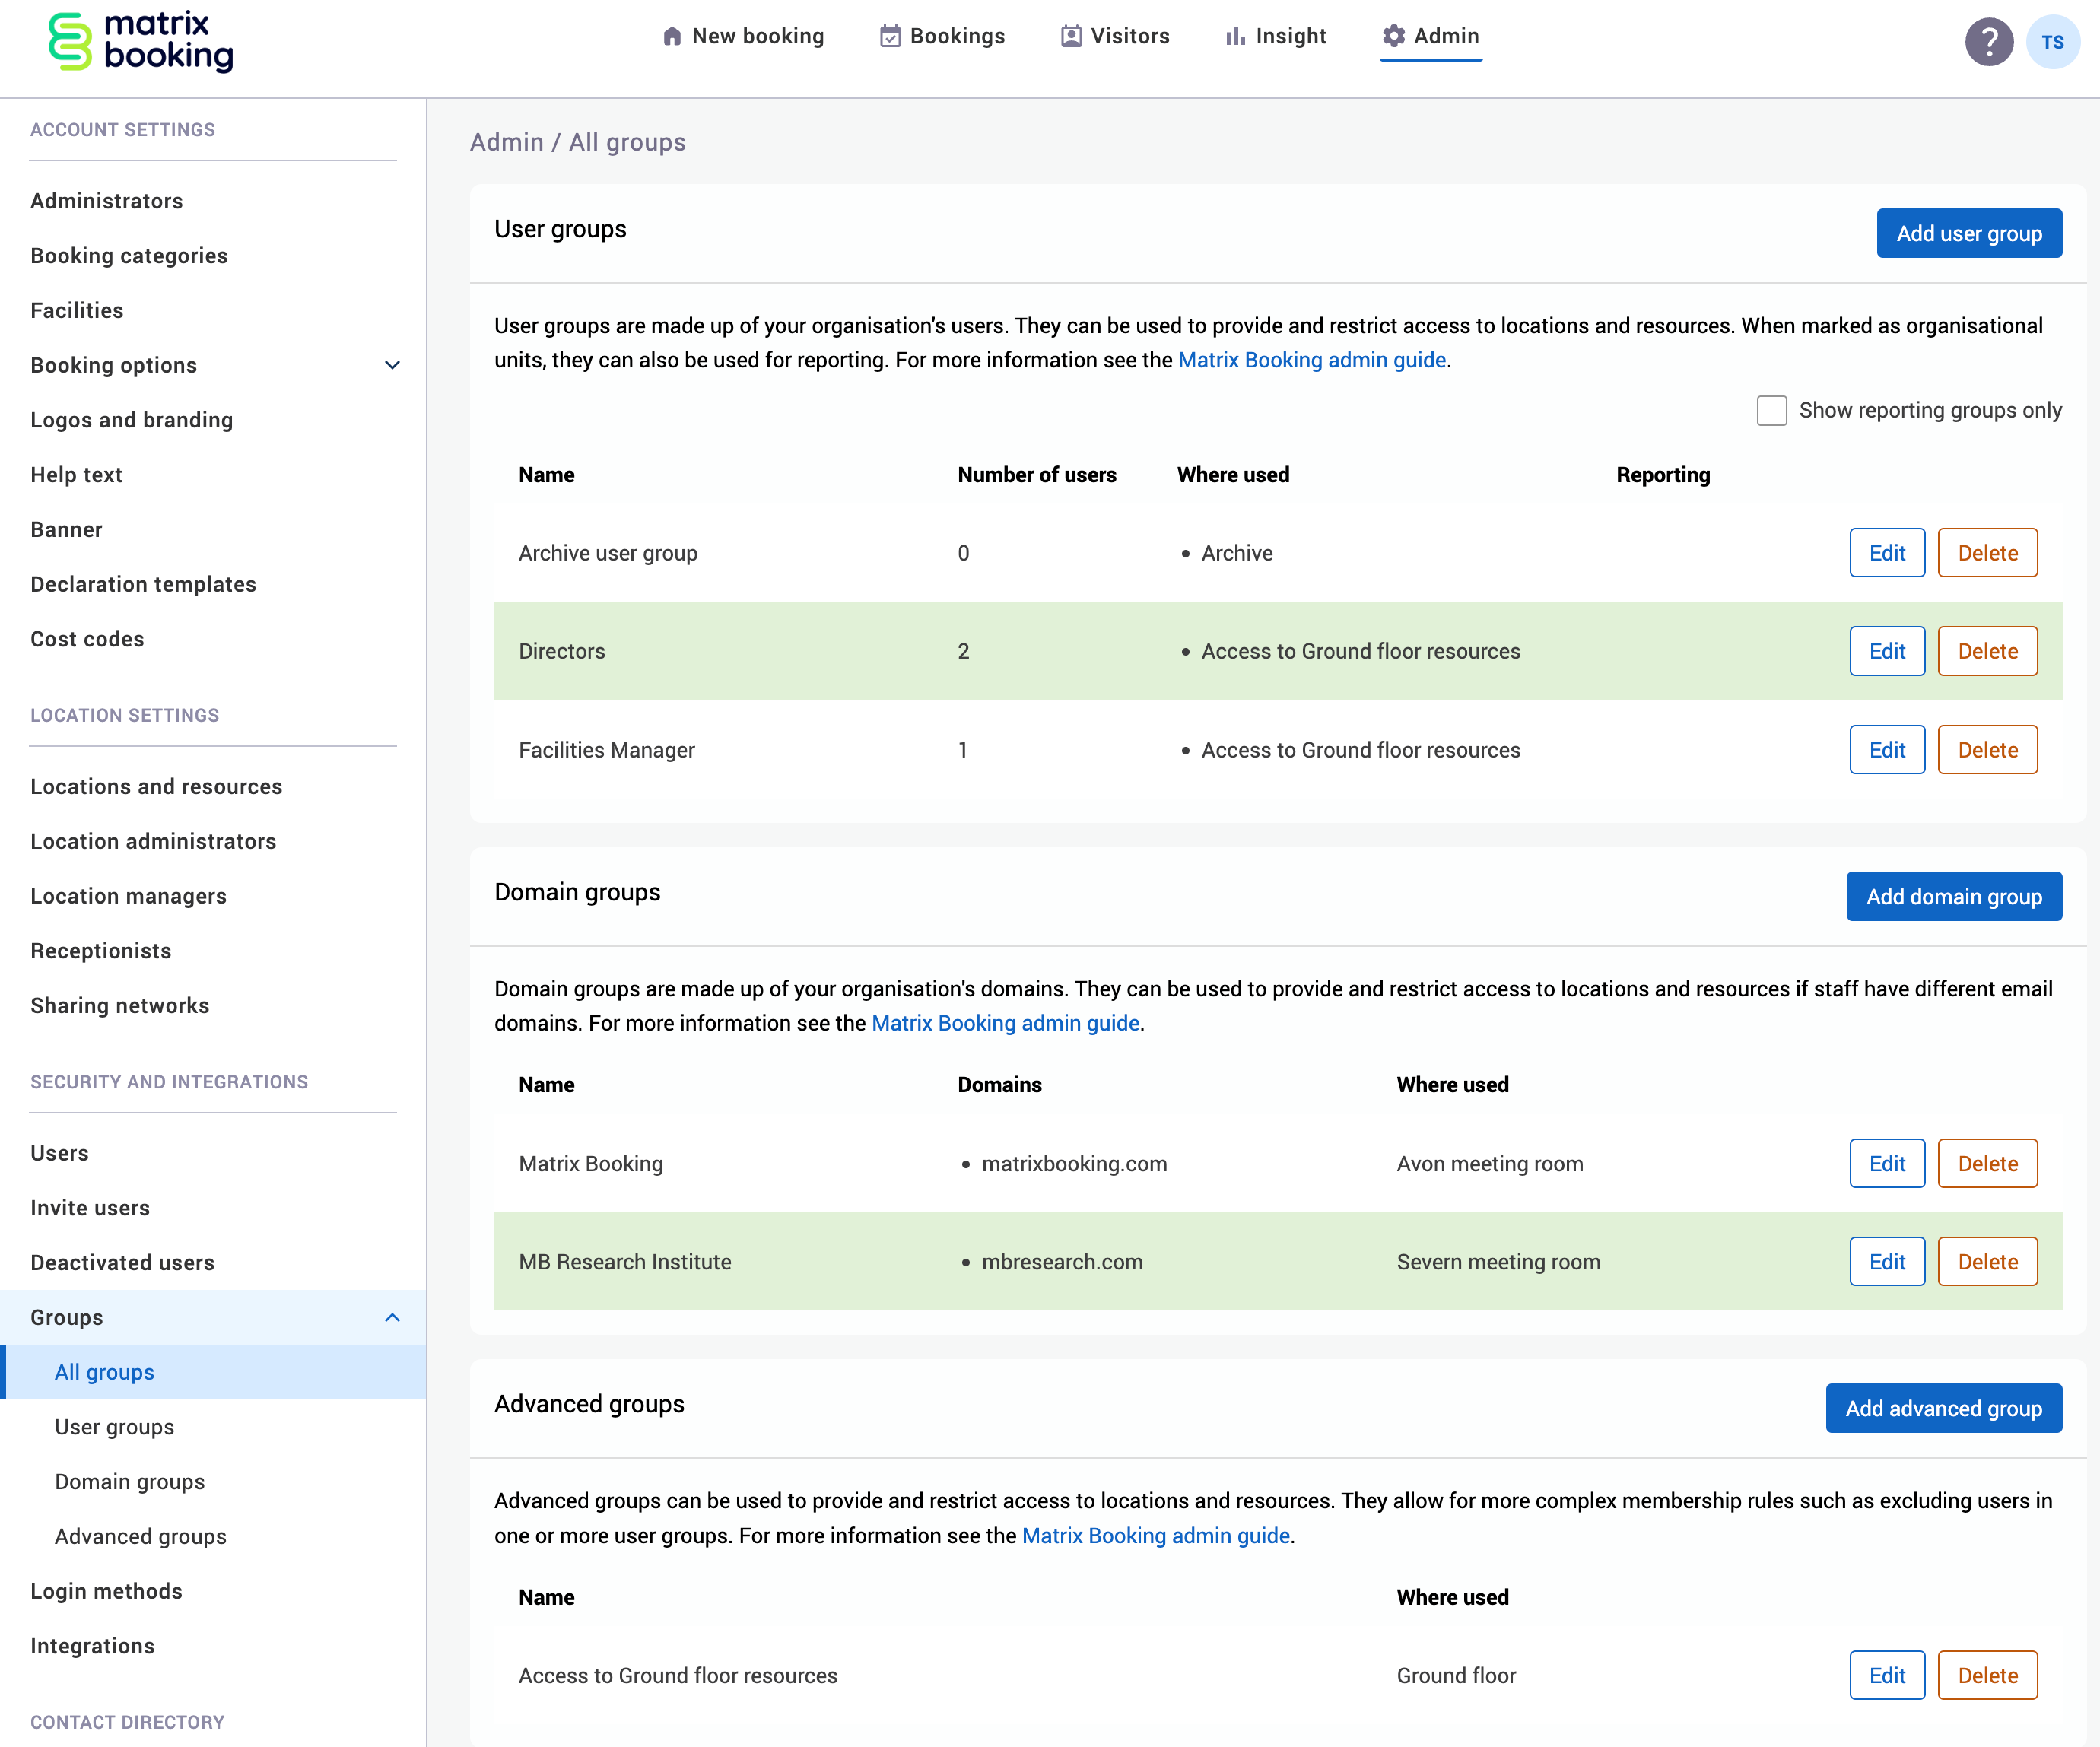
Access the Groups screens
-
Select Admin in the navigation bar.
-
Select Groups under the Security & Integrations section in the side menu. The Groups dropdown will appear.
-
Select one of the following:
-
All groups – displays all the type of groups you have on the All groups screen.
-
User groups – displays only user groups on the User groups screen.
-
Domain Groups – displays only domain groups on the Domain groups screen.
-
Advanced groups – displays only advanced groups on the Advanced groups screen.
-
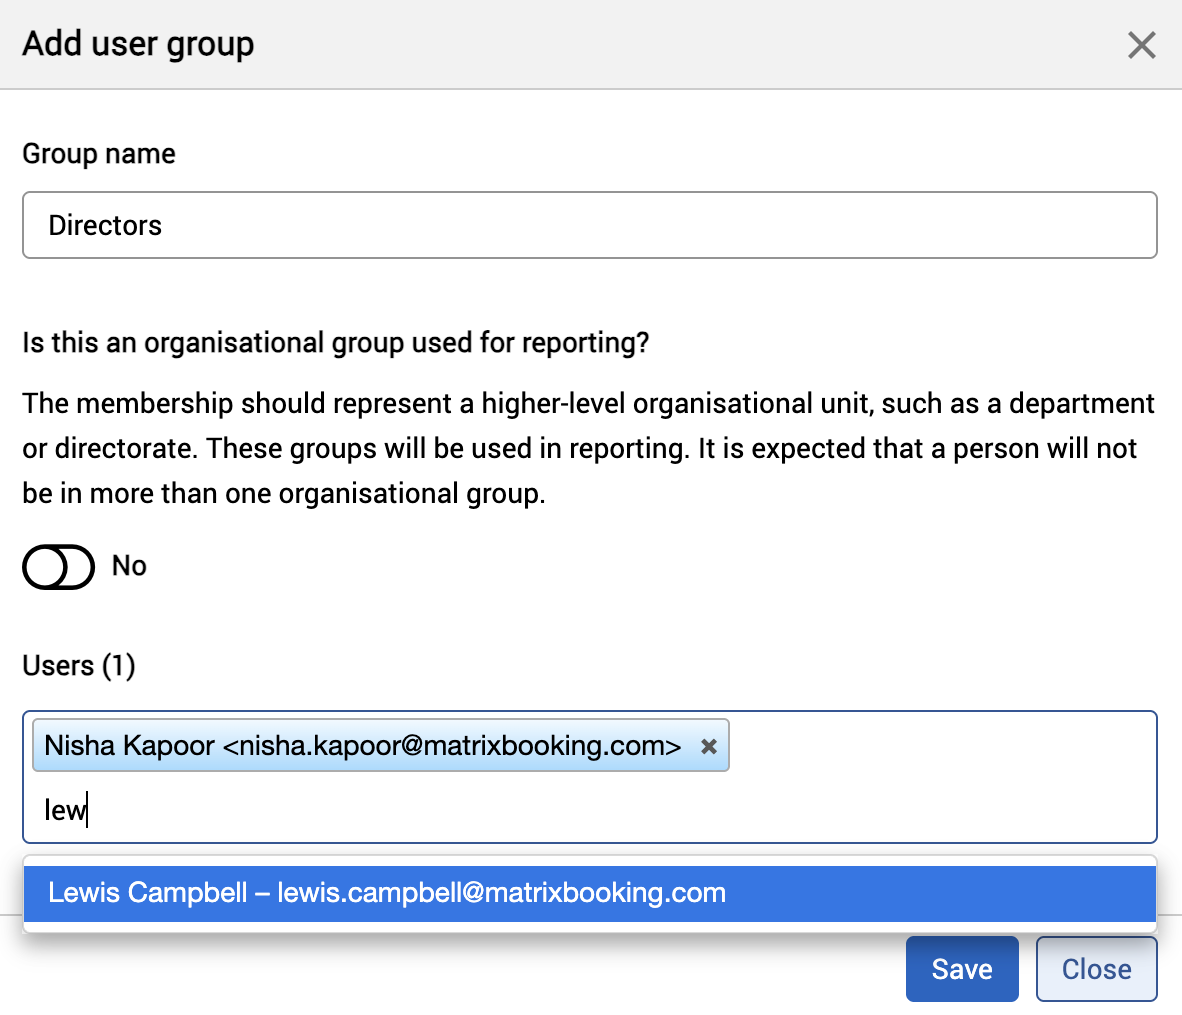
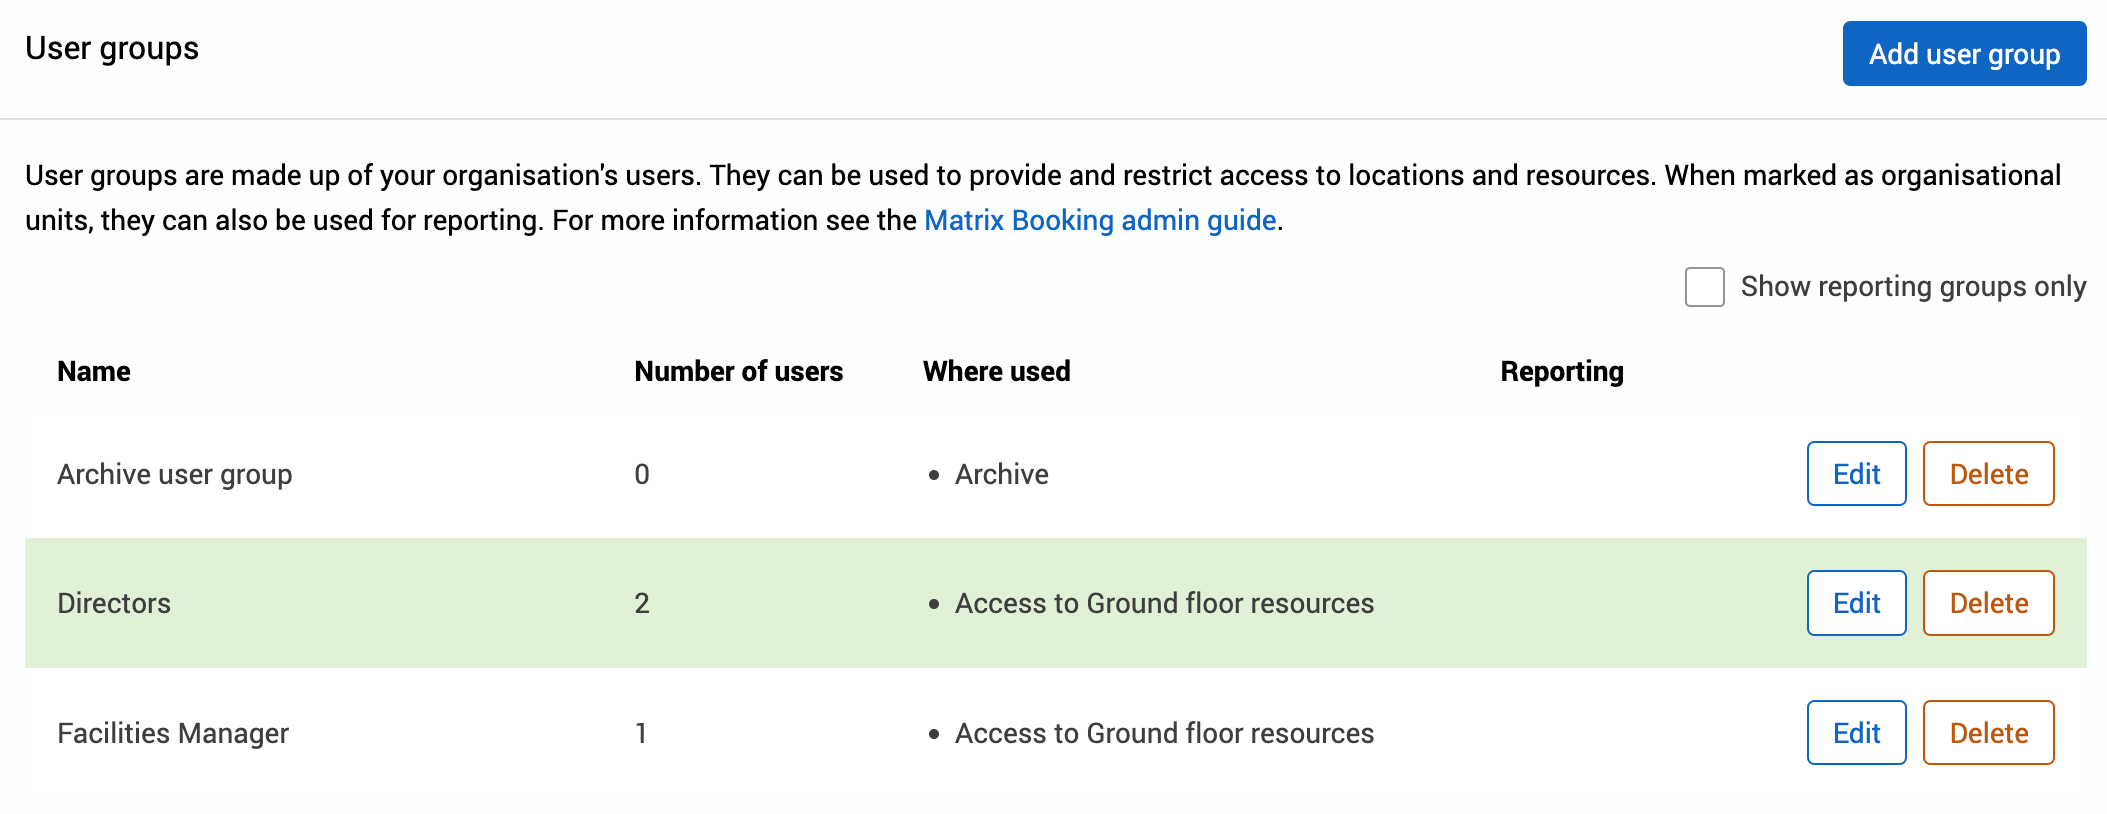
Add a user group
To add a user group:
-
Select Add user group. The Add user group dialog will appear.
-
Enter the name of the user group you’re creating in the Group name text box.
-
Select whether this is an organisational group for reporting purposes. The default is No.
-
Begin to enter the user’s name in the search bar. The User dropdown will appear.
-
Select the correct user from the dropdown.
-
To add more users to the user group, repeat steps 6 and 7.
-
Select either of the following and the dialog will close to return you to the User groups screen:
-
Save to keep your changes.
-
Close to discard your changes.
-
Warning: if a user doesn’t appear in the dropdown, they aren’t registered with Matrix Booking. They can’t be added to any type of group until they have been registered.
If you made the user group an organisation group user for reporting, you can filter on that group in the Booking summary and Resource utilisation dashboards on Matrix Booking Insight. You’re given all the information of what departments or directorates are using which resources, which might be useful for your workspace and resource management optimisation.
If a user that was in a user group is deactivated, they may still appear in the user group. Deactivated users can be removed from groups that they were put into. If they are reactivated, they will need to be added to those groups again. Raise a change setup support ticket to get this feature switched on.
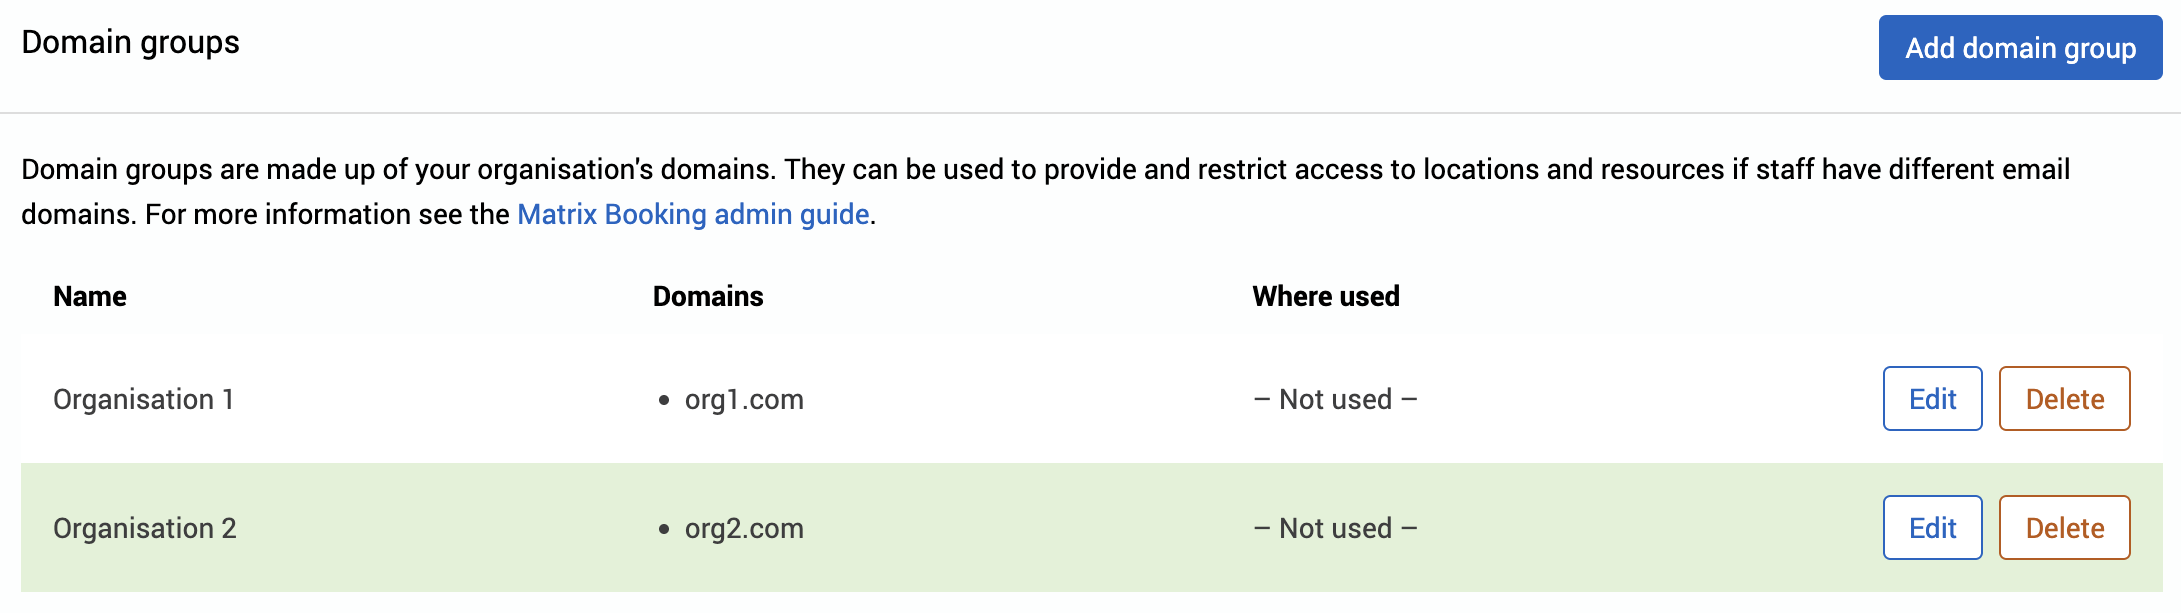
Add a domain group
In addition to user groups, you can specify domains instead. You may wish to do this if you:
-
have staff with different email domains
-
want to allow some rooms to be visible to all and some visible only to certain domains
To add a domain group:
-
Select Add domain group. The Add Domain Group dialog will appear.
-
Enter the name of the domain group you’re creating in the Name text box.
-
Enter the domain name without the @ symbol in the Add Domain text box.
-
Select the Enter or Return button to lock in the domain.
-
To add more domains to the domain group, repeat steps 4 and 5.
-
Select either of the following and the dialog will close to return you to the Domain groups screen:
-
Save to keep your changes.
-
Close to discard your changes.

-
Warning: you don’t enter the @ symbol when adding a domain group – it’s not needed.
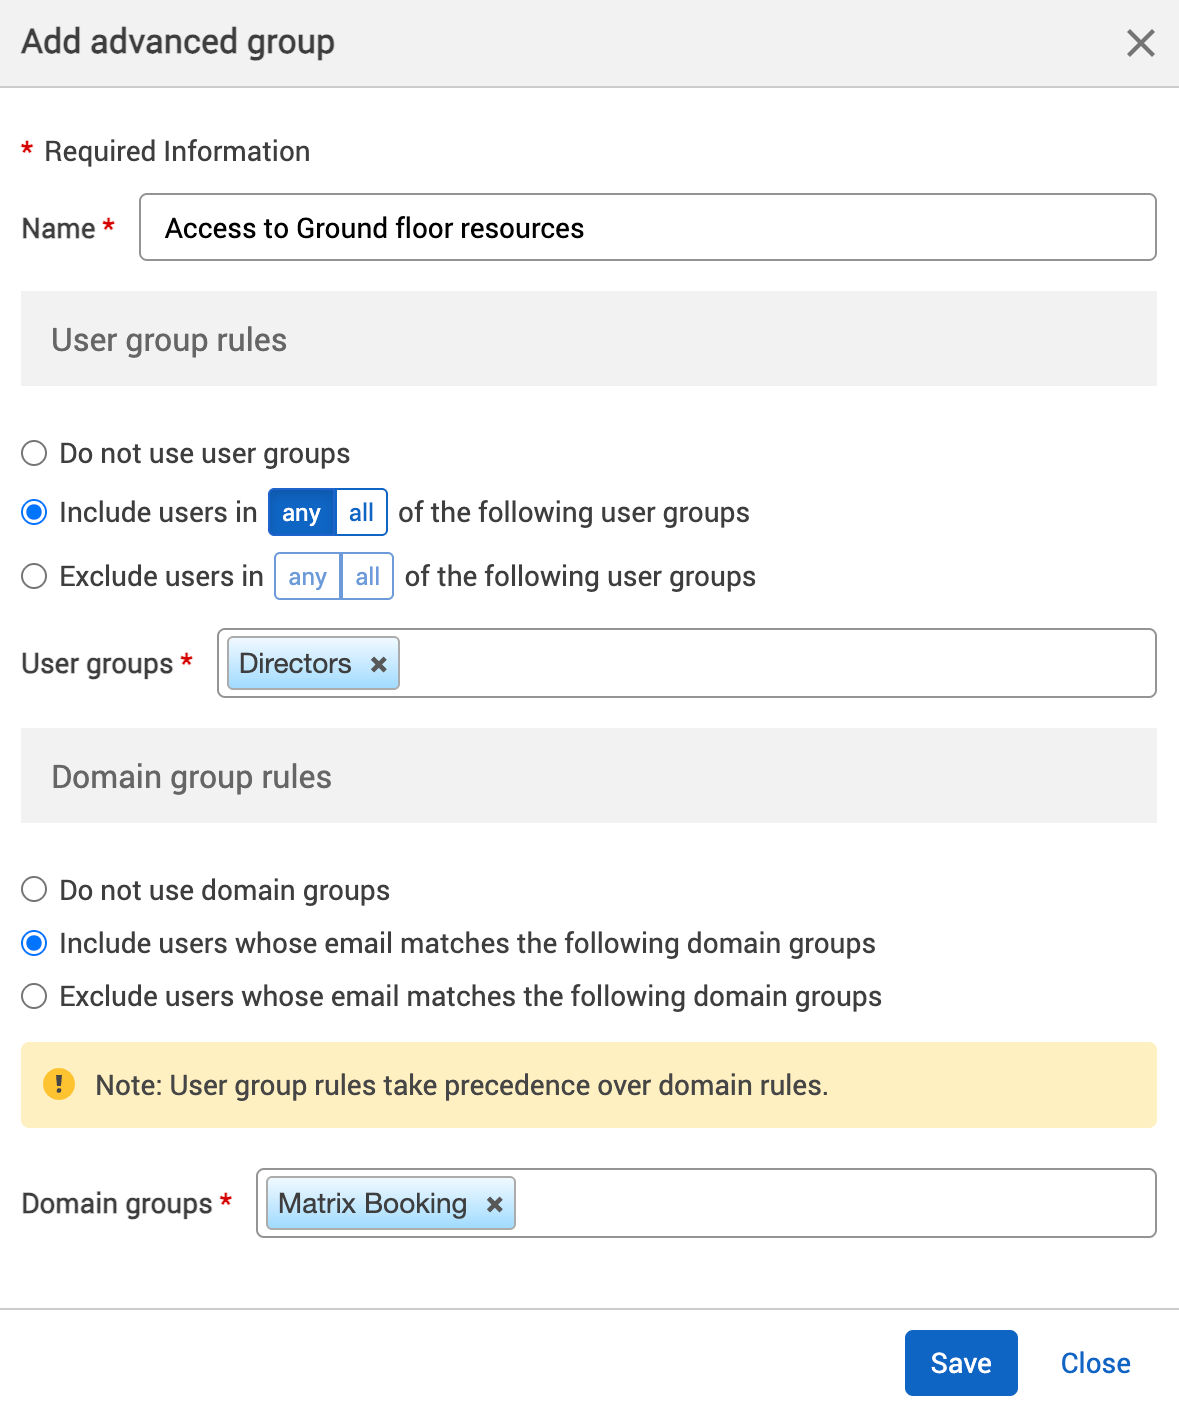
Add an advanced group
Rules
There are rules for including and excluding user and domain groups. For example, if we have 2 user groups added to an advanced group and you can:
-
select Do not use user groups
-
select Include users in any of the following user groups meaning that a user must be in at least 1 of the user groups to have access to the resource
-
select Include users in all of the following user groups meaning that a user must be in all of the user groups to have access to the resource
-
select Exclude users in any of the following user groups meaning that a user must be in at least 1 of the user groups to not have access to the resource
-
select Exclude users in all of the following user groups meaning that a user must be in all of the user groups to not have access to the resource
The same rules apply for domain groups based on domain names, but there are no any or all options.
Add a user and domain group to an advanced group
To add a advanced group:
-
Add at least 1 user group or 1 domain group.
-
Select Add advanced group. The Add advanced group dialog will appear.
-
Enter the name of the advanced group in the Name text box.
-
If you want to add user groups, continue to step 6. If you want to add domain groups, skip to step 12.
-
Under the User group rules section, select one of the following:
-
Do not use user groups – this is the default.
-
Include users in any or all of the following user groups.
-
Exclude users in any or all of the following user groups.
-
-
Select the toggle switch for any or all of the following user groups.
-
Begin to enter the user group name you want to include or exclude from the advanced group in the User groups text box. The User group dropdown will appear.
-
Select the user group from the dropdown.
-
To add more user groups, repeat steps steps 8 and 9.
-
If you want include or exclude domain groups, continue to step 12. If you don’t want to, skip to step 16.
-
Under the Domain group rules section, select either:
-
Do not use domain groups – this is the default.
-
Include user whose email matches the following domain groups.
-
Exclude user whose email matches the following domain groups.
-
-
Begin to enter the domain group name. The Domain group dropdown will appear.
-
Select the domain group from the dropdown.
-
To add more domain groups, repeat steps 13 and 14.
-
Select either of the following and the dialog will close to return you to the Advanced groups screen:
-
Save to keep your changes.
-
Close to discard your changes.
-
Warning:
-
You can only select user or domain groups that have previously been set up.
-
You can only choose either include or exclude – not both.
-
User group rules take a higher priority and override domain rules.
If a user that was in a user group that is used for an advanced group is deactivated, they may still appear in the user group and advanced group. Deactivated users can be removed from groups that they were put into. If they are reactivated, they will need to be added to those groups again. Raise a change setup support ticket to get this feature switched on.
Edit or delete a group
To edit a group:
-
Select Edit next to the group you want to change.
-
Make your changes.
-
Select either of the following and the dialog will close to return you to your chosen Groups screen:
-
Save to keep your changes.
-
Close to discard your changes.
-
To delete a group:
-
Select Delete next to the group you want to change. The group will be deleted immediately.
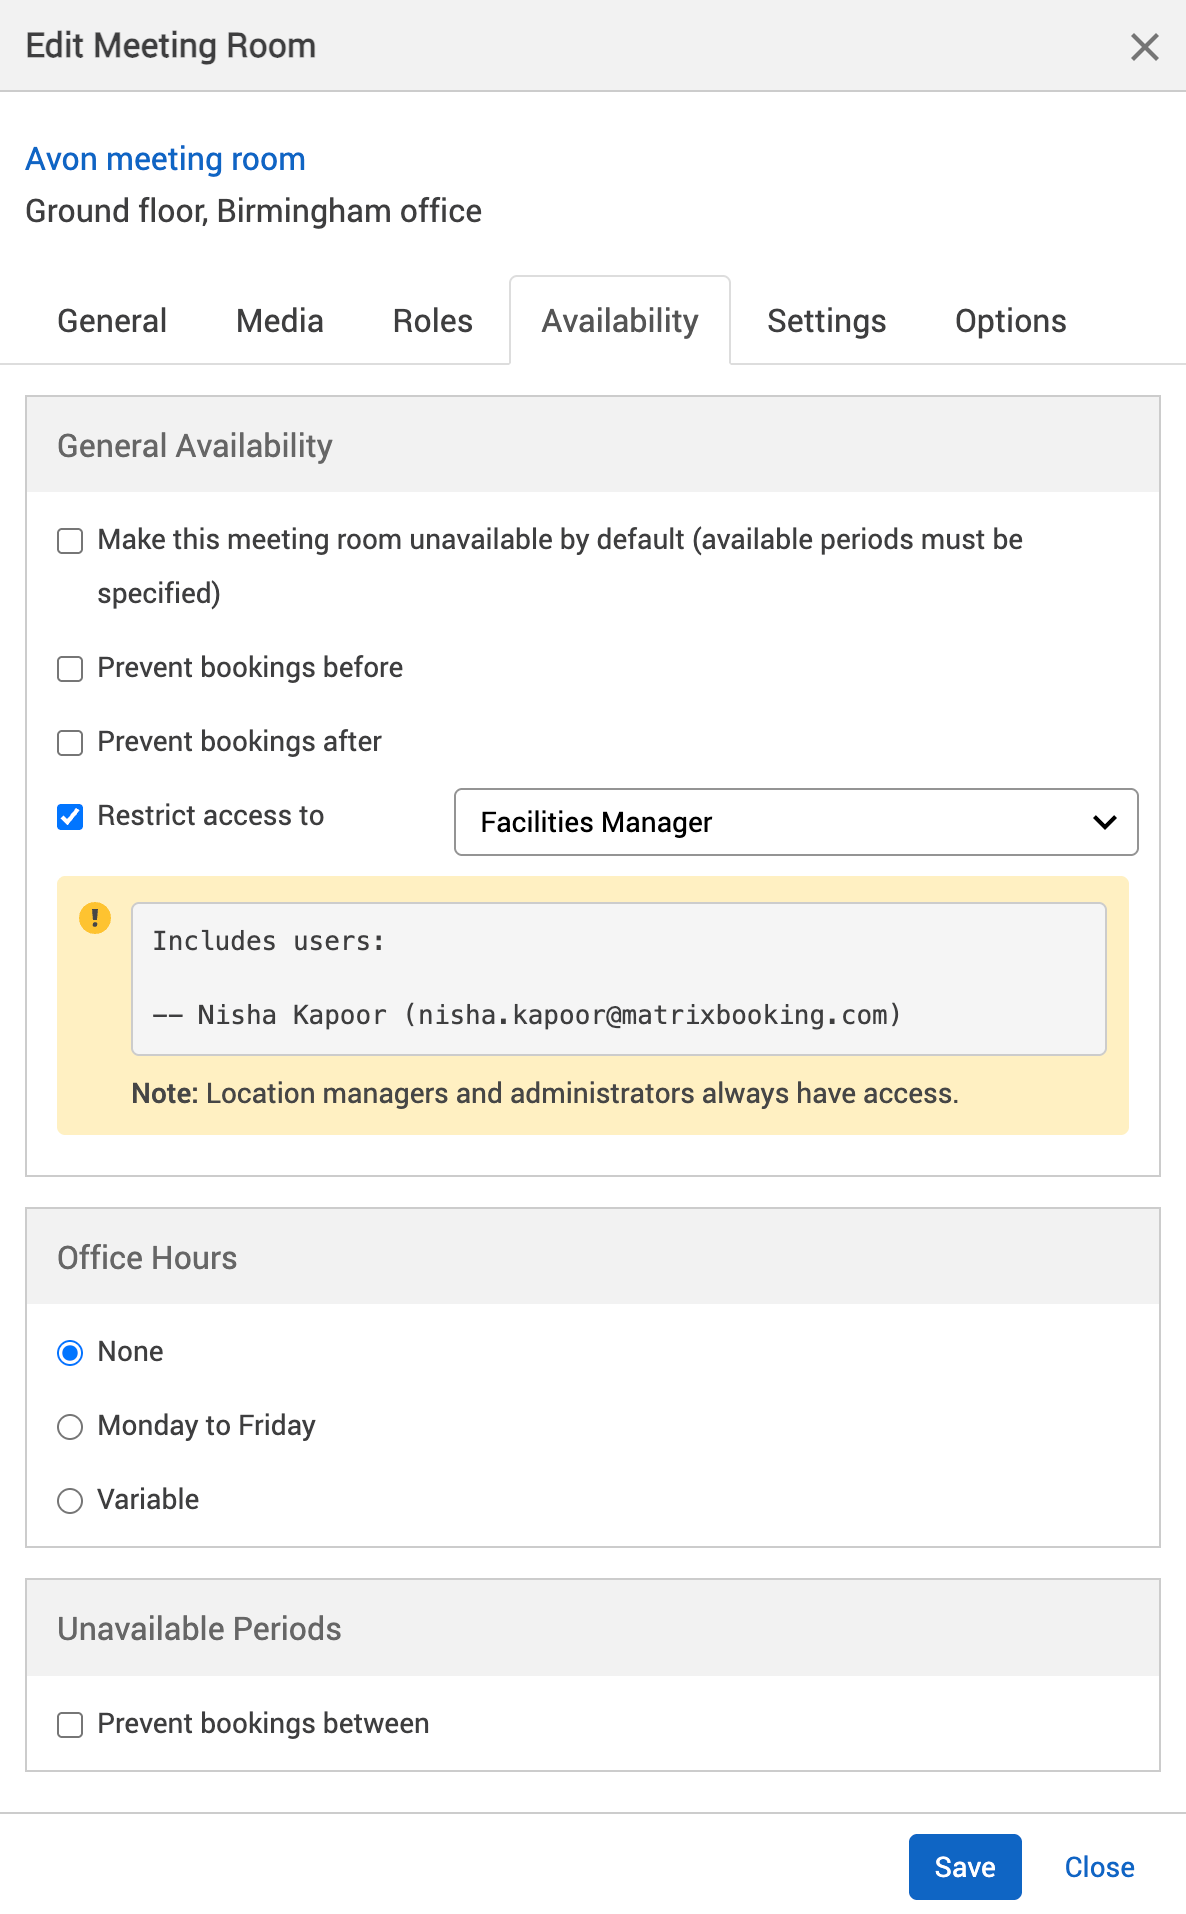
Restrict access to a location or resource for a group
Once your groups have been set up, you can restrict access to particular groups for your resources To do this:
-
Go to the General Availability section.
-
Select the Restrict access to checkbox. The Groups dropdown will appear.
-
Select the Groups downdown. A list of all your groups will be appear.
-
Select the group you want the location or resource restricted to. The list of users in that group will appear.
-
If you want to make the resource available to everyone again, select the Restrict access to checkbox again to untick it.
-
Select either of the following and the dialog will close to return you to the Locations and resources hierarchy:
-
Save to keep your changes.
-
Close to discard your changes.
-
-
Select Save changes.
Notes:
-
If your group doesn’t appear in the list:
-
Close the Edit [location or resource] dialog without saving.
-
Refresh or reload the page.
-
Start the process again.
Your new groups will sync with the list of available groups when the page refreshes or reloads.
-
-
If you book a resource on behalf of someone else and they don’t have access to that resource, the booking will be successful as it’s the booking organiser’s access to the resource that’s considered by Matrix Booking.
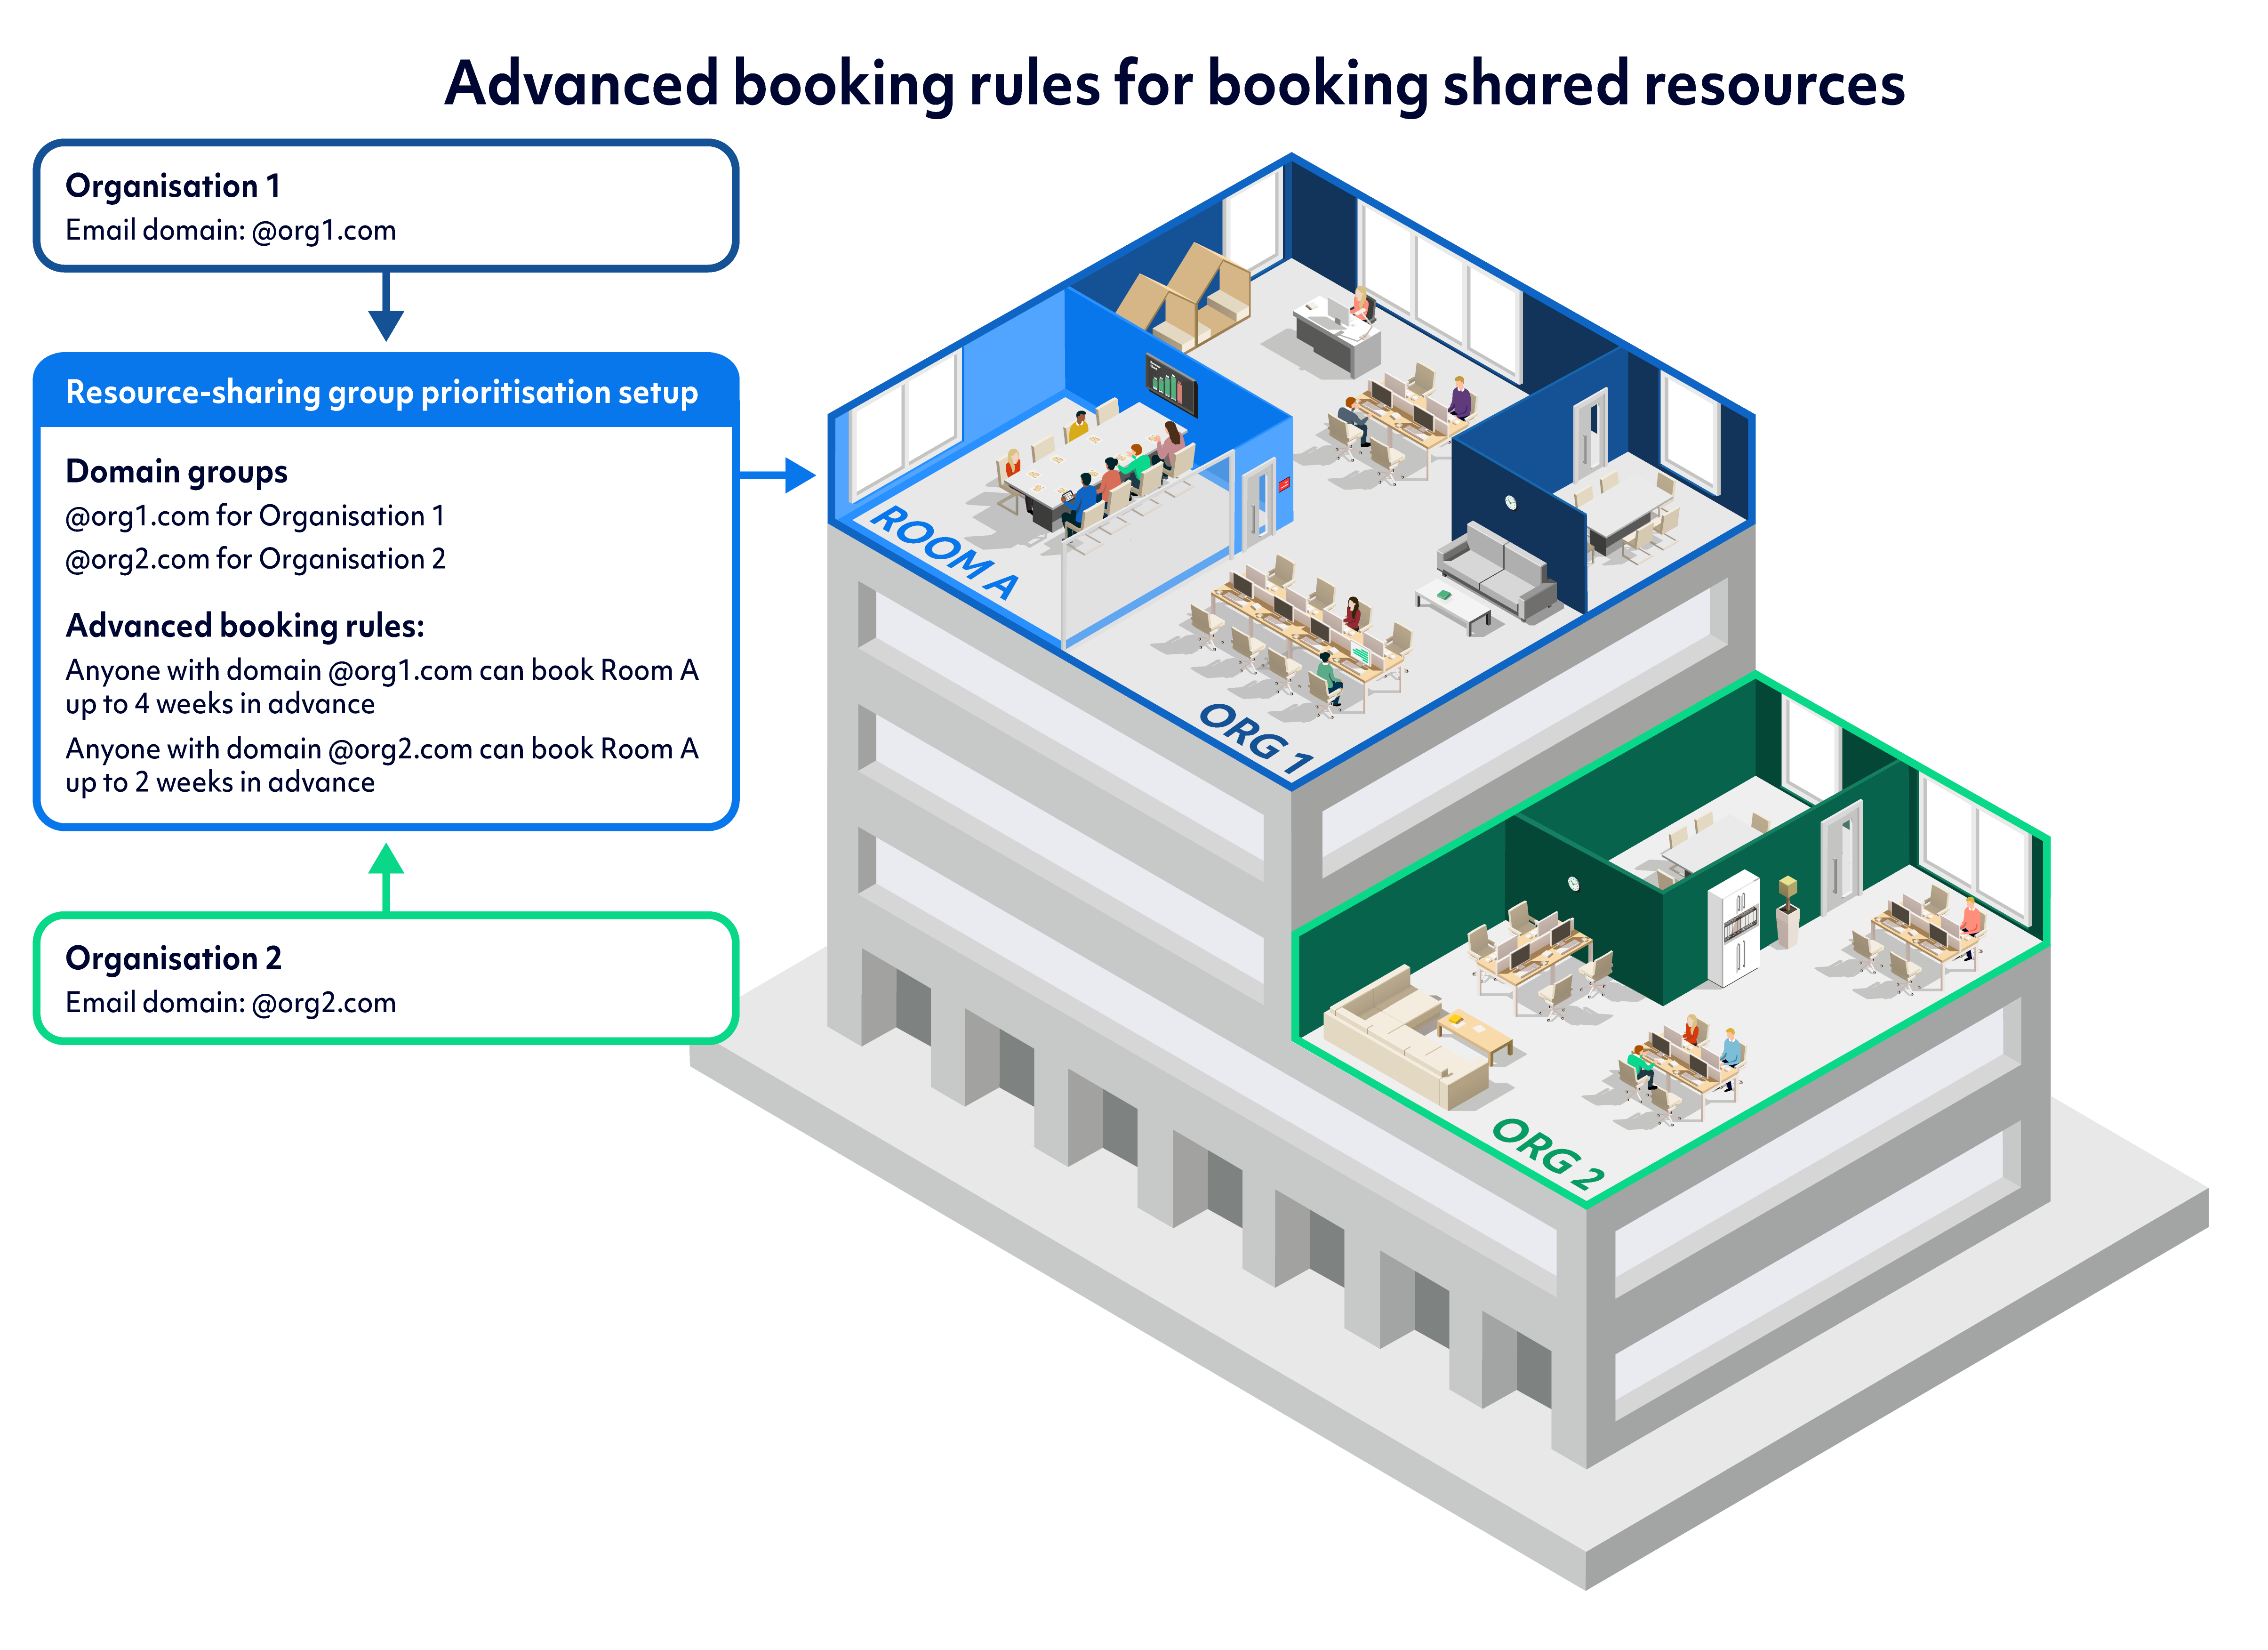
Advanced booking rules for booking shared resources
In the following example, we show how 3 features of Matrix Booking can be used together so that you can share your resources with other organisations while still giving priority to your staff.
Resource sharing
Organisation 1 shares a resource (Room A) with Organisation 2. Both organisations are in the same building, but occupy different floors. Organisation 1 wants to give its own staff higher prioritisation for booking Room A than Organisation 2.

Although the example below shows 1 shared resource in 1 shared building, this setup could be applied to multiple shared resources and across multiple buildings.

Domain groups
Before setting up the different prioritisations for the organisations that can book Room A, Organisation 1 needs to set up domain groups. Domain groups rely on each organisations’ email domain. Organisation 1 has set up the following domain groups:
-
Organisation 1 has the domain @org1.com
-
Organisation 2 has the domain @org2.com
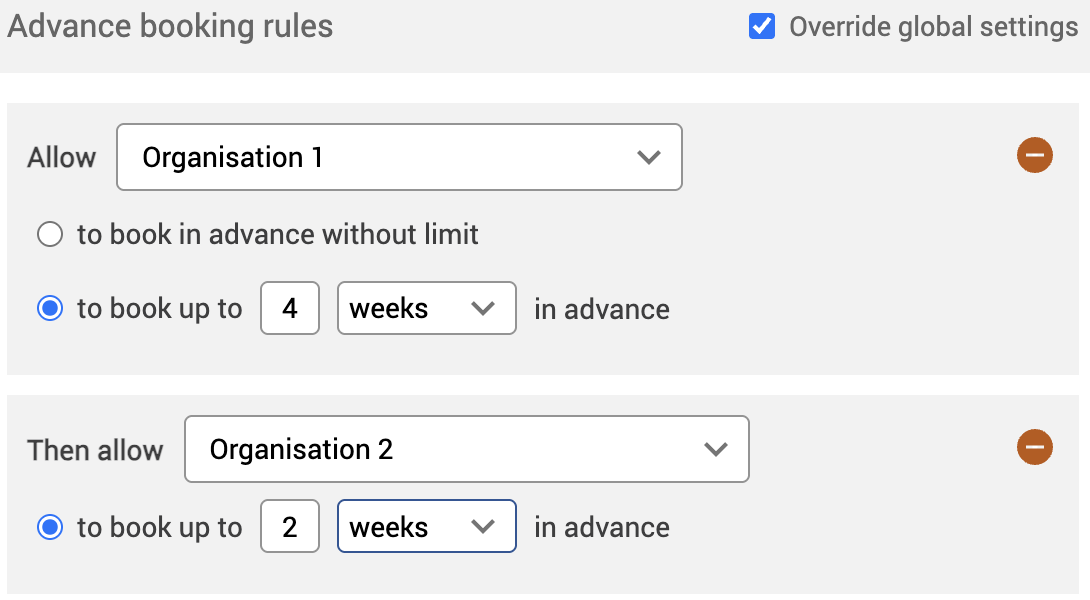
Advance booking rules (prioritisation)
Now that the domain groups have been set up, Organisation 1 can set up the Advance booking rules for each organisation based on the domain groups. Organisation 1 has set up the following Advance booking rules:
-
Domain group Organisation (@org1.com)1 can book Room A up to 4 weeks in advance.
-
Domain group Organisation (@org1.com)2 can book Room A up to 2 weeks in advance.
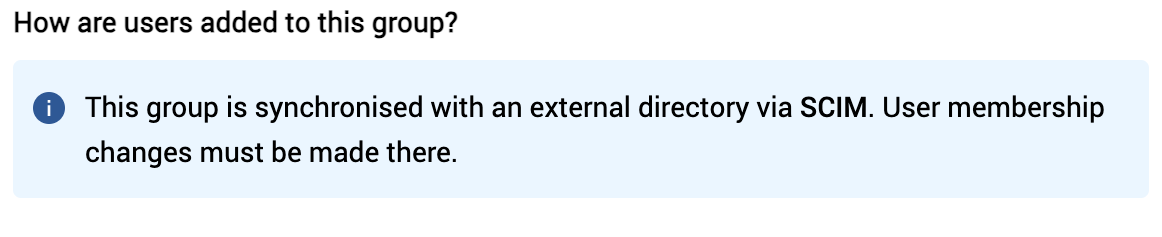
Synchronise Matrix Booking groups with Microsoft Entra ID and SCIM
If you’ve connected your directory to Matrix Booking using either the Microsoft Entra ID integration or SCIM (System for Cross-domain Identity Management) integration, you should add or remove users in the directory of the integration you’re using. You must have a master list of Matrix Booking users in Entra ID or SCIM. Matrix Booking can pull members in from the master list and set them up as Matrix Booking users. You can have other Entra ID or SCIM groups that can be used to create Matrix Booking user groups. However, those members in those groups must exist in the master list.
You need to have our single sign-on (SSO) integration to have our Microsoft Entra ID integration.
Use one of the following guides to set up a group in your chosen integration:
Once your directory sync has been set up and you add or edit a Matrix Booking Group, you’ll see an option to sync your Matrix Booking group with your Entra ID in the Edit group dialog. To sync your Matrix Booking and Entra ID groups:
-
Select Synchronised with Azure AD.
-
Begin to enter the Entra ID group name in the text box. The Group name dropdown will appear.
-
Select your Entra ID group from the dropdown.
-
Select either of the following and the dialog will close to return you to your chosen Groups screen:
-
Save to keep your changes.
-
Close to discard your changes.
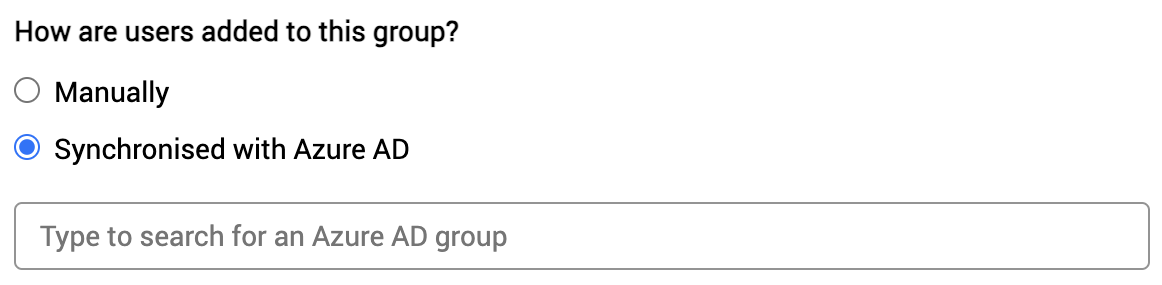
-
To sync your Matrix Booking and SCIM groups, this must be done on the SCIM side.
Note: for either directory sync, contact your customer success manager so they can discuss these options with you.
Security approach
Access is based on your Locations and resources hierarchy restrictions. You can restrict access at any level, with 1 group per location or resource.
Users must pass every level of restriction to gain access. For example:
-
A floor is restricted to Group A.
-
A resource on that floor is restricted to Group B.
Only users in both Group A and Group B can book that resource. Users in just one of these groups can’t.
Resource sharing security
If the sharer organisation enables Restrict access to in the Availability tab of a shared resource and sets it to one of their own groups, the sharee organisation won’t be able to book it.
To allow access to shared resources, remove any restrictions from the resource and any locations above it in the hierarchy.
You can apply 1 group restriction per shared location or resource. The same “must pass all levels” rule applies to shared locations and resources.
Next ❯
Contact and directory management