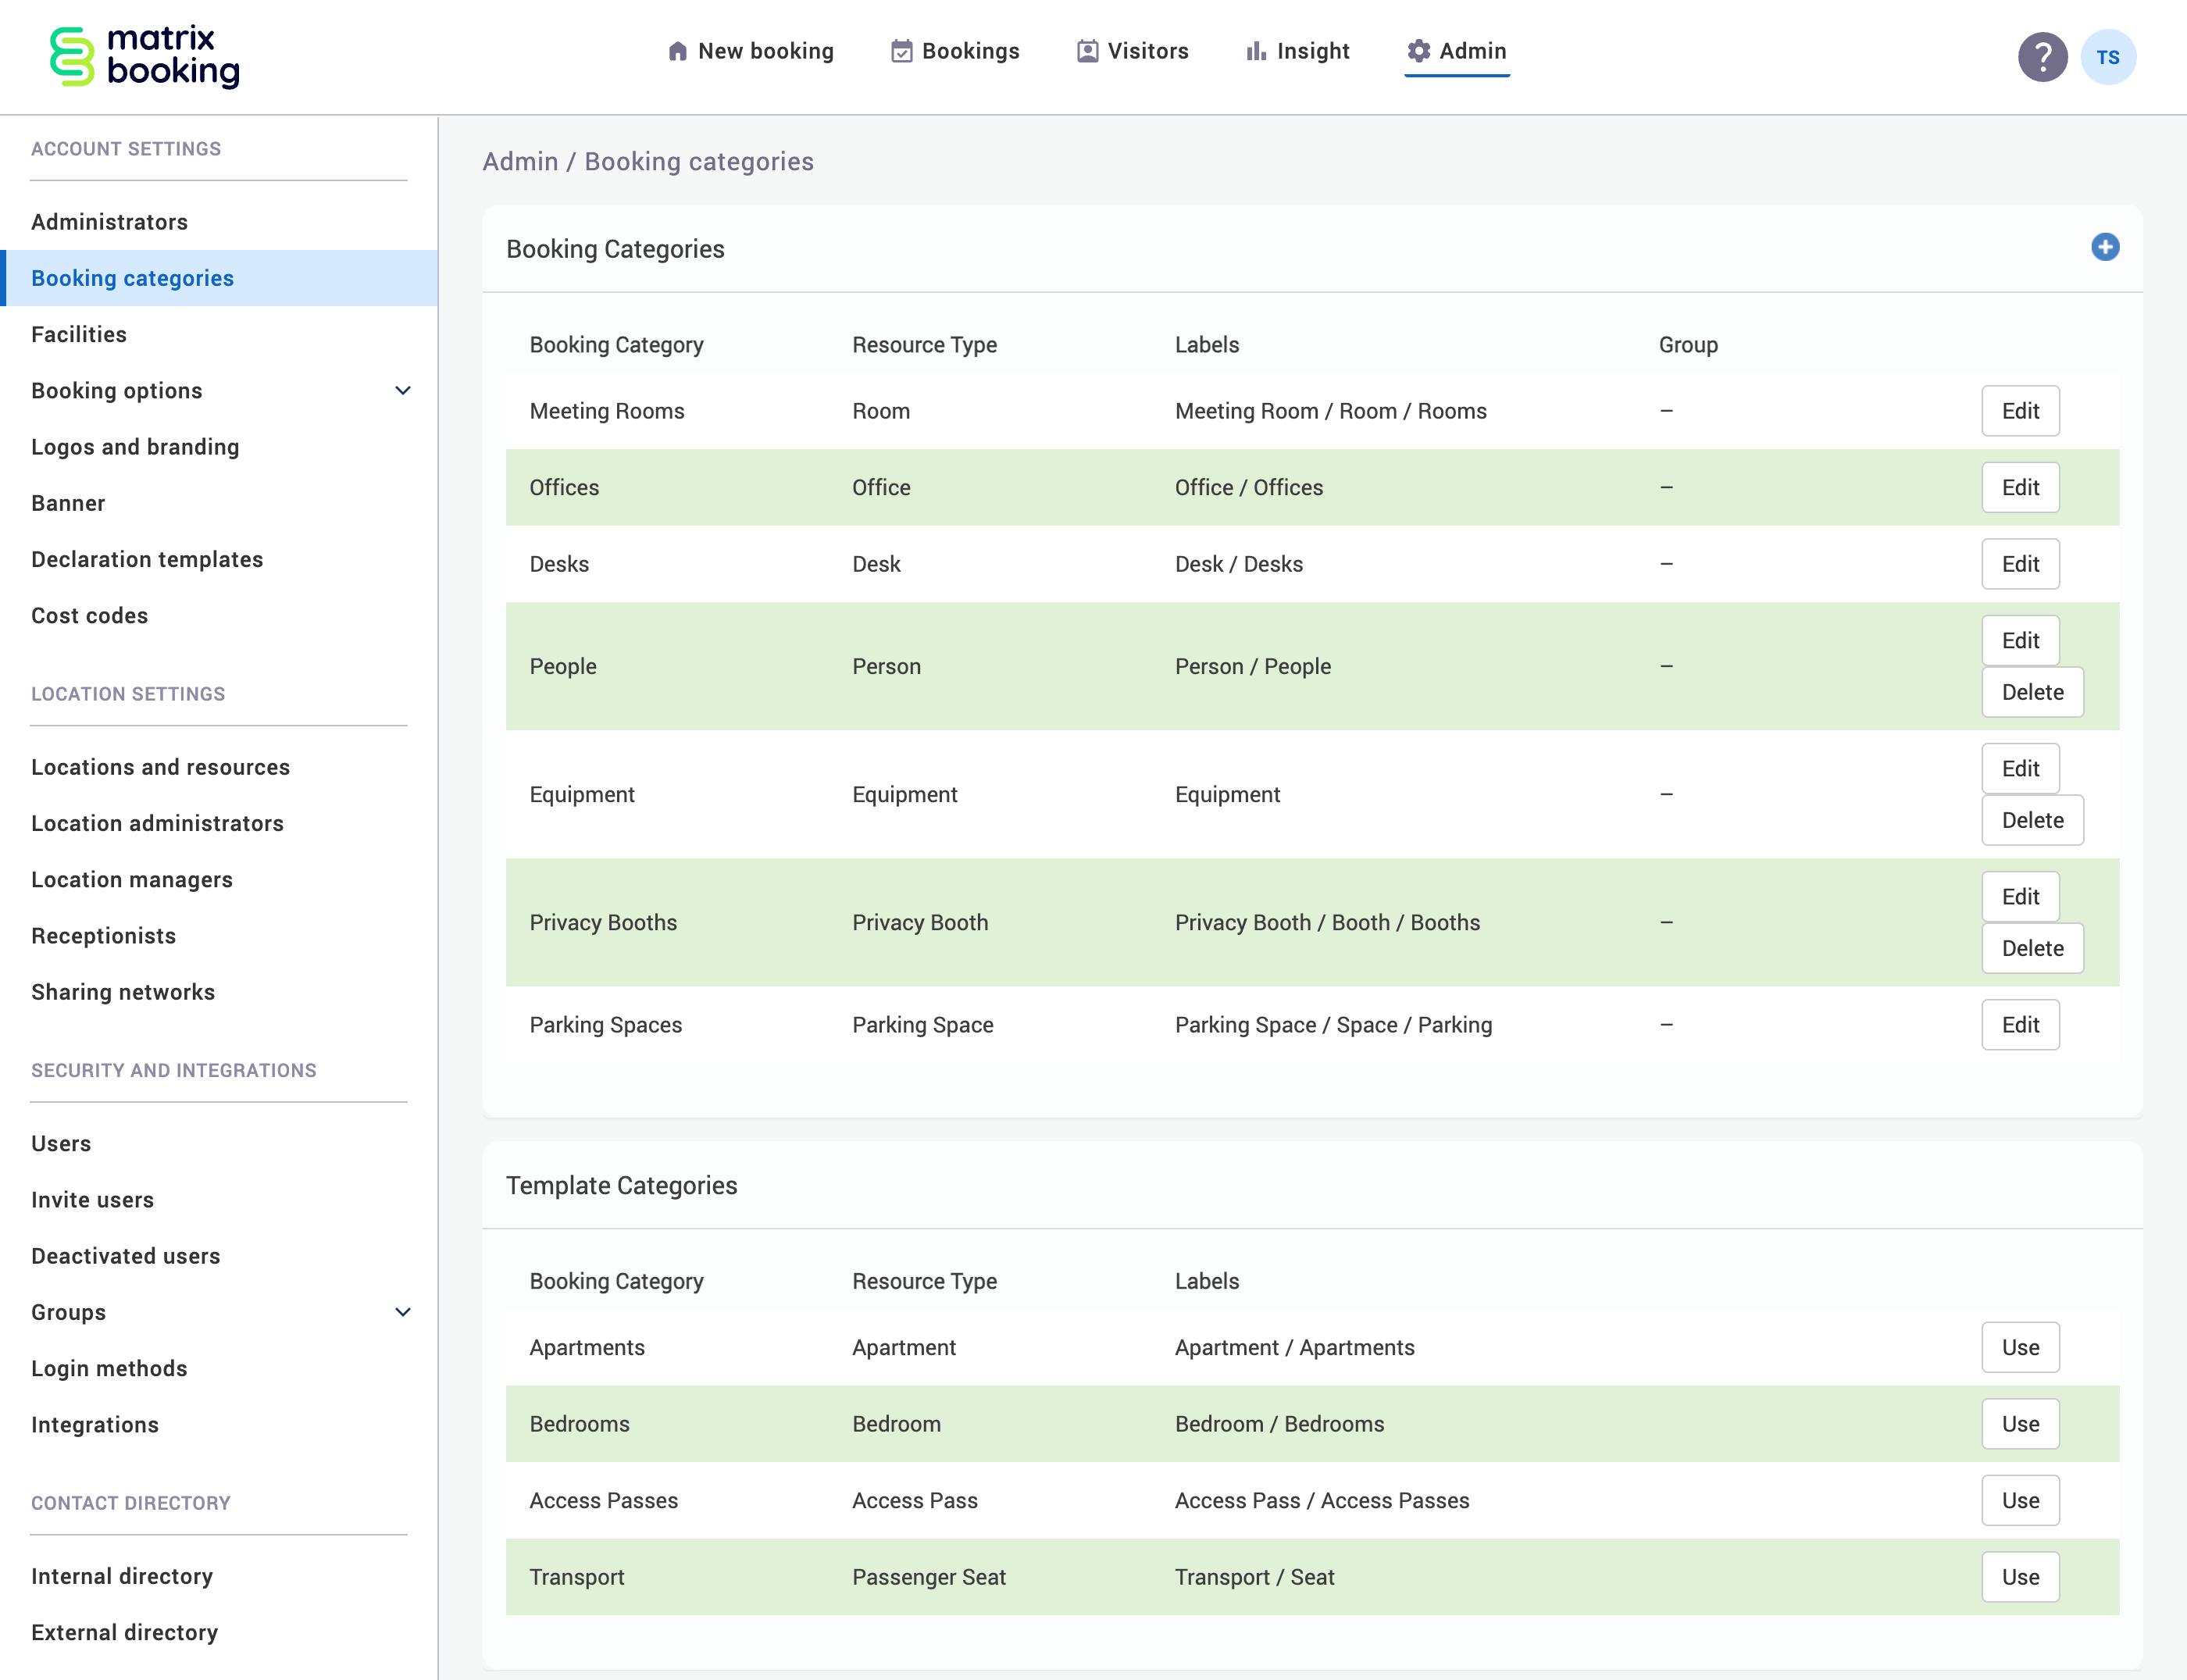
Booking categories are another name for resource types (for example, rooms, desks, or car parks). This page explains how booking categories can be used and the different features surrounding them. You’ll see the categories that you’re currently using and the others that are also available:
Category types
This section has 2 main functions:
-
To control which booking categories you’re using.
-
To define some very high-level rules around those categories and how they behave.
Add booking categories
To use a template category:
-
Select Admin in the navigation bar.
-
Select Booking categories under the Account Settings section in the side menu.
-
Go to the Template Categories section under the Booking Categories section.
-
Find the template category you want.
-
Select Use.

Remove categories
Remove categories used in the hierarchy
If you want to remove a category, you may have to remove it from your organisation’s hierarchy first before the Delete button appears in the Booking Categories screen.
Note: to remove a category that’s used in your hierarchy, follow the Delete a resource steps.
Remove categories not in the hierarchy
To remove a category that isn’t in your hierarchy:
-
Select Admin in the navigation bar.
-
Select Booking Categories under the Account Settings section in the side menu.
-
Find to the booking category you want to remove in the list.
-
Select Delete.
-
The resource will reappear in the Template Categories section at the bottom of the screen.
Edit category settings
There are several settings that you can amend at the category level. To edit a booking category’s settings:
-
Select Admin in the navigation bar.
-
Select Booking Categories under the Account Settings section in the side menu.
-
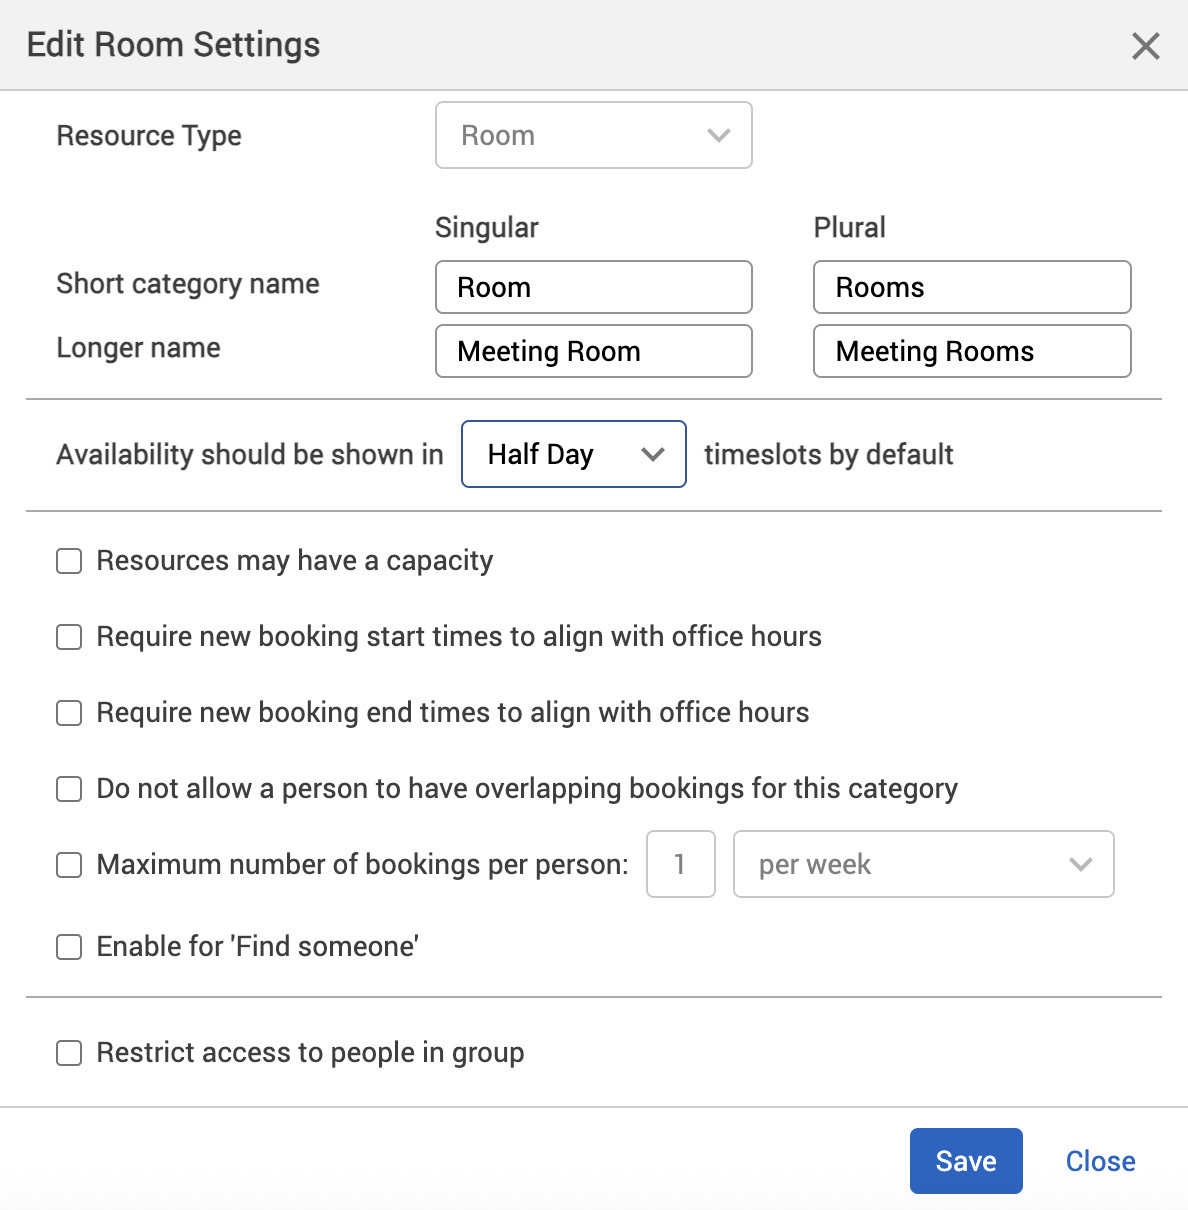
Select Edit next to the booking category you want to edit. The Edit [Booking category] Settings dialog will appear.
-
In the corresponding text boxes, enter the new:
-
Singular Short category name
-
Plural Short category name
-
Singular Longer name
-
Plural Longer name
-
-
For the Availability should be shown in [Time period] time slots by default setting, select the [Time period] dropdown (Hourly is selected by default).
-
Select 1 of the 3 settings:
-
Hourly
-
Half Day
-
Whole Day
-
-
If you want the booking category to have a capacity, select the Resource may have a capacity tick box.
-
If you want the booking category to have bookings start from your organisation’s opening times, select the Require new booking start times to align with office hours tick box.
-
If you want the booking category to have bookings end at your organisation’s closing times, select the Require new booking end times to align with office hours tick box.
-
If you want the booking category to not have overlapping bookings, select the Do not allow a person to have overlapping bookings for this category tick box.
-
If you want to limit the number of bookings that users can make, select the Maximum number of bookings per person: tick box. The number text box and the per [time slot] dropdown will activate and will no longer be greyed out.
-
Enter the number of bookings you want to limit each user to for the booking category.
-
Select the per [time slot] dropdown.
-
Select 1 of 4 settings:
-
per week
-
per month
-
per building, per week
-
per building, per month
-
-
If you want the booking category to be searchable by users if another user has made a booking for that booking category, select the Enable for 'Find someone' tick box.
-
If you want the booking category to be booked by a certain set of users only, select the Restrict access to people in group tick box. The Groups dropdown will appear.
-
Select the Groups dropdown.
-
Select 1 of the groups you’ve set up.
-
At the bottom of the dialog, select either:
-
Save to keep you changes.
-
Close to discard your changes.

-
Notes:
-
The Resource Type dropdown will be unavailable for preset Booking Categories.
-
The Hourly, Half Day, and Whole Day settings automatically select the corresponding time slot in the View as list and View as map.
-
When you’re making a new booking in the View as Calendar, the time slots don’t automatically select the corresponding time slot set by the Booking Categories. It will appear as the 30 minutes slot or the click-and-drag slot you select.
-
The Require new booking start times to align with office hours and the Require new booking end times to align with office hours settings change to the office hours you set in the Availability tab.
-
The Find someone feature can’t be enabled for individual users – it’s either on or off for your whole organisation.
-
The Find Someone feature isn’t available on our iOS and Android mobile apps.
-
If there’s a group set at the floor level, building level, or higher, the Show on floor plan button won’t be shown. Bookings will be shown, but not on a floor plan.
-
If you have access to the floor, but not to any of the resources on that floor, you’ll receive an error message saying that we are unable to display the floor plan.
-
You must have set up at least 1 group to be able to restrict access to that group. For more information on how to set up groups, see Groups.