This page describes how to use the My bookings tab in the Bookings screen:
Access the My bookings tab
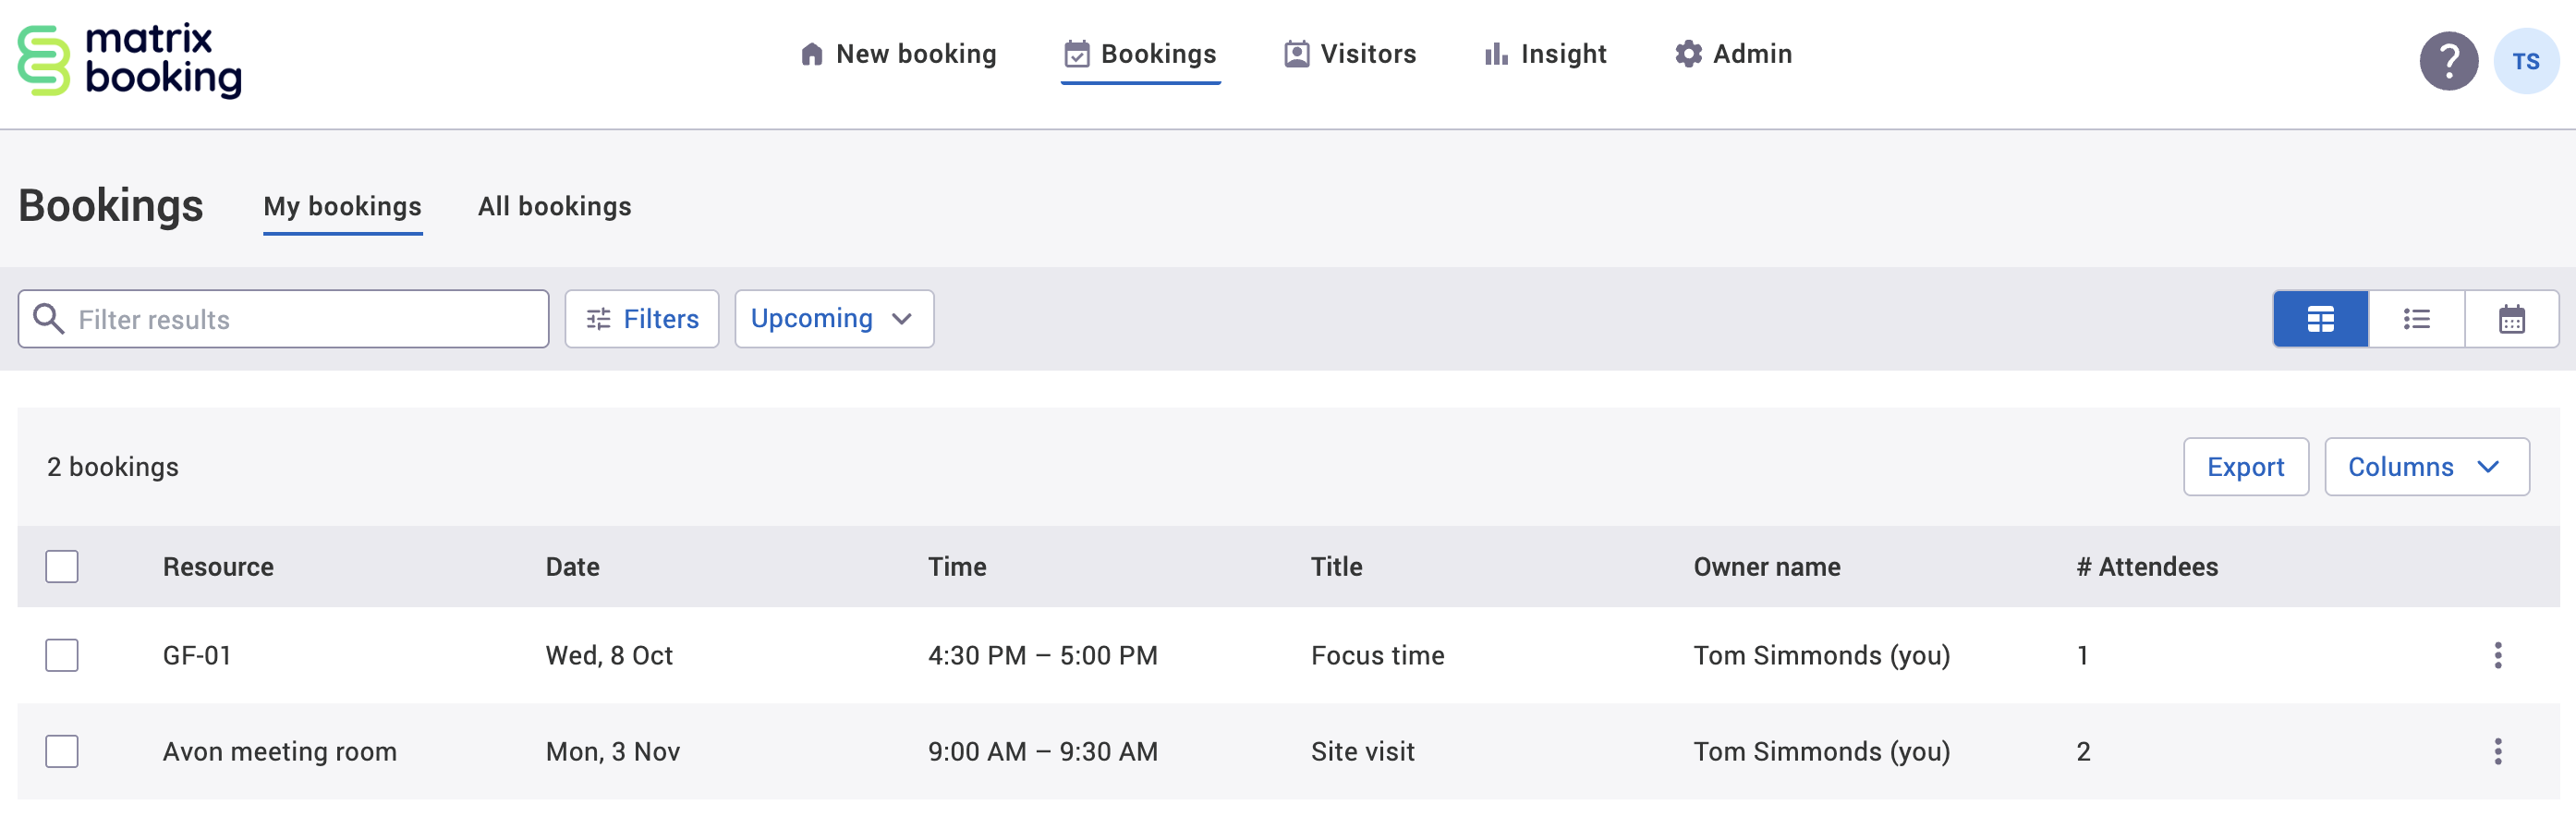
To access the My bookings tab:
-
Select Bookings in the navigation bar. The Bookings screen will appear.
-
Select the My bookings tab. The My bookings tab will appear.
-
Select the view you want:
-
Table view
-
List view
-
Calendar view
-
-
Enter a filter you want in the Filter search bar.
-
Select the filters you want.
-
Select the columns you want (where applicable).
-
The search will happen automatically.
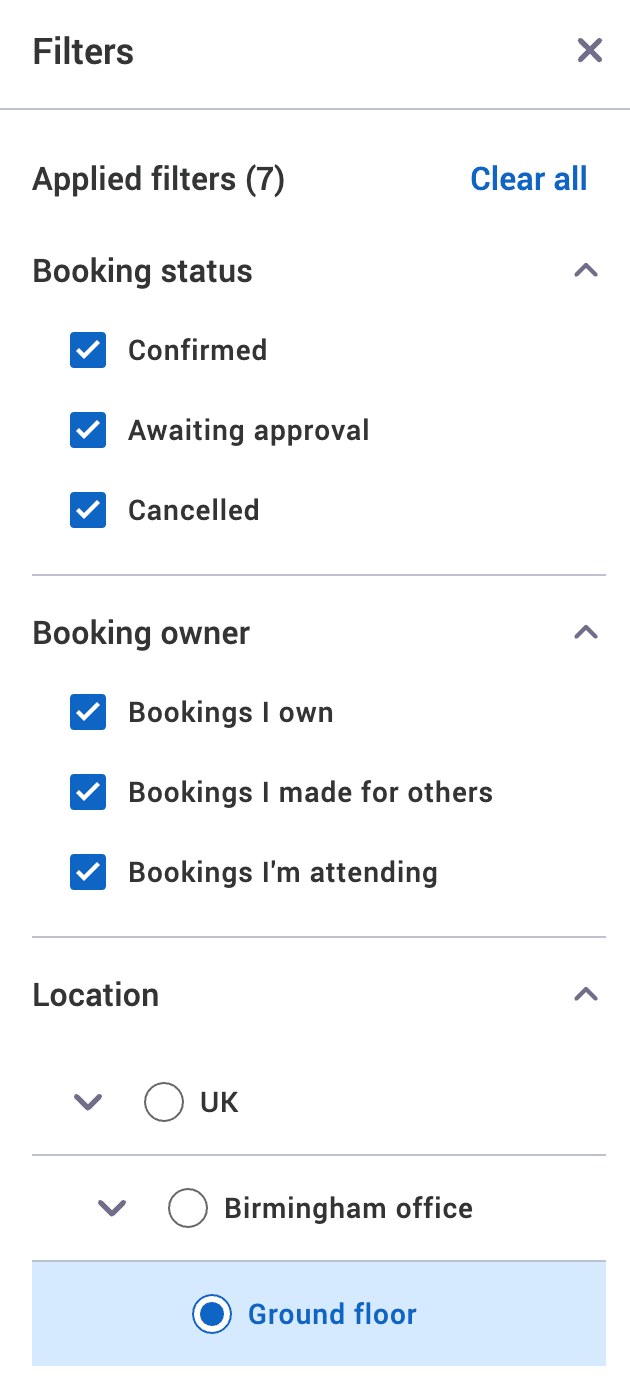
Filters
You can filter on the:
-
Booking status:
-
Confirmed
-
Tentative
-
Cancelled
-
-
Booking owner:
-
Bookings I own
-
Bookings I made for others
-
Bookings I'm attending
-
-
Location (if left blank, it will search the whole organisation)
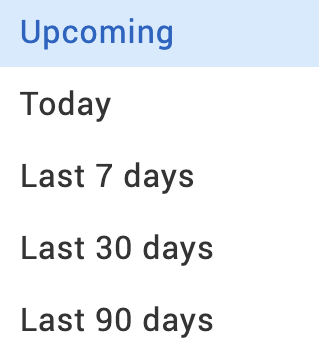
Time frame selector
You can additionally filter on time:
-
Upcoming
-
Today
-
Last 7 days
-
Last 30 days
-
Last 90 days
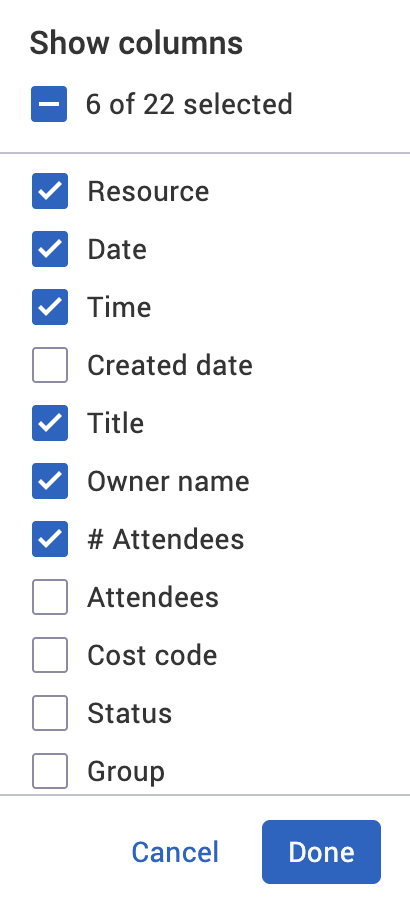
Choose columns dropdown
In the Table view, the full list of columns in the Choose columns dropdown is as follows:
-
Resource (selected by default)
-
Date (selected by default)
-
Time (selected by default)
-
Created date
-
Title (selected by default)
-
Owner (selected by default)
-
# Attendees (number of attendees, selected by default)
-
Attendees
-
Cost code
-
Status – the category of your booking (for example, confirmed or tentative)
-
Group
-
Location
-
Site
-
Building
-
Floor
-
Zone
-
Owner email
-
Booked by name
-
Booked by email
-
Notes – further information provided by the booking owner
-
Requests – booking options asked for by the booking owner (for example, catering)
-
Requests with times – booking options asked for by the booking owner at a specific (for example, catering at lunchtime)
Booking status definitions
There are different statuses that bookings can have:
|
Status |
Definition |
|---|---|
|
BOOKED |
A booking that has been approved by a location manager or above, or accepted by the Matrix Booking system. |
|
AWAITING APPROVAL |
A booking that has been made and is waiting for approval by a location manager or above. If not approved in time or rejected, this status will remain for the booking. |
|
CHECK IN NOW |
A booking that can be checked in to. |
|
CHECK-IN REQUIRED |
A booking that can’t be checked in to as the check-in window hasn’t elapsed. |
|
CHECKED IN |
A booking that’s been checked in to, but hasn’t started. |
|
IN PROGRESS |
A booking that has started. |
|
CANCELLED |
A booking that was rejected, or manually or automatically cancelled (due to the booking not being checked in). |
If a booking is approved, the status will move from AWAITING APPROVAL to either BOOKED, CHECK IN NOW, or CHECK-IN REQUIRED depending on your setup.
If a booking is rejected, cancelled, or auto-cancelled due to a “no show”, the booking will be removed from the tab. The booking then will then appear in the Cancelled tab.
If a booking becomes unassigned, the booking will have whatever status it had at the time of the user’s deactivation, but there will an [X] next to the user’s name in the booking information panel.
When a booking has been anonymised, it will display the booking owner name as Anonymisation Service [X] and their email address will also be anonymised.
Approve a booking
If you’re a location manager, location administrator, or administrator, you can approve or reject bookings.
To approve a booking in the My bookings tab:
-
Depending on the view you’ve selected, a different step may need to be taken:
-
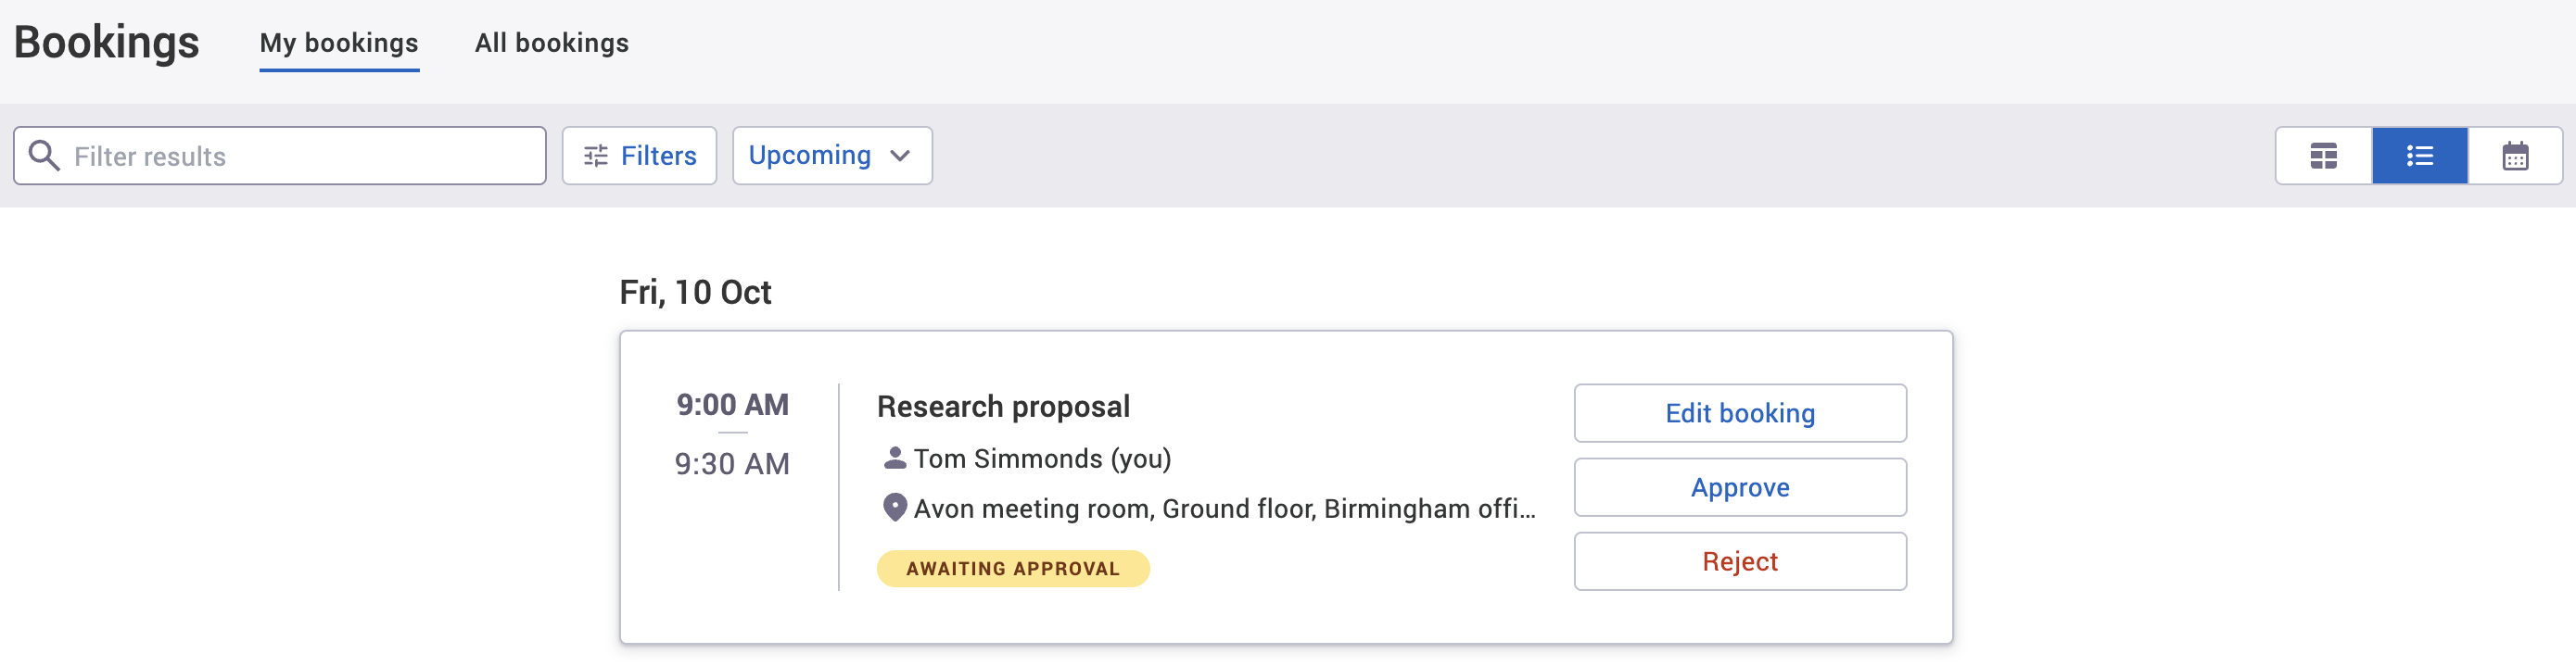
For the List view, select Approve next to your chosen booking (see image below).
-
For the Calendar view, select the vertical three-dots icon to open the more options menu.
-
In the Edit booking dialog, select the vertical three-dots icon to open the more options menu.
-
-
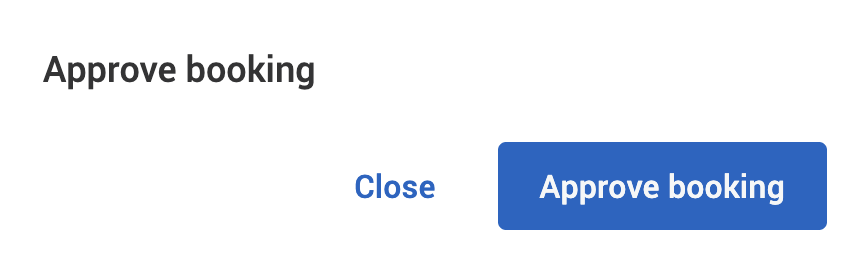
Select Approve. The Approve booking dialog will appear.
-
Select either of the following and the dialog will close to return you to the Bookings screen:
-
Select Approve booking to approve the booking.
-
Select Close to not continue to approve the booking.
-
Reject a booking
If you’re a location manager, location administrator, or administrator, you can approve or reject bookings.
To reject a booking in the My bookings tab:
-
Depending on the view you’ve selected, a different step may need to be taken:
-
For the List view, select Reject next to your chosen booking (see image below).
-
For the Calendar view, select the vertical three-dots icon to open the more options menu.
-
In the Edit booking dialog, select the vertical three-dots icon to open the more options menu.
-
-
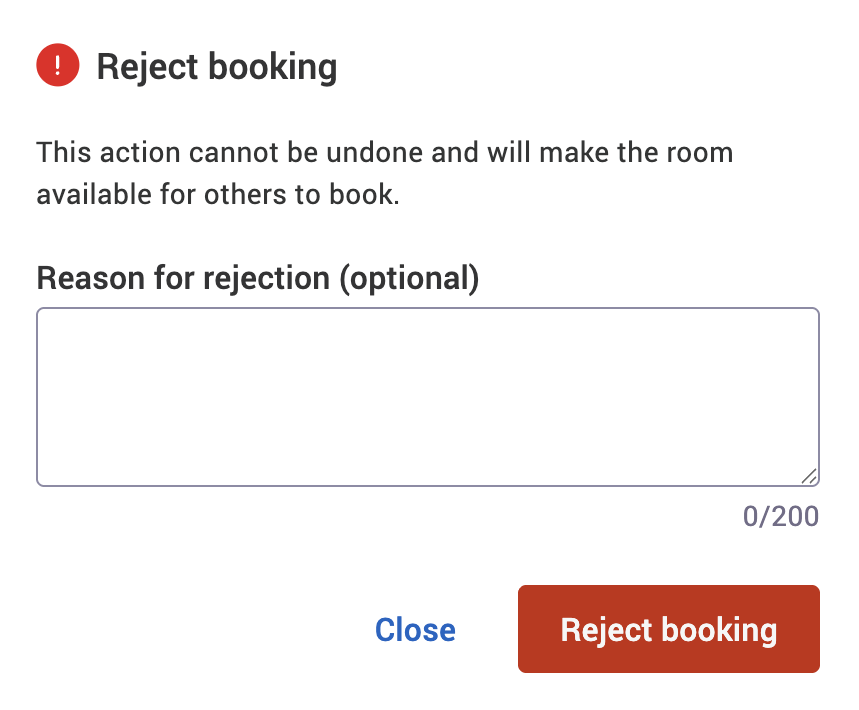
Select Reject. The Reject booking warning dialog will appear.
-
Optional: enter the reason why the booking is being rejected in the Reason for rejection text box.
-
Select either of the following and the dialog will close to return you to the Bookings screen:
-
Select Reject booking to approve the booking.
-
Select Close to not continue to approve the booking.
-
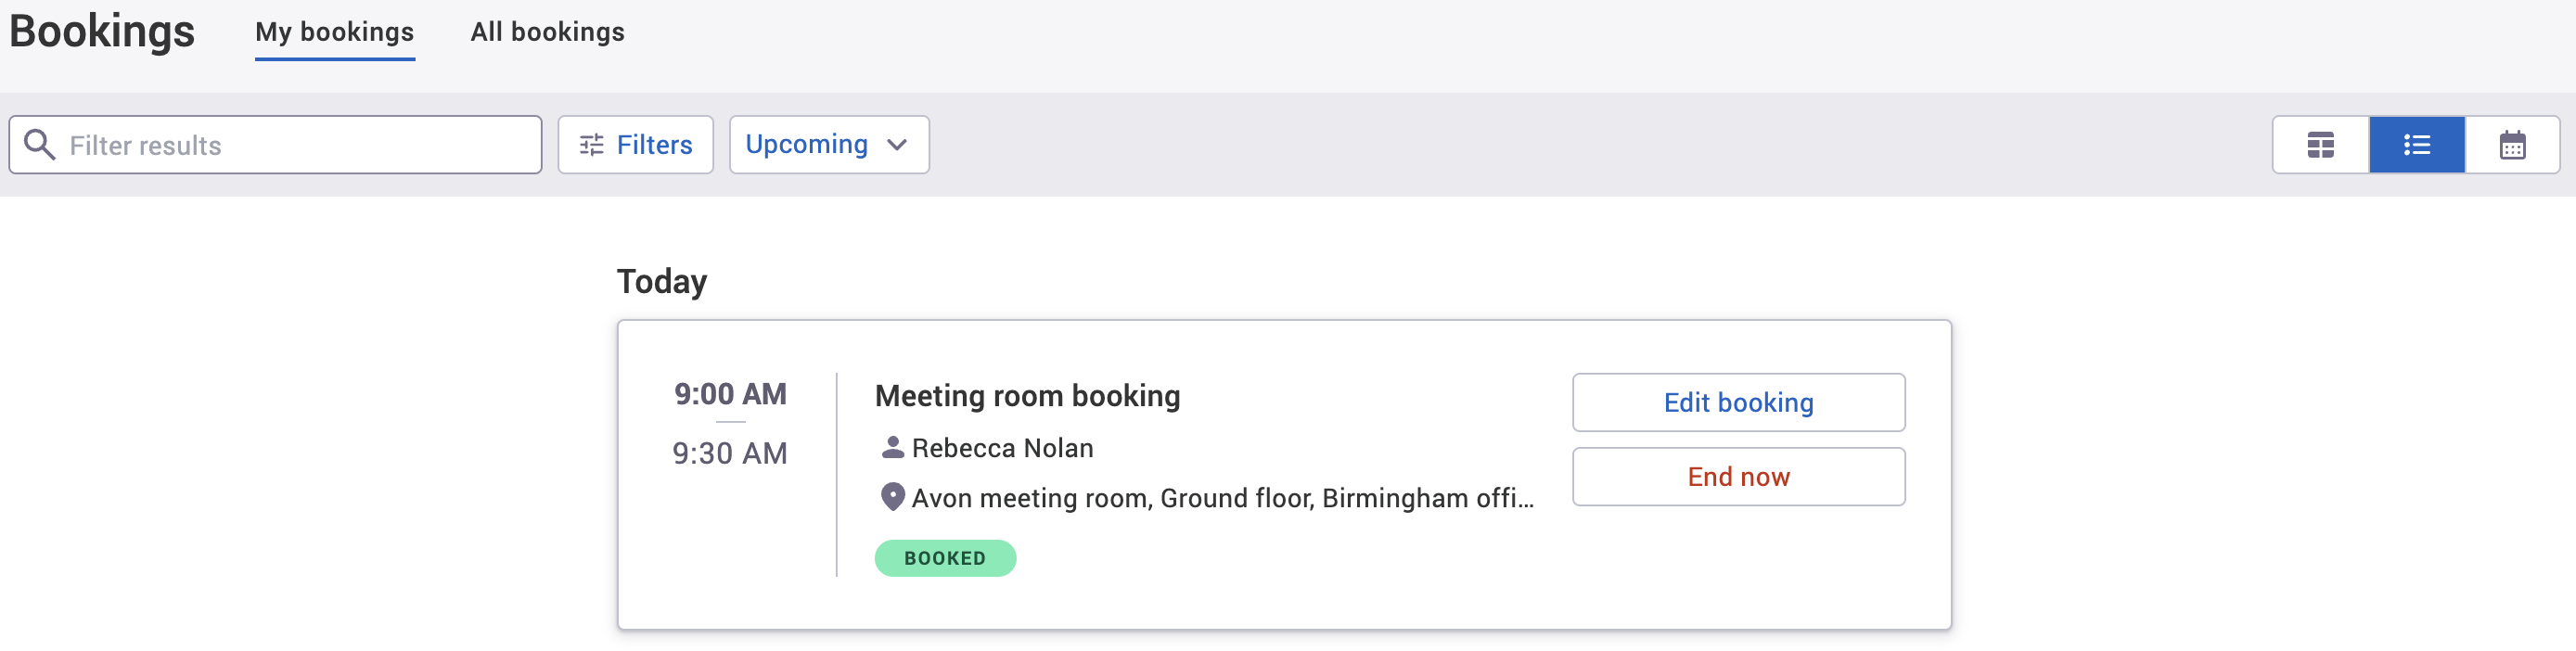
Check in to a resource
If check-ins have been switched on, you’ll need to check in to your resource before your booking start time.
To check in to a booked resource in the My bookings tab:
-
Depending on the view you’ve selected, a different step may need to be taken:
-
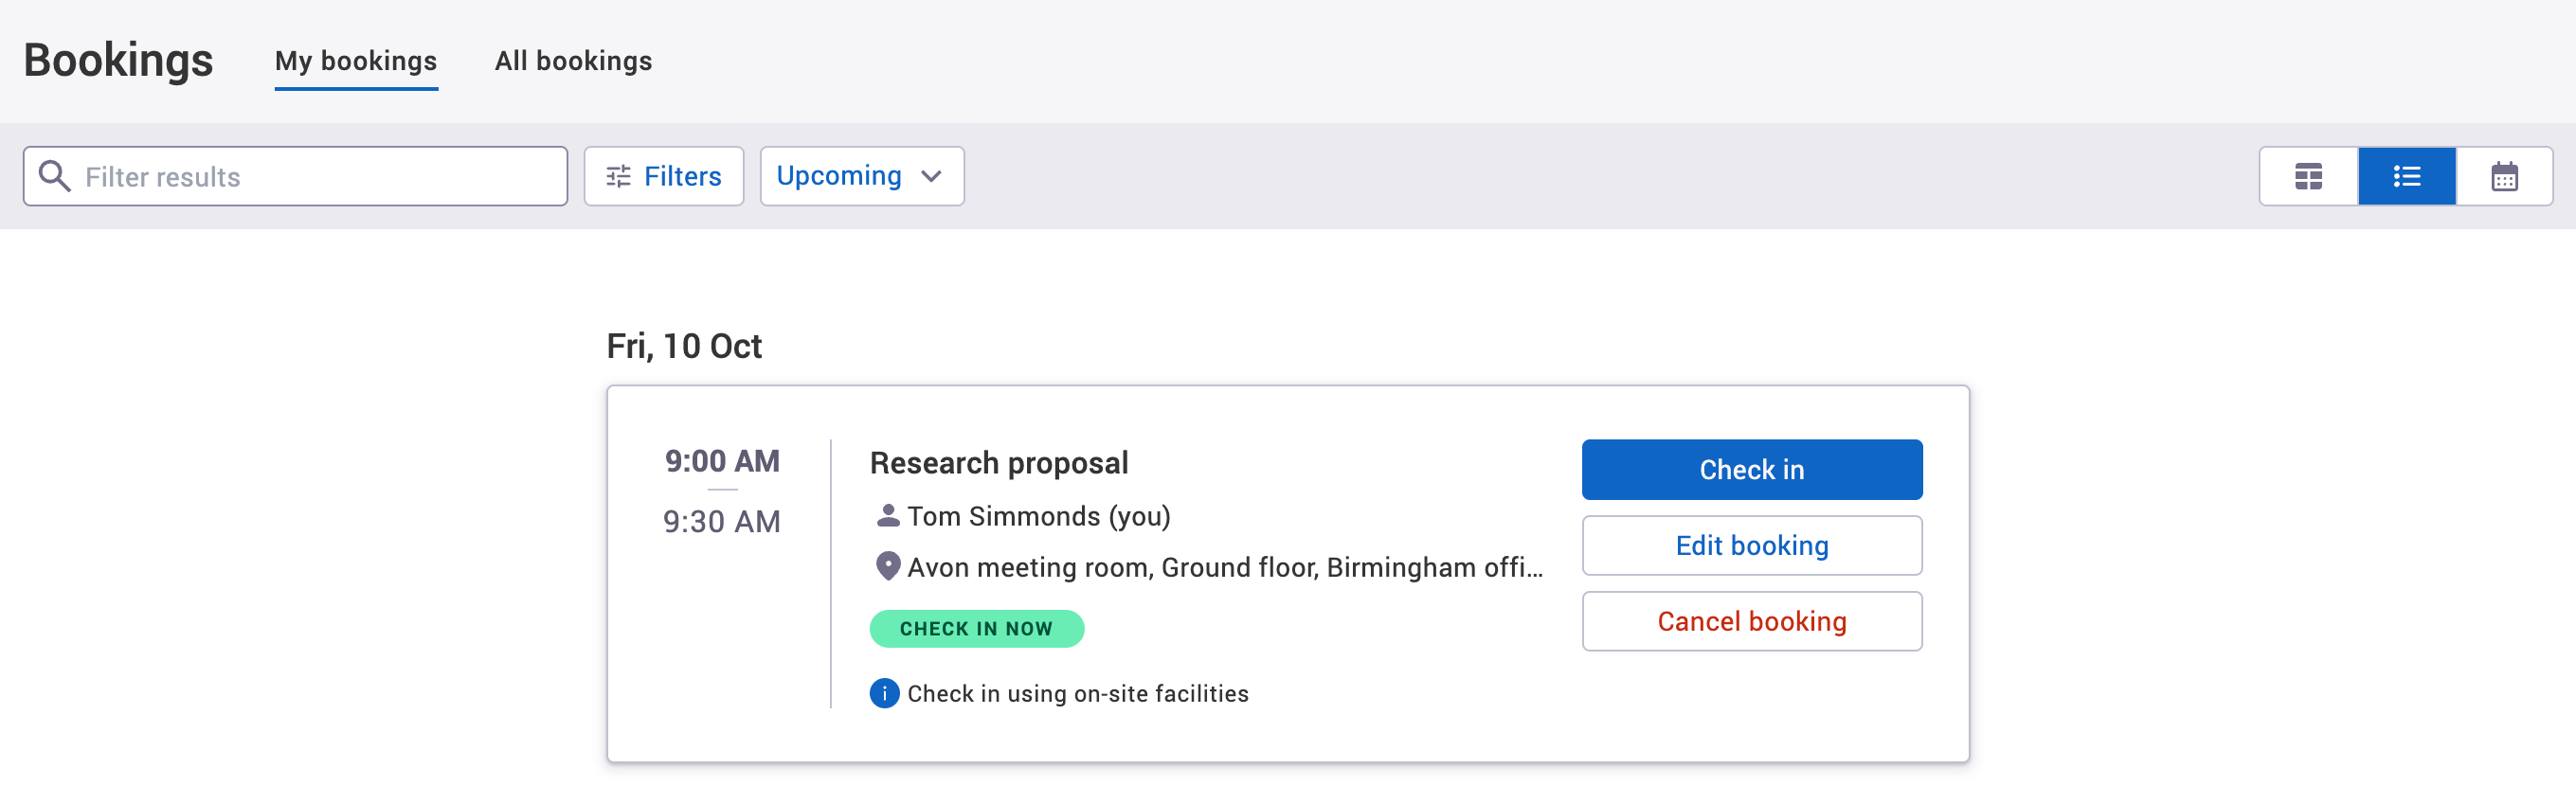
For the List view, select Check in next to your chosen booking (see image below).
-
For the Calendar view, select the vertical three-dots icon to open the more options menu.
-
In the Edit booking dialog, select the vertical three-dots icon to open the more options menu.
-
-
Select Check in.
-
Your resource has been checked in to.
Edit a booking
To edit a booked resource in the My bookings tab:
-
Depending on the view you’ve selected, a different step may need to be taken:
-
For the List view, select Edit booking next to your chosen booking (see image below).
-
For the Calendar view, select the vertical three-dots icon to open the more options menu.
-
-
Select Edit booking. The Edit booking dialog will appear.
-
Make the changes you need to.
-
If the booking is upcoming, select 1 of the following and the dialog will close to return you to the Bookings screen:
-
Select Save and notify attendees to keep your changes and let your invited attendees know of the changes.
-
Select the dropdown next to Save and notify attendees to open the dropdown and select Save without notification to keep your changes without letting your invited attendees know of the changes.
-
If you added or removed at least 1 attendee, select Save and notify all attendees to keep your changes and let all attendees know of the changes.
-
If you added or removed at least 1 attendee, select the dropdown next to Save and notify attendees to open the dropdown and select Save and notify changed attendees to keep your changes and let attendees know if they need to attend or not.
-
Select Cancel to discard your changes.
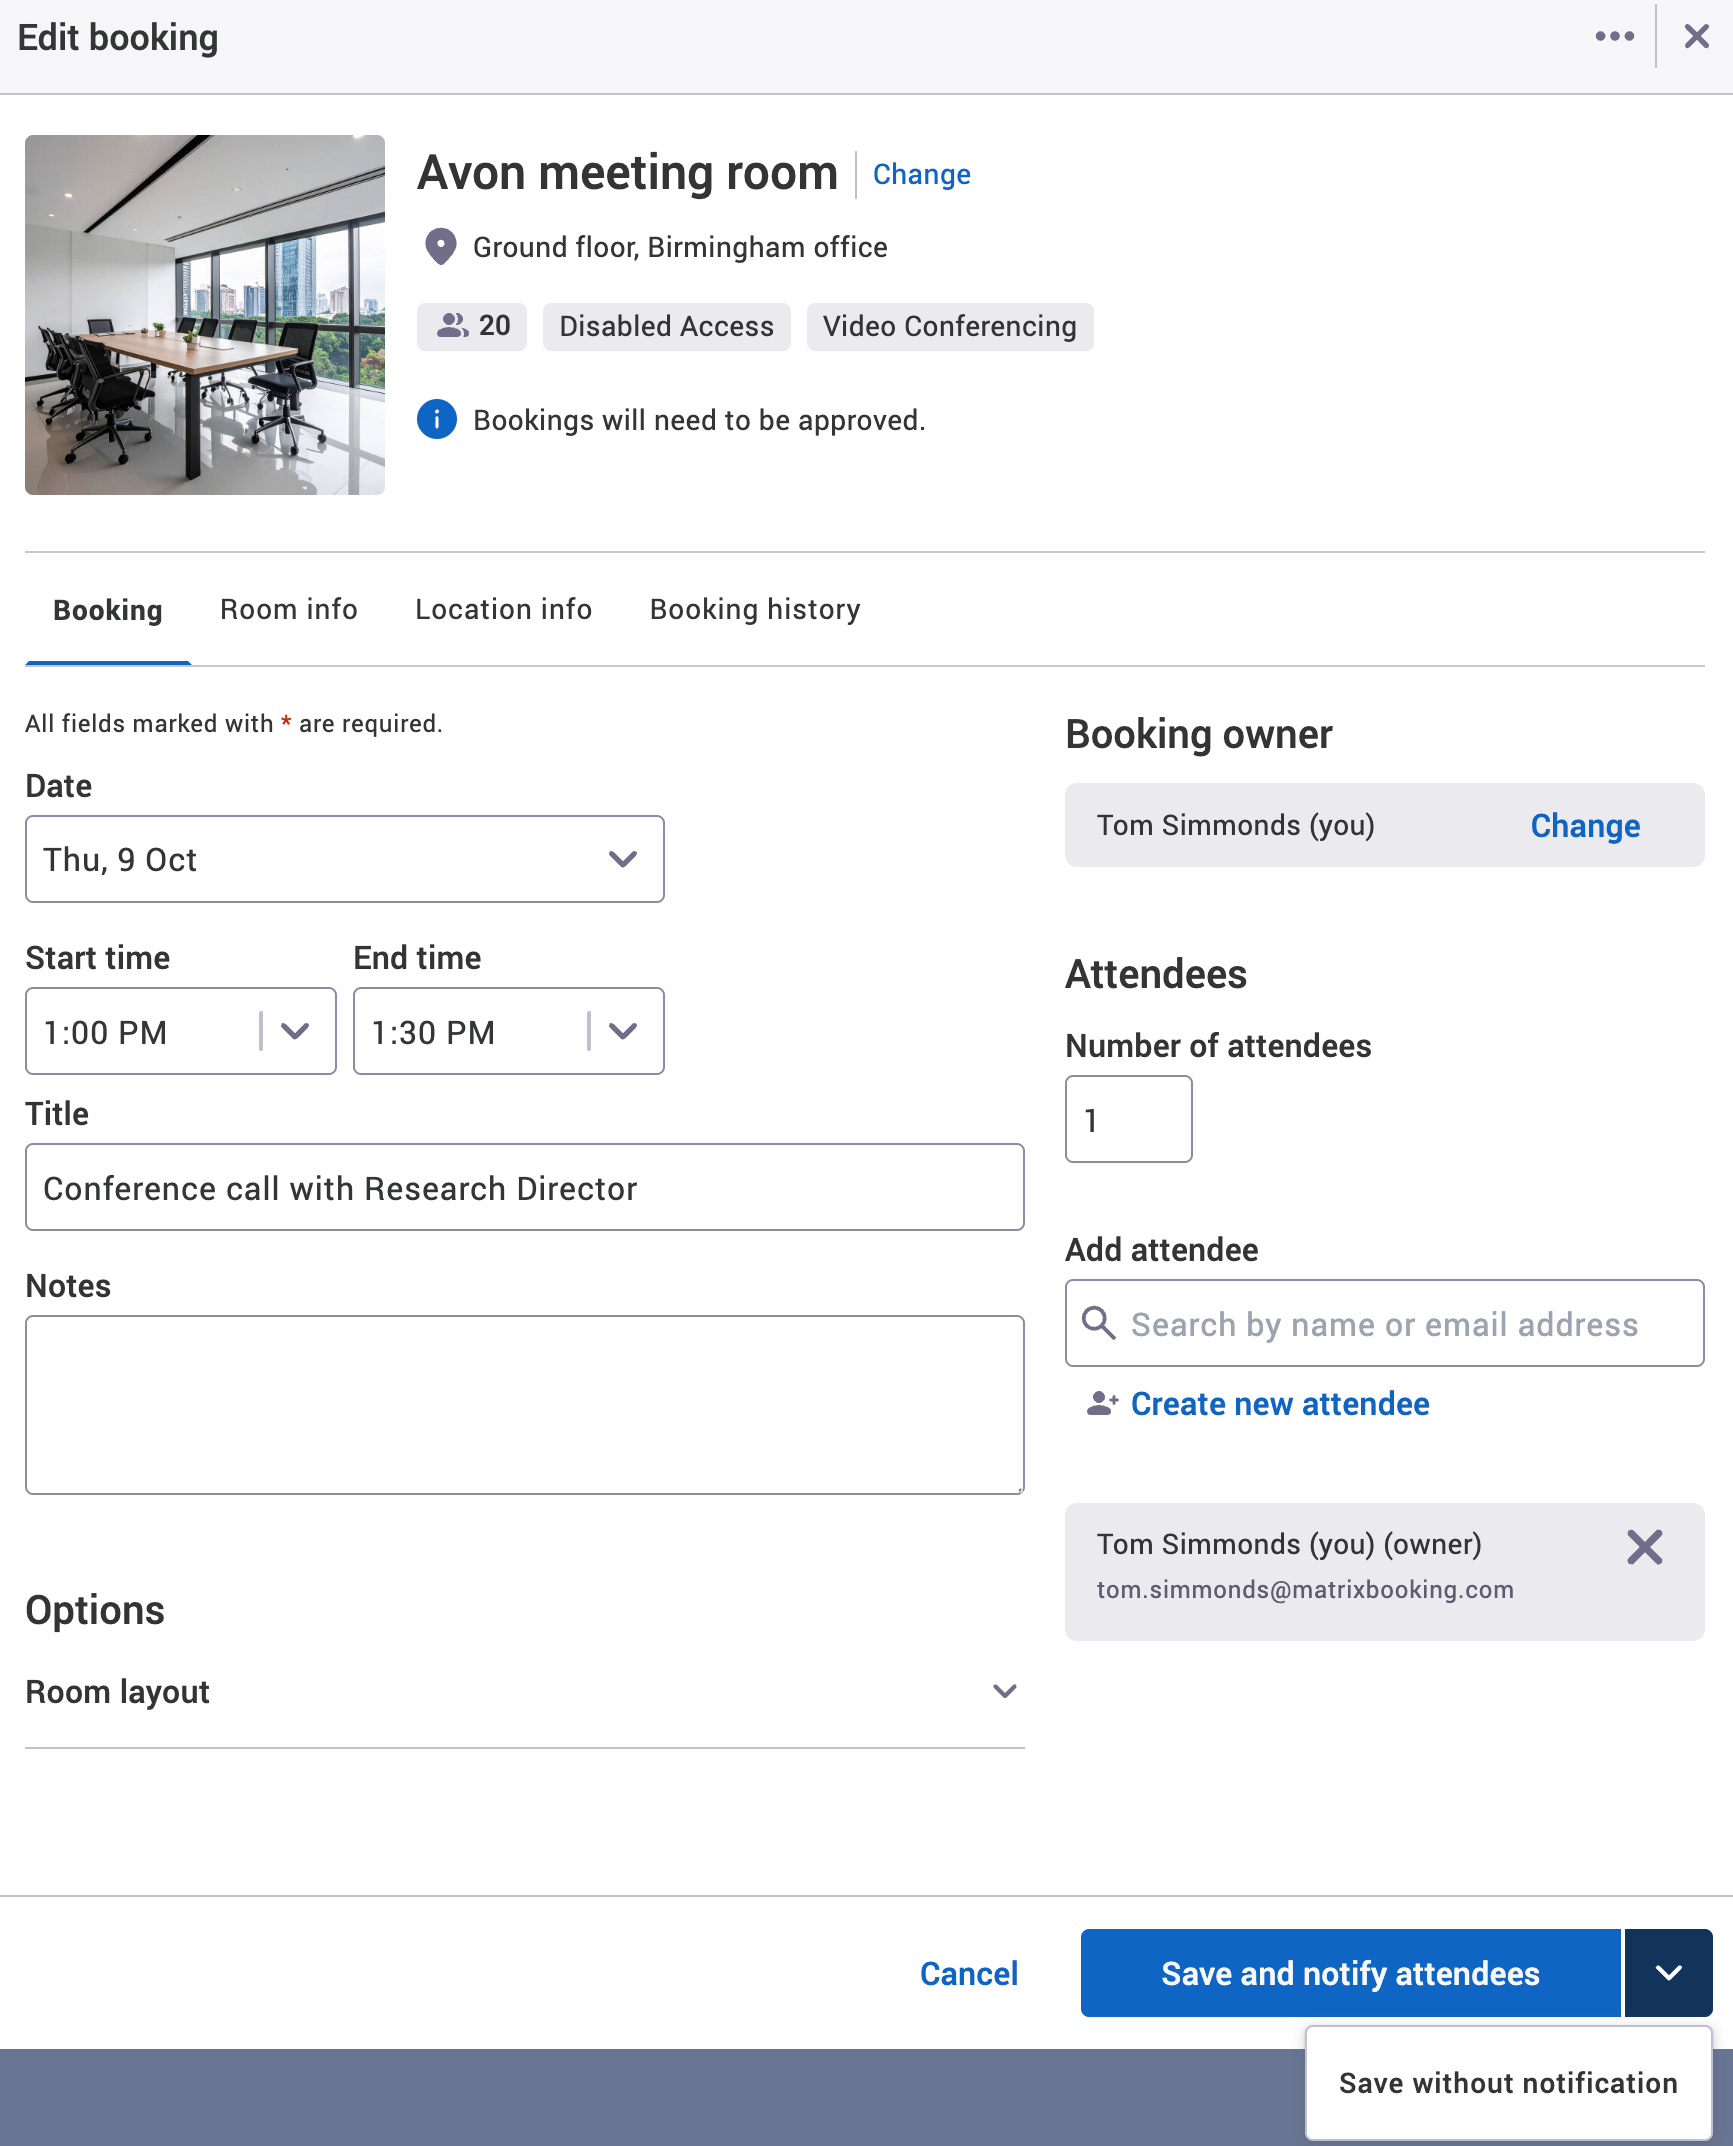
-
-
If the booking is in the past, select either of the following and the dialog will close to return you to the Bookings screen:
-
Select Save changes to keep your changes.
-
Select Cancel to discard your changes.
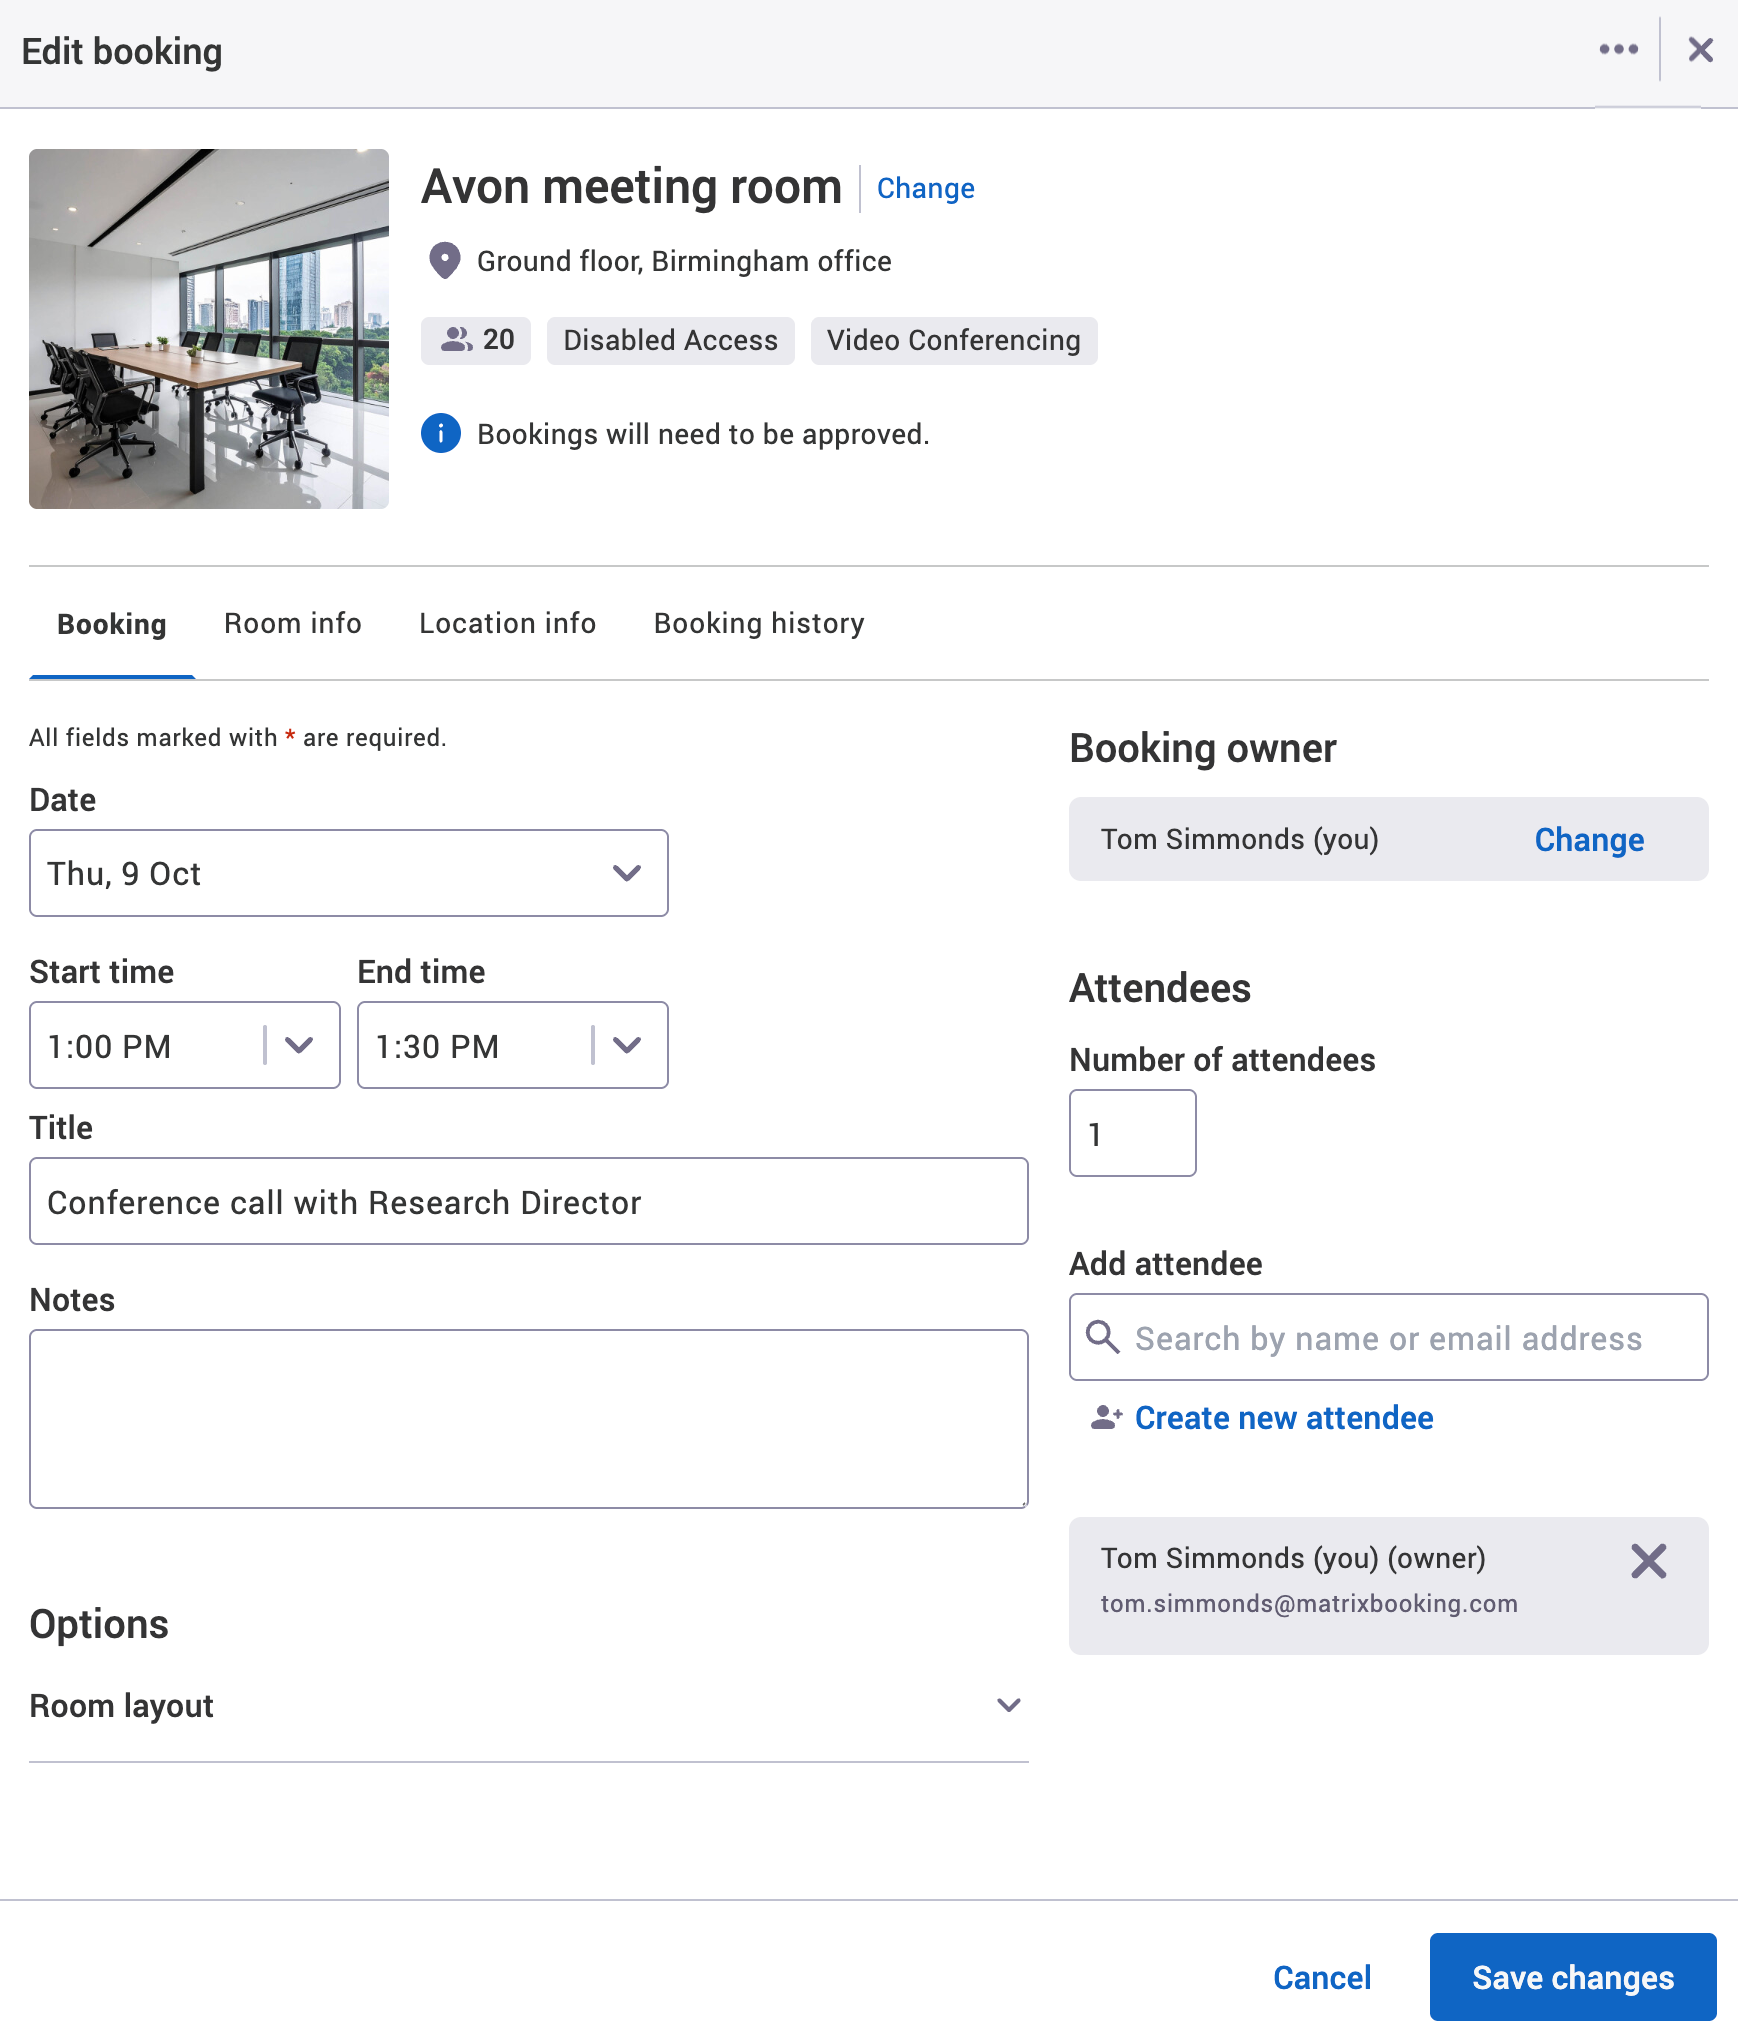
-
End a booking early
To end a booking early in the My bookings tab:
-
Depending on the view you’ve selected, a different step may need to be taken:
-
For the List view, select End now next to your chosen booking (see image below).
-
For the Calendar view, select the vertical three-dots icon to open the more options menu.
-
In the Edit booking dialog, select the vertical three-dots icon to open the more options menu.
-
-
Select End now. The End booking now warning dialog will appear.
-
Select either of the following and the dialog will close to return you to the Bookings screen:
-
Select End booking now to end the booking early.
-
Select Close to keep the booking going.
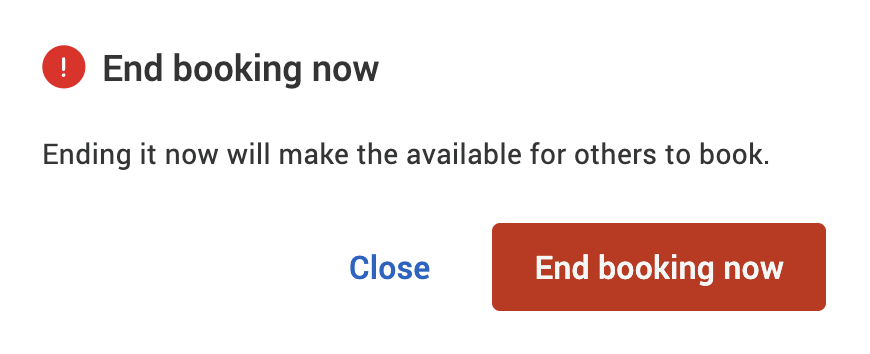
-
-
The booking won’t be displayed as the My bookings displays upcoming booking only.
Note: if you have our Microsoft 365 integration and you end a booking early, the booking is removed from the resource’s Outlook calendar rather than being updated to reflect the end time. This keeps the booking or calendar event in both the booking organiser’s and the attendees’s calendars. It also prevents an updated invitation being sent to the attendees with different meeting times.
Cancel a booking
There are 3 ways to cancel a booking in the My bookings tab:
Cancel an individual upcoming booking
To cancel an individual upcoming booking in the My bookings tab:
-
Depending on the view you’ve selected, a different step may need to be taken:
-
For the List view, select Cancel next to your chosen booking (see image below).
-
For the Calendar view, select the vertical three-dots icon to open the more options menu.
-
In the Edit booking dialog, select the vertical three-dots icon to open the more options menu.
-
-
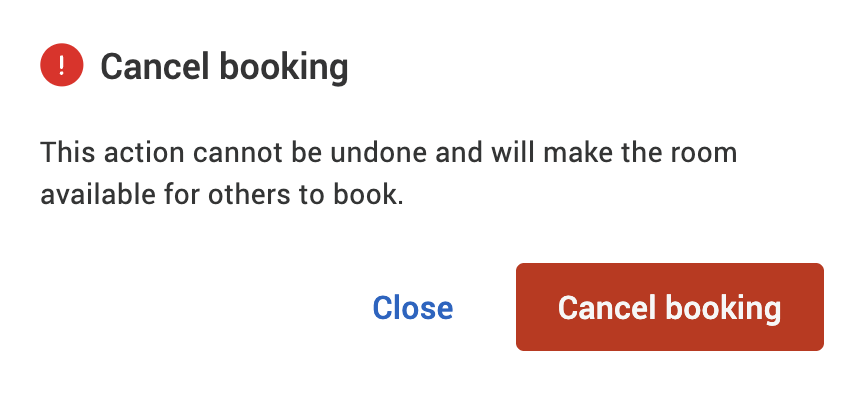
Select Cancel booking. The Cancel booking warning dialog will appear.
-
Select either of the following and the dialog will close to return you to the Bookings screen:
-
Select Cancel booking to cancel the booking.
-
Select Close to keep the booking.
-
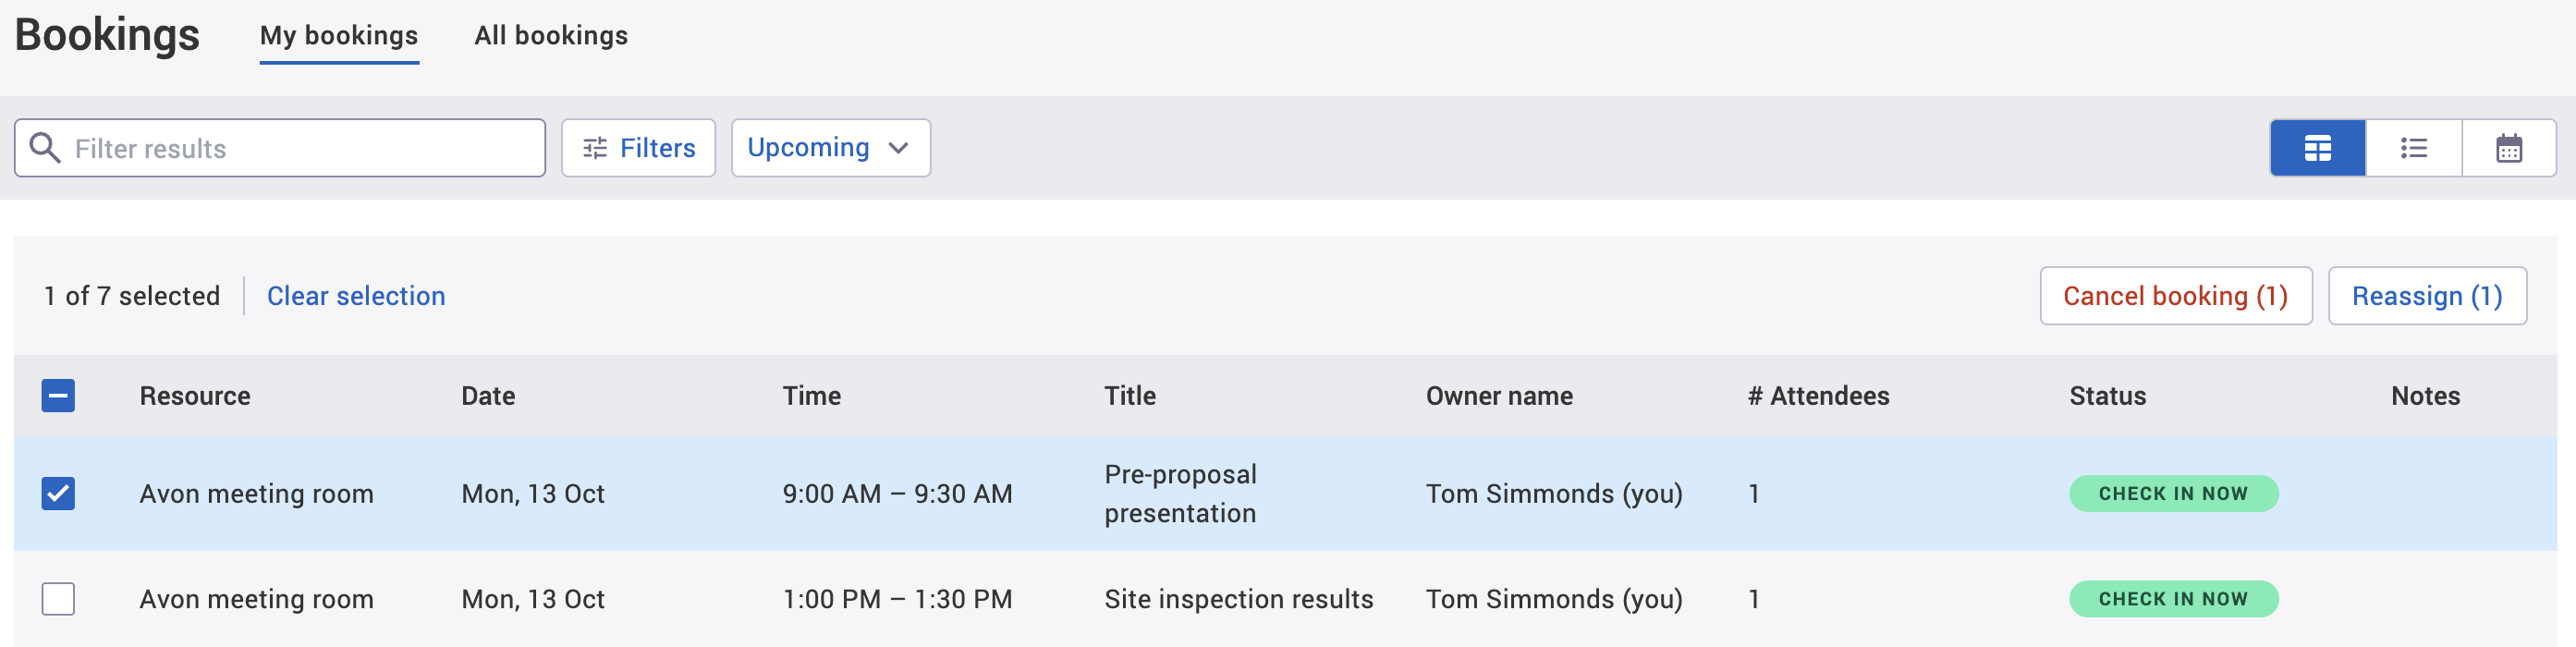
Cancel upcoming bookings in bulk
To cancel upcoming bookings in bulk in the My bookings tab:
-
Select the Table view.
-
Select the checkboxes next to the bookings you want to cancel. The bookings selected will be highlighted and the Cancel booking (number) button will appear (where number represents the number of bookings selected).
-
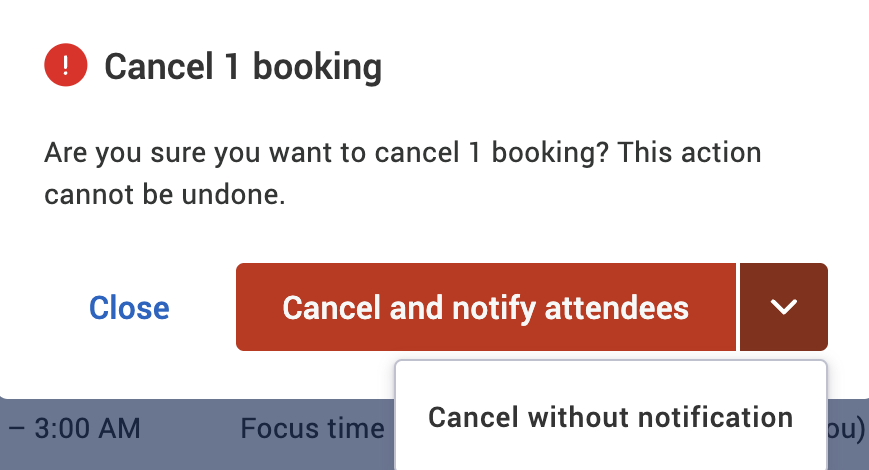
Select Cancel booking (number). The Cancel (number) bookings warning dialog will appear.
-
Select 1 of the following and the dialog will close to return you to the Bookings screen:
-
Select Cancel and notify attendees to cancel the booking and let your invited attendees know of the changes.
-
Select the dropdown next to Cancel and notify attendees to open the dropdown and select Cancel without notification to cancel the booking without letting your invited attendees know of the changes.
-
Select Close to disregard the cancellations.
-
Cancel all upcoming bookings
To cancel all upcoming bookings in the My bookings tab, follow the Cancel upcoming bookings in bulk steps, but select the checkbox at the top-right of the table. This will select all upcoming bookings.
Reassign a booking
Note: Reassigning bookings is a Matrix Booking feature and isn’t supported by Microsoft. Bookings can only be reassigned in Matrix Booking without our Microsoft 365 integration.
There are 2 ways to reassign a booking in the My bookings tab:
Reassign upcoming bookings in bulk
To reassign upcoming bookings in bulk in the My bookings tab:
-
Select the Table view.
-
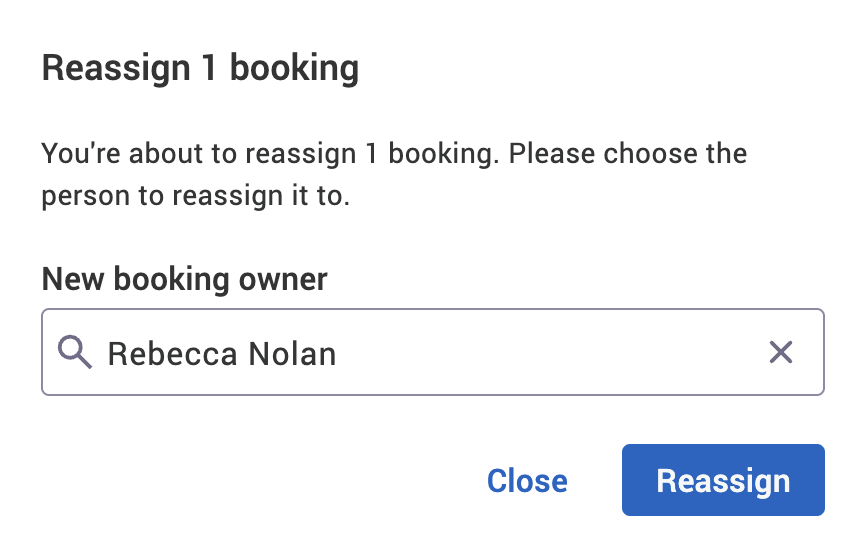
Select the checkboxes next to the bookings you want to reassign to another user. The bookings selected will be highlighted and the Reassign booking (number) button will appear (where number represents the number of bookings selected).
-
Select Reassign booking (number). The Reassign (number) bookings dialog will appear.
-
Begin to enter the new booking owner’s name or email into the New booking owner text box. The New booking owner dropdown will appear.
-
Select their name from the dropdown.
-
Select either of the following and the dialog will close to return you to the Bookings screen:
-
Reassign to reassign the bookings to the new booking owner.
-
Close to to disregard the reassignments.
-
Reassign all upcoming bookings
To reassign all upcoming bookings in the My bookings tab, follow the Reassign upcoming bookings in bulk steps, but select the checkbox at the top-right of the table. This will select all upcoming bookings.
Export search results
As a location manager, location administrator, or administrator, you can export your search results as a .csv file. To do this:
-
Enter your search parameters and filters.
-
Select the Table view.
-
Select Export. This will bring up the file explorer on your computer (for example, Finder on Apple Macs).
-
Select Save (or equivalent) in the location you want the file saved.
Limitations
-
The My bookings tab is limited to the page size in your set up (the default is normally 10 entries per page).
-
The My bookings tab is limited to the first 5,000 entries for all your bookings and populates the pages based on the search parameters you selected.
-
All the bookings displayed in the Table view and List view are upcoming bookings only.
-
You can only edit, end early, or cancel 1 booking at a time unless the booking is part of a series of bookings where you have the option to make changes to 1 booking or all of them.
-
You can edit a booking when it has started or ended. Once a meeting has started, the start time can only be changed to the current time or later. For example, you booked a desk for 1:00 PM to 5:00 PM today and you want to change the start time to 2:00 PM. It’s currently 2:05 PM. You can only change the start time to 2:05 PM or later and not for 2:00 PM as that’s already been. If the booking end time has elapsed, the booking times can’t be changed.
-
Bookings that were ended early will not appear in any view of My bookings because the screen is for upcoming bookings only. The new end time will be reflected in the All bookings screen.
-
The system can’t allow a booking to be cancelled once it’s started – only end it early if the booking end time hasn’t elapsed.