Contents
Advance Booking Rules
How far in advance can standard users create a booking?
This setting allows your organisation to control how far in advance standard users are permitted to book a room. It ensures that booking availability aligns with your operational policies and planning cycles.
You can specify a simple rule here that applies to all staff (such as all staff can book 3 months in advance), or you can use our Priority Booking rules below to give specific teams different priority periods (for example, Finance can book 3 months in advance, Marketing can book 1 month in advance, Sales can book 1 week in advance, and all other users can view only).
Priority Booking Rules
If your organisation requires different advance booking windows based on user groups (for example, to prioritise certain departments), this can be configured using Group Priority Settings within the same rule.
If you’re interested in implementing this feature, please contact your Implementation Manager, who will be happy to assist.
For more information on setting up Advanced Booking Rules, please refer to our Advanced booking rules guide.
Note: Location Managers and users with higher permissions can override these setting for locations they manage.
You can configure these settings at either:
-
Individual room level, or
-
Parent location level (for example, a building).
If configured at the parent level, the rule will be inherited by all child locations (rooms within that building), with an option to override at a child location if required.
Approvals
Managing approvals
If your organisation has chosen to require approval from a Location Manager for certain rooms, bookings for those rooms will initially be created in a tentative state.
You can decide how the system handles room availability during the approval process:
-
Option 1: Block the room immediately – Once a booking request is made, the room becomes temporarily unavailable to others until the request is approved or declined.
-
Option 2: Allow multiple requests – The room remains available for others to request during the approval window. The Location Manager then reviews all submissions and selects which booking to approve.
This setting provides flexibility depending on how you wish to manage demand, availability, and booking fairness.
If you're unsure which option is best for your organisation, your Implementation Manager can provide guidance based on your specific requirements.
Note: There is an option to allow Location Managers who are booking a resource that they manage, to override these setting for locations they manage, for example, If a Location Manager books a room that requires approval from themselves, the system can automatically approve this at the time of booking.
You can configure this setting at either:
-
Individual room level, or
-
Parent location level (for example, a building).
If configured at the parent level, the rule will be inherited by all child locations (rooms within that building), with an option to override at a child location if required.
Check Ins
Do room bookings require starting?
This setting allows an organisation to decide if they want their users to ‘Start’ or ‘Check In’ their bookings to confirm their attendance (this setting is mandatory if implementing frictionless check in).
If this setting is enabled, a ‘Start’ button will appear on the ‘My Bookings’ screen within the Web application, Mobile application, and Signage, provided you are within the defined booking start timeframe (see below explanation).
This feature helps users easily initiate their bookings at the appropriate time, enhancing visibility and engagement across platforms.
For more information and step-by-step instructions on how to configure rooms that require a booking to be started, please refer to our Set up Check Ins guide.
If you choose to enable this feature, the following configuration options should also be considered:
How far in advance can a booking be started?
This setting allows you to define how far in advance of the scheduled start time a user can initiate their booking by selecting the ‘Start’ button. This is sometimes referred to as the ‘Start booking timeframe’.
Note: Starting a booking early does not alter the original booking time or duration in any way.
Example: If you set this window to 10 minutes, the ‘Start’ button will become visible on the Web application, Mobile application, and Signage device 10 minutes before the booking’s scheduled start time.
For instance, if a booking is scheduled from 10:00 AM to 11:00 AM, the ‘Start’ option will appear at 9:50 AM.
Who will be authorised to start the booking
When a booking requires starting, you can stipulate ‘Who’ is authorised to start the booking, either:
-
attendees only – only people who have been invited to the booking, including the booking organiser (Administrators, Location Administrators, and Location Managers can always check in or start a booking). Please note, if this room has a Signage device, this option requires attendees to log in to the signage device or tablet to initiate the booking. Many users find this process time-consuming and cumbersome, so we do not recommend enabling this option unless access cards are being used to start bookings.
-
any user – Any user with a Matrix Booking login and access to this room can start a booking.
Please note, this option requires staff to log in to the signage device or tablet to initiate the booking. Many users find this process time-consuming and cumbersome, so we do not recommend enabling this option unless access cards are being used to start bookings. -
anyone – anyone who can access your resources (for example, external visitors using your signage devices).
Please note: In order to use our Signage application, you will need to select ‘anyone’
Only allow on-site check in methods
If you want to ensure that bookings are only checked in by users who are physically present, you can enable the "Only allow on-site check-in methods" option.
When this setting is enabled, check-ins can only be completed using the following on-site methods:
-
Signage
-
Welcome screens
-
Frictionless check-in
This helps ensure accurate space usage and prevents remote or unintended check-ins, supporting better occupancy management and resource tracking.
Should a booking be automatically cancelled if not started?
This setting allows your organisation to determine whether a booking should be automatically cancelled if the user fails to start (check in to) the booking. Enabling this option helps free up unused bookings so they can be made available to others.
Auto-Cancellation Timing Configuration
This setting defines how long after the booking start time a booking will be automatically cancelled if the user has not ‘Started’ (checked in to) the booking.
If a booking has not been started by one minute past the start time, the system will auto generate an email, reminding the booking owner that their booking is now at risk of cancelling.

Once cancelled, the booking status will be updated to ‘Cancelled due to No Show’ and will be removed from the ‘All Bookings’ report and added to the Cancellation Report.
Example:
If you configure this setting to 10 minutes, the ‘Start’ button will remain available on the web application, mobile application, and signage device for up to 10 minutes after the scheduled start time.
For a booking scheduled from 10:00 AM to 11:00 AM, the user must start the booking by 10:10 AM. If they fail to do so, the auto-cancel process will be triggered.
Auto-Cancellation of Repeat Booking Series
This setting allows you to define how many consecutive missed bookings—where the user has failed to start (check in to) the booking, will trigger the automatic cancellation of all remaining bookings in the series.
Example:
If this value is set to 3, and a user misses (i.e. triggers an auto-cancel due to no show) three consecutive bookings in a recurring series, the system will automatically cancel all remaining future bookings in that series.
You can configure the above settings at either:
-
Individual room level, or
-
Parent location level (for example, a building).
If configured at the parent level, the rule will be inherited by all child locations (rooms within that building), with an option to override at a child location if required.
Is a Cost Code required to book a room?
This setting allows your organisation to determine whether entering a Cost Code is mandatory when creating a room booking.
You can configure this setting at either:
-
Individual room level, or
-
Parent location level (for example, a building).
If configured at the parent level, the rule will be inherited by all child locations (rooms within that building), with an option to override at a child location if required.
Cost Code configurations
There are several ways to configure Cost Code entry, including:
-
Free text input
-
Dropdown selection
-
Validated options
Details on these configuration methods can be found via the link below.
Additionally, users can save a default Cost Code in their personal profile. If a default is set, it will automatically populate the Cost Code field during the booking process—while still allowing the user to edit it if needed.
For more information and step-by-step guidance on setting up Cost Codes, please refer to our Cost codes guide.
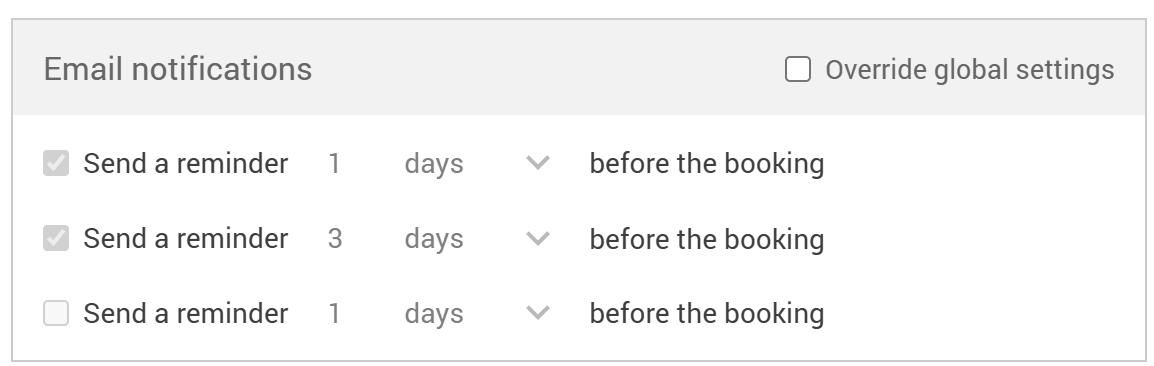
Email Notifications (Booking Reminders)
Here you can specify, when booking reminders are sent to users via an email. There are three options available, if the options overlap the user will only receive the one email with a list of the reminders. The default send time of booking reminders is 10am unless confirmed otherwise.
For more information and step-by-step guidance on setting up booking reminders, please refer to our Booking Reminders guide.
You can configure this setting at either:
-
Individual room level, or
-
Parent location level (for example, a building).
If configured at the parent level, the rule will be inherited by all child locations (rooms within that building), with an option to override at a child location if required.
Signage
This section allows you to specify whether a Signage device is intended solely for ‘booking’ display purposes or if it should also enable users to book, cancel, or end meetings early on the day via the device.
When setting up an organisation with Signage devices, there are several configuration settings to consider to ensure the system meets your operational needs effectively.
Allow new bookings starting in the next 'X' minutes to be made anonymously
This setting allows new bookings that begin within the next ‘X’ minutes to be made anonymously. It is primarily intended for situations where a user is passing by a room and wishes to book it immediately for immediate use. On the booking history, the booking owner will be the Signage user.
Allow new bookings to be assigned to an owner without logging in
This option enables users to select themselves as the booking owner from the internal directory during the booking process, without requiring a login.
Require new bookings to be assigned to a user by logging in
This option requires users to log in with their credentials when creating a booking. Please note, this option is not supported for customers who manage system access via Single Sign-On (SSO), Or sharing locations with other Matrix Booking organisations via Cross Org (unless a pseudo tenant user has been created for this purpose).
Allow in-progress bookings to be ended anonymously
This option allows a booking to be ended without the need to identify the user actioning the ‘End Booking’ option. If this option is not selected, ending a booking early will require a user to log in (which is not supported if SSO is set up for your organisatoin.
Do not show titles of bookings
This option allows an organisation to hide booking titles on the signage devices.
For more information and step-by-step guidance on setting up or reconfiguring Signage devices, please refer to our Signage guide.
You can configure these settings at either:
-
Individual room level, or
-
Parent location level (for example, a building).
If configured at the parent level, the rule will be inherited by all child locations (rooms within that building), with an option to override at a child location if required.
Room images to display during the booking journey
Room images can be displayed to users during the booking journey to enhance the overall experience and aid in room selection. These images can be uploaded at any time by local administrators, even after the initial implementation.
For clients subscribed to Admin-as-a-Service (AaaS), image upload support is also available through our service desk—simply raise a support ticket, and our team will handle the upload on your behalf.
Enhanced Media Display Functionality
In addition to room images, the system supports a variety of media types that can be presented to users during the booking journey. Through the Media tab, local administrators can upload and manage content such as:
-
Room images
-
Floor plans
-
Supporting documents (for example, room usage guidelines or policies)
-
External links (for example, virtual tour, help resources)
These assets can be added at any time during or post-implementation. For clients with Admin-as-a-Service (AaaS), our support team can assist by uploading media content upon request—simply raise a support ticket.
For more information and step-by-step guidance on setting up the content of the Media tab, please refer to our Media Tab guide.
Do you want to allow ‘overlapping’ room bookings?
We offer the ability to restrict standard users from creating overlapping room bookings, which is configured at the booking category level. This setting is commonly used to ensure that standard users maintain only one active (personal) booking at any given time.
for example, A user cannot hold ownership of two room bookings that overlap in time.
-
If a user books a room on behalf of another person, this is permitted because they are not the owner of both bookings.
-
However, if the same user is trying to book a second room booking that occurs during the same time, the system will reject the second booking to prevent conflicts.
This is a global setting that applies to all resources within the specified category, such as desks or rooms and can only be enabled or disabled at that level.
Please note that users with Location Manager permissions or higher can override this restriction if necessary.
For more information and step-by-step guidance on setting up categoris, please refer to our Booking Categories guide.
Is a ‘Title’ mandatory for a room booking?
This setting allows you to specify whether a Booking Title is mandatory when creating a booking.
You can configure this setting at either:
-
Individual room level, or
-
Parent location level (for example, a building).
If configured at the parent level, the rule will be inherited by all child locations (rooms within that building), with an option to override at a child location if required.
Do you want ‘Find someone’ enabled for this category
Once enabled, users can search for colleagues within their organisation, view their bookings, and book nearby spaces via the floor plan. Users can also search for themselves to view their own bookings and see them displayed on the floor plan.
This feature is currently available on the web app only.
To activate the functionality, it must first be enabled via an account-level setting. Once activated, it can then be configured on a per-booking-category basis within the Booking Categories screen.
For more information and step-by-step guidance, please refer to our Find Someone guide.
Business rules information overview